Showing posts with label email. Show all posts

Friday, June 23, 2017

TechNet Guru Awards May 2017 - Azure

TechNet Guru Awards May 2017 - Azure - Silver medal


I won the SILVER medal for one of my Azure article on TechNet Guru competition


Code :
     GitHub : blobstorageemailattatchment


Saturday, May 27, 2017

Send smtp email with Azure blob storage attatchments

Introduction

Smtp is the most common protocol to send messages over the internet. Smtp stands for Simple Mail Transfer Protocol. Smtp messages are secured using SSL by default, so no need to worry about security.

Azure Blob storage is going to store unstructured data as binary files, text files, any type of data in the cloud. It can store an image, document or a video as a blob, simply as an object. You can select a specific tier to store your blobs by referring to the pricing models of Azure blob storage.

Let's see how we can store a file in Azure blob storage and send it using smtp email.

Background

If you want to know how to send an email using smtp, Please go through this article, https://social.technet.microsoft.com/wiki/contents/articles/36282.c-create-a-simple-smtp-email-with-html-body.aspx

If you want to know how to send an email concurrently using a windows service, check this article, https://social.technet.microsoft.com/wiki/contents/articles/36288.how-to-fire-an-email-using-a-windows-service.aspx

Store files in the blob storage

This article is going to describe how to store an image, text file and a video in azure blob storage,

Create a storage account in Azure portal

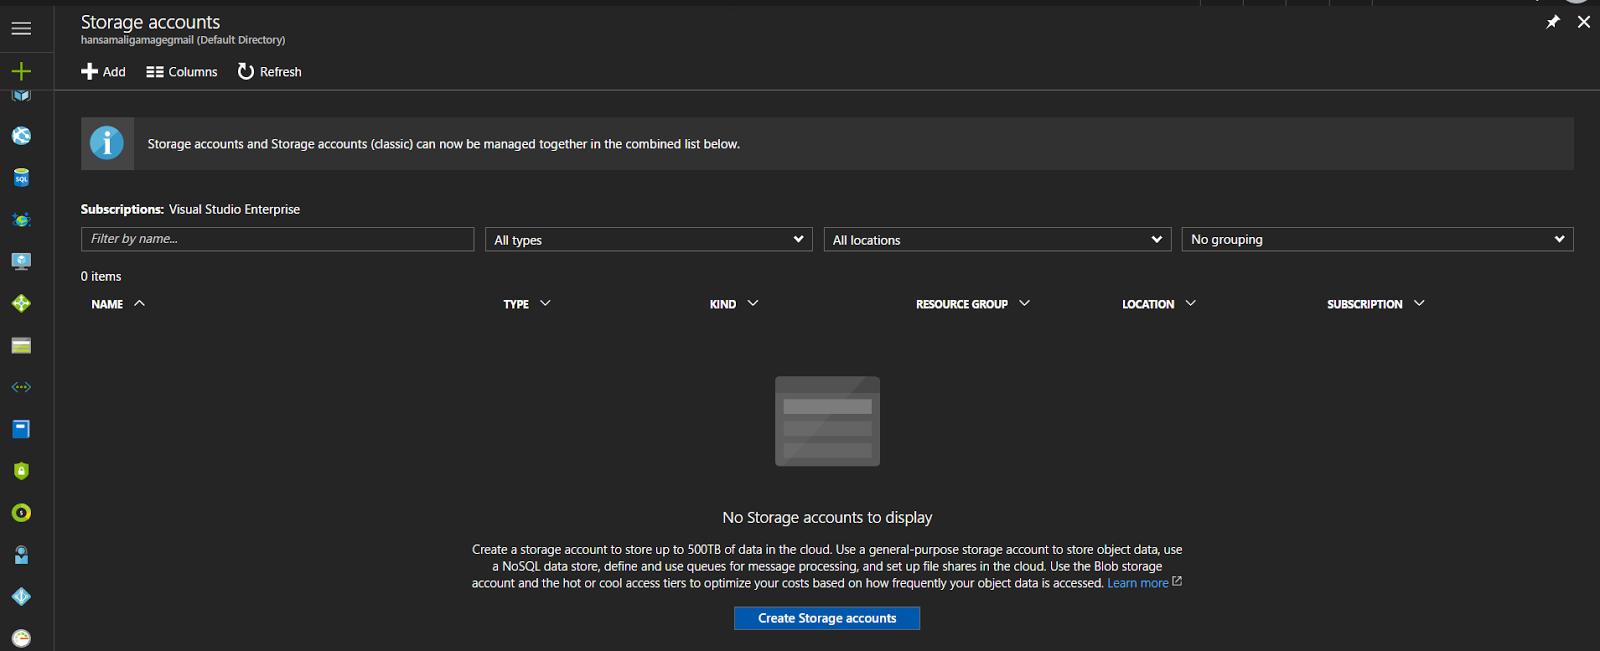
Log in to Azure portal, https://portal.azure.com Click on More Services link as below, It will open up all available services in azure portal. click on Storage accounts


All storage accounts are displayed in here, currently this azure account doesn't have any storage accounts. Click on Create Storage accounts to create a new storage account.


Add a name to the storage account, in this example, used mailfilestore 

Deployment model is going to tell how your storage account is going to deploy and manage, select Resource manager as Deployment model

storage accounts created by Azure portal is deployed under Resource manager Deployment model, it has newer features in Azure, and accounts created by Azure classic portal is deployed under classic.
In Account kind, it says what type of a storage account you want to use, General purpose accounts are going to store blobs, files, tables and queues,If you select account type as blob storage, it stores only blobs.

If you select Blob storage as account type, it's going to disable premium performance, You need to go for premium performance, when you need low latency performance like accesing virtual machine disks and databses. In here we are going to access files stored in a storage, it's not very frequenly accessible, so go for standart performance, thats enough.

You need to select a way to replicate storage account to maintain high availability and durability.  Replication copies your data into a same data centre or another data centre. Let's select default replication method, Read access geo redundant storage (RA-GRS), in this replication method, it's going to replicate data into multiple data centres and data readds can be performed in secondary data centre as well.

In Access tier, you can specify how you can access stored data. You can select Hot Access tier for more frequent data access, Cool access tier for less frequenly accessed data like backups. In this exmple, let's select Hot access tier.

Storage service encryption is going to protect your data using encryption within data center
Select your subscription for storage account

create a new resource group or use an existing resource group

When you use a resource group, you can deploy and manage all your resources in that group separately.

select a region to store your storage account, let's select East Asia, since it's near for me 😀


Go to storage account and search for Access Keys and copy connection string of key1 in access keys, If you wonder why storage account has two access keys, Azure has recommended to regenerate access keys frequently in order to maintain security of your stored data. While you regenerating a one access key, you can use second access key to manage your storage withourt any issue, since you have two access keys.


Let's add some code to save your files in blob storage

Create a console application in Visual studio, we want to store storage connection-string as a configuration in our application. Create a configuration setting in app.config file as below.

<appSettings>

<add key="StorageConnectionstring"
value="DefaultEndpointsProtocol=https;AccountName=mailfilestore;AccountKey=pO+lfN4ycIRtC7LncRjUynQ94/Qk0tKnNupYfaXMclH1NCqxwDMXa05PyqwZ0FVaWNgVfVARF4xvCKWq+POkSQ==;EndpointSuffix=core.windows.net"/>


Create a class to handle blob storage saving part, In this example PropertyHandler class is going to do that. In PropertyHandler class, initialize a private variable to hold the storage connection string 


private static string storagekey = ConfigurationManager.AppSettings["StorageConnectionstring"]; 


Create a method to save to blob storage, and create an Azure storage account by passing the storage key parameter, 


public static void SaveBlobs () 
{
  var storageAccount = CloudStorageAccount.Parse(storagekey);

Create blob service client using azure storage account,


//create blob service client 
var blobClient = storageAccount.CreateCloudBlobClient();

add a configuration into app.config file to define the container,


<add key="container" value="testcontainer"/>


Define a container name to store files in azure storage account


private static string containerstring = ConfigurationManager.AppSettings["container"];

Create a reference to the container like this,


var container = blobClient.GetContainerReference(containerstring);

Create the blob container if it doesnt exist,


//create blob container container.CreateIfNotExists();

Set container permission to public, so any client can read your blob data, if you want to change access level, modify access policies on blob storage


container.SetPermissions( new BlobContainerPermissions { PublicAccess = BlobContainerPublicAccessType.Blob }); 

Go to created storage account and click on Overview section and you can see available containers, you'll see container you created as below, check access type of the container, it's Blob type


Save image to a blob storage

Let's add more coding to save an image to a blob storage,
Create a configuration to hold the image path in app.config file,


<add key="imagePath" value="C:\store\images.jpg"/>

access imagepath to get the path of a image, get file extention and append it to the file name.


string filePath = ConfigurationManager.AppSettings["imagePath"];
var extension = Path.GetExtension(filePath);

var filename = "image" + extension;

Get a reference to the blob container,


//Get a reference to block blob container
 var blockBlob = container.GetBlockBlobReference(filename);


upload the image to blob storage, don't forget to set the content type of the image as jpeg, and update blob properties after that.


using (var stream = File.OpenRead(filePath))
{
//upload file stream to block blob
blockBlob.UploadFromStream(stream);
blockBlob.Properties.ContentType = "image/jpeg";
blockBlob.SetProperties();
}
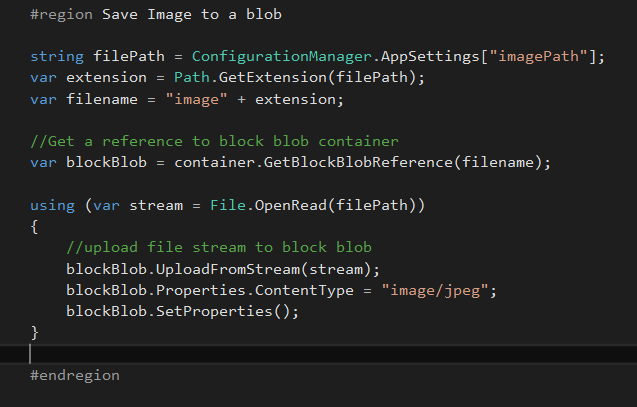
You can see complete code to save an imgae to a blonb storage


#region Save Image to a blob

string filePath = ConfigurationManager.AppSettings["imagePath"];
var extension = Path.GetExtension(filePath);
var filename = "image" + extension;

//Get a reference to block blob container
var blockBlob = container.GetBlockBlobReference(filename);

using (var stream = File.OpenRead(filePath))
{
//upload file stream to block blob
blockBlob.UploadFromStream(stream);
blockBlob.Properties.ContentType = "image/jpeg";
blockBlob.SetProperties();
}

#endregion


This code sample describes how to store a text file into blob storage, Get the configured file path, and store file in blob storage and set content type as text/plain


#region Save text file to a blob

filePath = ConfigurationManager.AppSettings["filePath"];
extension = Path.GetExtension(filePath);
filename = "file" + extension;

//Get a reference to block blob container
blockBlob = container.GetBlockBlobReference(filename);
using (var stream = File.OpenRead(filePath))
{
//upload file stream to block blob
blockBlob.UploadFromStream(stream);
blockBlob.Properties.ContentType = "text/plain";
blockBlob.SetProperties();
}

#endregion

You can save a video file to a blob storage as below,


#region Save video file to a blob

filePath = ConfigurationManager.AppSettings["vedioPath"];
extension = Path.GetExtension(filePath);
filename = "vedio" + extension;

//Get a reference to block blob container
blockBlob = container.GetBlockBlobReference(filename);
using (var stream = File.OpenRead(filePath))
{
//upload file stream to block blob
blockBlob.UploadFromStream(stream);
blockBlob.Properties.ContentType = "video/mpeg";
blockBlob.SetProperties();
}

#endregion

Go inside testcontainer and view available files in it,


If you want to open one of this file, select a file and you can see the url of it.


Send email with stored files as attachments

Define configuration settings used to send an email, In this example, used gmail server as email server with specific port. email from and to addresses are also defined as a configurable setting.

<add key="emailServer" value="smtp.gmail.com"/>
<add key="emailPort" value="587"/>
<add key="emailCredentialUserName" value="hansamaligamage@gmail.com"/>
<add key="emailCredentialPassword" value="SavingHope2016"/>
<add key="fromAddress" value="hansamaligamage@gmail.com"/>
<add key="mailTo" value="ham@tiqri.com"/>

Create a class to set email properties as below,


class Email
    {

        public string Subject { get; set; }
        public string[] MailRecipientsTo { get; set; }
        public string[] MailRecipientsCc { get; set; }
        public string Content { get; set; }
        public Attachment Image { get; set; }
        public Attachment File { get; set; }
        public Attachment Vedio { get; set; }

    }

In sample appliication, create a seperate class to hold send an email, create a method to send and email and create an instance from Email calss and set basic properties as below.


 public static void SendEmail ()
        {
            Email email = new Email();

            email.MailRecipientsTo = new string[] { ConfigurationManager.AppSettings["mailTo"] };
            email.MailRecipientsCc = new string[] { ConfigurationManager.AppSettings["mailTo"] };

            email.Subject = "test email";
            email.Content = "Hi, How are you doing ? " + "<br/><br/>";


Get Azure storage account reference by passing storage account connectionstring, create the blob client and get a reference to storage container,


CloudStorageAccount storageAccount = CloudStorageAccount.Parse(storagekey);
CloudBlobClient blobClient = storageAccount.CreateCloudBlobClient();
CloudBlobContainer container = blobClient.GetContainerReference("testcontainer");


Get a reference to image, we stored in testcontainer,


#region Image
CloudBlockBlob blob = container.GetBlockBlobReference("image.jpg");


Download file to a memeory stream, and set content type and create a new attatchment object from it.


var stream = new MemoryStream();
blob.DownloadToStream(stream);
stream.Seek(0, SeekOrigin.Begin);
ContentType content = new ContentType(MediaTypeNames.Image.Jpeg);
email.Image = new Attachment(stream, content);


As same as image, create a new attatchment from text file as well and set the content type as plain, if content type doesnt set properly, it will attatch the file as a invalid type of file.


#region text file

blob = container.GetBlockBlobReference("file.txt");

stream = new MemoryStream();
blob.DownloadToStream(stream);
stream.Seek(0, SeekOrigin.Begin);
content = new ContentType(MediaTypeNames.Text.Plain);
email.File = new Attachment(stream, content);

#endregion


create the video attatchment as well,


#region vedio file

 blob = container.GetBlockBlobReference("vedio.mp4");

  stream = new MemoryStream();
  blob.DownloadToStream(stream);
  stream.Seek(0, SeekOrigin.Begin);
  content = new ContentType("video/mpeg");
  email.Vedio = new Attachment(stream, content);

  #endregion

  SendMail(email);


Create a method to send email as below, its going to construct the email and sends it


private static void SendMail(Email email)
  {
     try
        {
             SmtpClient smtpClient = EmailClientBuilder();
             var emailMessage = MessageBuilder(email);
             smtpClient.Send(emailMessage);
         }
        catch (Exception ex)
         {
             throw ex;
          }
      }


Create a method to return smtpclient object, initialize a smtpclient instance and set email configurations as below.


 private static SmtpClient EmailClientBuilder()
        {
            string emailServer = ConfigurationManager.AppSettings["emailServer"];
            int emailPort = Convert.ToInt32(ConfigurationManager.AppSettings["emailPort"]);
            string emailCredentialUserName = ConfigurationManager.AppSettings["emailCredentialUserName"];
            string emailCredentialPassword = ConfigurationManager.AppSettings["emailCredentialPassword"];
            SmtpClient smtpClient = new SmtpClient(emailServer, emailPort);
            smtpClient.UseDefaultCredentials = false;
            smtpClient.Credentials = new System.Net.NetworkCredential(emailCredentialUserName, emailCredentialPassword);
            smtpClient.DeliveryMethod = SmtpDeliveryMethod.Network;
            smtpClient.EnableSsl = true;
            return smtpClient;
        }


In MessageBuilder method, populate MailMessage object using Email object we constructed earlier.


private static MailMessage MessageBuilder(Email email)
        {
            string fromAddress = ConfigurationManager.AppSettings["fromAddress"];

            MailMessage mail = new MailMessage();
            mail.From = new MailAddress(fromAddress);
            mail.Body = email.Content;
            mail.Subject = email.Subject;
            mail.IsBodyHtml = true;

            if (email.Image != null)
                mail.Attachments.Add(email.Image);
            if (email.File != null)
                mail.Attachments.Add(email.File);
            if (email.Vedio != null)
                mail.Attachments.Add(email.Vedio);

            foreach (var mailRecipient in email.MailRecipientsTo)
            {
                mail.To.Add(new MailAddress(mailRecipient));
            }

            return mail;
        }


Download

5.1 Tech Net Gallery

You can download the source code from Microsoft tech net gallery, https://gallery.technet.microsoft.com/Azure-blob-storage-files-985136db?redir=0

5.2 GitHub

You can clone git hub repository from here, https://github.com/hansamaligamage/blobstorageemailattatchment

Conclusion

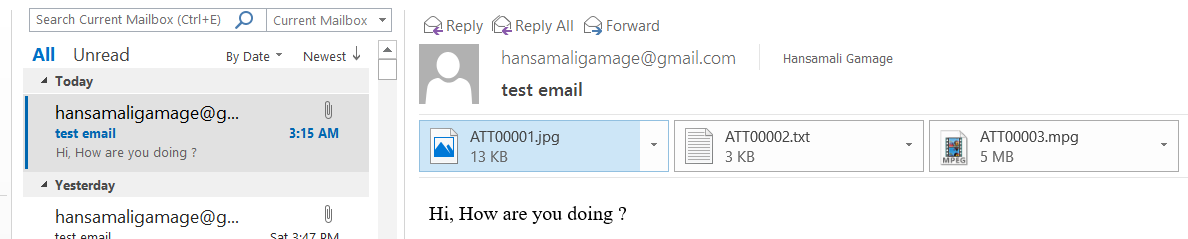
Run the console application and check whether email is sent, You can see image, text file and video is attatched to the email as below. All the files are attatched with propert content types as we specified


In this article, We saw how to upload an image, text file and vedio to a blob storage and how to attatch them into a smtp mail message. Download the code sample and run it and see 

See Also


References

Tuesday, July 19, 2016

How to fire an email using a windows service

1. Introduction


If you want to schedule something to run or your program takes long time to process, Sometimes we may have to create a separate service application,

Windows service allows a long running application to run in a own windows process. These services can be managed thorough a services portal available in Windows. A service can be started, stopped, paused or restarted by automatically as well as manually.

I wanted to write an application to send emails in specific time periods, I thought of writing a windows service application.

We can install this service in your server or local computer and configure it to run on intervals using a timer.


2. Create a Windows service


When we create a windows service from visual studio, It gives us a service class with constructor method, OnStart and OnStop methods as follows.


public Scheduler()
{
}
protected override void OnStart(string[] args)
{
}
protected override void OnStop()
{
}


2.1. Scheduling the task with a timer


When program needs to periodically perform a task, for that it needs a timer component, add a timer into the service design from toolbox


2.2. Fill up OnStart method


we need to initialize timer component inside the OnStart method, then I set timer interval and added a elapsed event to track each interval.


protected override void OnStart(string[] args)
 {
     Debugger.Launch();
     logger.Info("Service is started.");
     try
      {
          Timer tmrEmailScheduler = new Timer();
           tmrEmailScheduler.Interval = 120000;
           tmrEmailScheduler.Elapsed += tmrEmailScheduler_Elapsed;
           tmrEmailScheduler.Start();
           ProcessEmail.CreateEmail();
      }
       catch (Exception ex)
        {
           logger.Error(ExceptionHandler.ToLongString(ex));
        }
 }


2.3. Actual scheduling done in here


inside timer elapsed event, actual task is going to run. elapsed event is called for each 2 minutes according to this code sample


private void tmrEmailScheduler_Elapsed(object sender, ElapsedEventArgs e)
 {
      logger.Info("Timer is ticked");
      ProcessEmail.CreateEmail();
 }


2.4. How to stop the execution


to stop the execution, OnStop event is used.


protected override void OnStop()
 {
    logger.Info("Service is stopped.");
    tmrEmailScheduler.Stop();
 }


3. How to install the windows service


Before installing the service in your pc, we need to create a installer class,


Add installer class as shown above


3.1. Installer Class


In Installer class, we need to give a service name, so we can identify the service by its name.


[RunInstaller(true)]
public partial class ProjectInstaller : System.Configuration.Install.Installer
{
     private ServiceProcessInstaller process;
     private ServiceInstaller service;
      public ProjectInstaller()
       {
           InitializeComponent();
           process = new ServiceProcessInstaller();
           process.Account = ServiceAccount.LocalSystem;
           service = new ServiceInstaller();
           service.ServiceName = "test Service";
           Installers.Add(process);
           Installers.Add(service);
        }
   }


3.2. Let’s install the service


service is getting created after we build the application. we can find the .exe file in the bin folder. But we can’t install the service by double clicking on it.

we have to install it to the local pc or server.


3.3. InstallUtil


InstallUtil.exe is used to install/uninstall services in local machine or server. We can run installUtil command from Developer command prompt, type InstallUtil.exe with full path to the service exe file.


But this doesn’t going to install the service, It throws an error.


It seems like we don’t have access to install the service, Let's try this, run Developer command prompt as administrator, then this permission issue is getting resolved.

We can install a service using cmd as well,


run cmd as administrator, then we can install the service using cmd as well.


4. View services


We can check available services, by just typing services in your program list.


I gave service name as ‘test service’ in installer class.


5. Windows service on Local Computer started and then stopped


I tried to start the service from the panel, But it didn't work,

this issue comes normally when code has some kind of a error. It’s somewhat difficult to debug a windows service application to find out errors,


6. Debug a windows service application


normally in a windows service, program.cs looks like this.


If we want to check whether our service implementation has any issue, we can use this trick


manually start a method that has exact same code as the service implementation, inside of start method implementation, we can check whether service logic works properly.


using this trick, we can identify our service logic is working fine.

Another way of testing the program logic is, create another console application and call service logic method from console app and verify it works fine.


6.1. Debugger Launch


If we want to debug onStart method, we can launch the debugger in start method


we can launch the debugger like this,


we can debug the code like this.


But in here specific file we attached into debugger is getting loaded. So other files are not loaded. Only we can debug the service file as this code sample shows.


7. Windows service can’t connect to the database


In my service, i need to access to the database, But it gives me an error like this, Login failed. Login failed for user ‘NT AUTHORITY\SYSTEM’

windows service is running on ‘NT AUTHORITY\SYSTEM’ login. this login doesn’t seem to have access to the database.

To resolve this, add this in your connectionstring, Integrated Security=SSPI or else create a user account for ‘NT AUTHORITY\SYSTEM’ in your database server and give necessary permissions.


8. Downloads

8.1. TechNet Gallery


8.2. Github


9. Conclusion


This article explains how to configure a windows service to send emails periodically. If you go through the code sample, We have used a timer component to handle the timeline, Windows service is running accordingly in its own process without being idle until it stops.