Showing posts with label C#. Show all posts

Sunday, March 31, 2019

TechNet Guru Awards February 2019 - Miscellaneous

TechNet Guru Awards February 2019 - Miscellaneous - SILVER


I won the SILVER medal for one of my article on TechNet Guru competition


Source Code 
    TechNet Gallery : angular-zingchart-gauge
    GutHub : angular-zingchart


Saturday, February 2, 2019

TechNet Guru Awards December 2018 - ASP.NET

TechNet Guru Awards  December 2018 - ASP.NET - SILVER medal

I won the SILVER medal for my ASP.NET article on TechNet Guru competition


Source Code 
    TechNet Gallery : ng-input-restrictions
    GutHub : ng-input-restrictions


Saturday, December 1, 2018

Global Office 365 Developer Bootcamp - Colombo 2018

Graph API to read Outlook mail


Session Abstract : In a big organization there will be hundreds maybe thousands of mails a day. Within those you might find plenty of invoices sent. Lets use the power of Graph Api and read those invoices and at the end of the month, send a invoice summary from azure function app

Thursday, November 1, 2018

TechNet Guru Awards September 2018 - ASP.NET

TechNet Guru Awards  September 2018 - ASP.NET - BRONZE medal

I won the BRONZE medal for my ASP.NET article on TechNet Guru competition


Source Code 
    TechNet Gallery : ASP.NET Core : loading a partial view
    GutHub : ajax-partialview


Tuesday, October 23, 2018

aOSKL Malaysia 2018

Using Graph API to read Outlook mail for Accounting


Session Abstract : What if you have hundreds of invoices landed in your Outlook as in the email. And you need a way of processing them into real invoices or maybe store in a database. Lets discuss how to do this using Microsoft Graph API, Outlook and Azure functions.


Source Code
    GitHub : trackmailboxchanges


Related Blogs :

Saturday, October 20, 2018

Input validations in a form with Angular 6

Introduction


This article is going to explain how to apply input validations to a form. We have used Angular 6 directive to perform that using Visual Studio Code. Let's see how we can do that with step by step instructions.


Background


Create Angluar application


You can go through the previous blog post to know how to create Front end and back end solution from the beginning Angular 6 - Input restrictions in a form
You can see the sample web page in the browser like this,


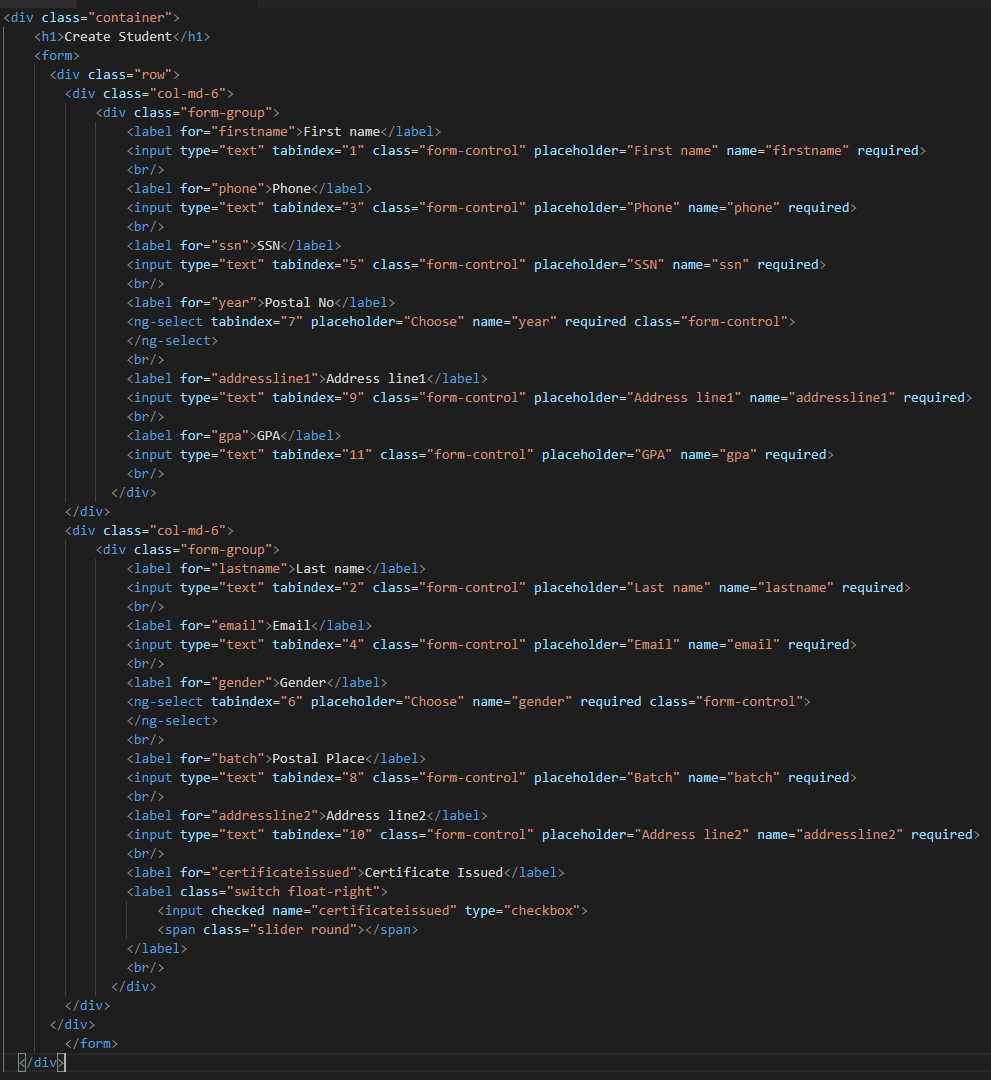
You can see app.component.html file as below, it has a form to get input values, it's going to check for mandatory fields like First name, Last name, Email, SSN and Gender. 
All of these fields have required attribute, angular directive is used to check whether input values are given in correct format with the help of a regular expression.  


We are going to use directives to apply the validation, so directives are added to app.module component as below. PhoneVaidator, EmailValidator and SSNValidator.


import {PhoneValidator} from './directives/input-validators/phone-validator.directive'; 
import {EmailValidator} from './directives/input-validators/email-validator.directive'; 
import {SSNValidator} from './directives/input-validators/ssn-validator.directive';

@NgModule({ 
  declarations: [ 
    AppComponent, 
    PhoneValidator,
    EmailValidator, 
    SSNValidator 
], 
imports: [ 
   BrowserModule, 
   FormsModule, 
   NgSelectModule, 
   HttpClientModule 
], 
providers: [], 
bootstrap: [AppComponent] 
})

You can see the directive to apply email validation as follows, It's going to use a regular expression to parse the input text in the email field.


//validate email 
import { NG_VALIDATORS, FormControl, ValidatorFn, Validator } from '@angular/forms'; 
import { Directive } from '@angular/core'; 

@Directive({ 
  selector: '[emailvalidator][ngModel]', 
  providers: [ 
    { 
      provide: NG_VALIDATORS, 
      useExisting: EmailValidator, 
      multi: true 
    } 
 ] 
}) 

export class EmailValidator implements Validator { 
  
  validator: ValidatorFn; 

  constructor() { 
    this.validator = this.emailValidator(); 
  } 

  validate(c: FormControl) { 
    return this.validator(c); 
  } 

  emailValidator(): ValidatorFn { 
     return (c: FormControl) => { 
       if(c.value == "") { 
          return null; 
       } 
       let isValid = /^[_a-z0-9]+(\.[_a-z0-9]+)*@[a-z0-9-]+(\.[a-z0-9-]+)*(\.[a-z]{2,4})$/                      .test(c.value); //email 
       if (isValid) { 
          return null; 
       } else { 
          return { 
             emailvalidator: { 
                valid: false 
               } 
              }; 
            } 
          } 
        } 
      }

We can validate Phone no field using this regular expression, It allows to enter phone no in +11111111111 format.


//validate phone no 
import { NG_VALIDATORS, FormControl, ValidatorFn, Validator } from '@angular/forms'; 
import { Directive } from '@angular/core'; 

@Directive({ 
   selector: '[phonevalidator][ngModel]', 
   providers: [ 
      { 
         provide: NG_VALIDATORS, 
         useExisting: PhoneValidator, 
         multi: true 
       } 
 ] 
}) 

export class PhoneValidator implements Validator { 
   validator: ValidatorFn; 
  
   constructor() { 
      this.validator = this.phoneValidator(); 
    } 

   validate(c: FormControl) { 
      return this.validator(c); 
   } 
   
   phoneValidator(): ValidatorFn { 
      return (c: FormControl) => { 
         if(c.value == "") { 
            return null; 
          } 
      
      let isValid = /^\+[0-9]{11}$/.test(c.value); 
      if (isValid) { 
         return null; 
      } else { 
         return { 
            phonevalidator: { 
               valid: false 
            } 
          }; 
        } 
      } 
    } 
  }

We want to validate SSN field in Norway, so have to install npm package to validate ssn field as below,

npm install --save norwegian-national-id-validator

You can find the following directive has used installed npm package to validate norwegian ssn no


//validate ssn 
import { NG_VALIDATORS, FormControl, ValidatorFn, Validator } from '@angular/forms'; 
import { Directive } from '@angular/core'; 
import { validateNorwegianIdNumber } from 'norwegian-national-id-validator'; 

@Directive({ 
   selector: '[ssnvalidator][ngModel]', 
   providers: [ 
      { 
         provide: NG_VALIDATORS, 
         useExisting: SSNValidator, 
         multi: true 
      } 
   ] 
}) 

export class SSNValidator implements Validator { 
   validator: ValidatorFn; 

   constructor() { 
      this.validator = this.ssnValidator(); 
   } 

   validate(c: FormControl) { 
      return this.validator(c); 
   } 

   ssnValidator(): ValidatorFn { 
      return (c: FormControl) => { 
         if(c.value == "") { 
            return null; 
         } 
      
         let isValid = /^[0-9]{6}( )[0-9]{5}$/g.test(c.value); 
         if (isValid) { 
            var format = validateNorwegianIdNumber(c.value.replace(/ /g,'')); 
            if(format){ 
               return null; 
            } 
            else{ 
               return { 
                  ssnvalidator: { 
                     valid: false 
                  } 
                }; 
              } 
            } else { 
                return { 
                   ssnvalidator: { 
                      valid: false 
                    } 
                  }; 
                } 
              } 
           } 
         }

You can see package.json file like this after installing npm package to validate ssn field


When you run the application, you can see Create Student form as below, Save button is disabled since the form is not dirty yet.


When you hit on the Save button after entering some values, You can see all the required field error messages as follows, It shows SSN and Email fields as invalid as well.
It doesn't show Phone as invalid since we haven't added any value to it and Phone is not a mandatory field.


You can see Gender dropdown field has turned into red border as above, we have to add some styling to achieve that.


.invalid-feedback-select { width: 100%; font-size: 80%; color: #dc3545; }

We have to add style file in angular.json file


"styles": [ 
   "./node_modules/bootstrap/dist/css/bootstrap.min.css", 
   "src/styles.css", 
   "src/assets/css/common.scss" 
 ], 

Let's input data to required fields and check what happens, still shows invalid fields as below for phone no, email and ssn


After entering correct values for Phone, Email and SSN form look like this.


Download


TechNet Gallery


You can download the sample code from here, ng-input-validations

GitHub


You can clone this repo from GitHub, ng-input-validations


Conclusion


In this article, it describes how to apply input validations to form controls using Angular 6. The sample code has used .NET Core Web API project to develop the service layer. We used Angular 6 directives to achieve this.


References

Thursday, October 11, 2018

Sri Lanka .NET Forum - October Meetup - 2018

A real-world example with Microsoft Graph API and Outlook.


Session Abstract : What if you have hundreds of invoices landed in your Outlook as in the email. And you need a way of processing them into real invoices or maybe store in a database. Lets discuss how to do this using Microsoft Graph API, Outlook and Azure functions.


Source Code
    GitHub : trackmailboxchanges


Related Blogs :

Saturday, September 15, 2018

Angular 6 - Input restrictions in a form

Introduction


This article is going to describe how to restrict some values typing in a text box input field, We have used Angular 6 to develop this application using Visual Studio Code as the IDE, Let's see how to do it

Background


Create Angular project


Let's create an angular project from Visual Studio Code terminal window, Open Visual Studio Code and navigate to the menu, click on Terminal and then New Terminal. You can type ng new command to create a new angular project as follows,

ng new <projectname>


A new project is created and you can check file explorer to check created files, We are going to change app.component.html and insert a form with some text inputs


Let's build the angular application with build command,

ng build


Run the application and try to access it from http://localhost:4200/ 

ng serve


You can see the application in the browser like this,


Let's change app.component.html page and add a student creation form like this,


We want to add a dropdown control to select Gender value, let's add it


When you add ng-select component, it shows following parser error, it says ng-select is not a known element,


Let's install ng-select package to this solution and check how it works


We have to import ng-select module in app.module file to use it in the solution


import { NgSelectModule } from '@ng-select/ng-select'; 

You can see student create form as below, its working fine since we added necessary libraries like ng-select library


Let's inspect the code and check how it works, You can see how bootstrap classes and input controls have been used. Postal No and Gender values rendered as dropdown controls. We have to fetch some values from the server and bind into it. Let's try to start with that


We have partially completed implementing HTML view, let's try to fill initial data in to form such as Gender and Postal code dropdown values,
We have to get data from the server when form loads, so let's implement ngOnInit event in app.component.ts, before that we have to get necessary libraries, let's implement OnInit in the component as below

export class AppComponent implements OnInit { 

It shows cannot find name 'OnInit', we haven't added necessary libraries to the .ts file,


Let's add OnInit library from angular/core and try to resolve the issue

import { Component, OnInit } from '@angular/core';


In the code, it extends from OnInit interface but necessary methods are not added yet, let's add ngOnInit method in app.component.ts file

ngOnInit(){ 

}


Create a Service project

Let's start to create a service project using Visual Studio 2017, Go to available templates to create a ASP.NET Core Web application


When you click on OK button, you will be able to see available templates for ASP.NET Core 2.2, Let's select API project from available templates and go with the default screen


Your API project is created. After that will try to create a shared project to hold our common business logic. Let's add a new project and create a shared project in .NET framework.


You can see the solution with 2 projects, Web API project & Shared project as follows,


Let's create a class to hold common objects. MasterData class will hold data for Gender and PostalCode, we want these lists to populate dropdowns. 


namespace input_restrictions_dal.Dto 

   public class MasterData 
   { 
      public IEnumerable Gender { get; set; } 
      public IEnumerable PostalCode { get; set; } 
   } 

   public class DropDownField 
   { 
      public int Id { get; set; } 
      public string Value { get; set; } 
    } 

    public class PostalCodefield 
    { 
       public int Id { get; set; } 
       public string Code { get; set; } 
       public string City { get; set; } 
     } 
   } 

We want to hold gender values in a enum, you will see these values in Gender dropdown


namespace input_restrictions_dal.Enum 

   public enum Gender 
   { 
      Male = 1, 
      Female = 2 
    } 


Open startup class to check what happens when the application starts. We have to enable necessary configurations to communicate with the client application.
We have to enable CORS to allow communication with any origin as below, Let's add necessary code lines into ConfigureServices and Configure method.


public void ConfigureServices(IServiceCollection services) 

  services.AddCors(o => 
  { 
    o.AddPolicy("AllowAnyOrigin", builderCor => 
    { 
       builderCor.AllowAnyOrigin().AllowCredentials().AllowAnyHeader().AllowAnyMethod();        
    }); 
    o.DefaultPolicyName = "AllowAnyOrigin"; 
  }); 
}


public void Configure(IApplicationBuilder app, IHostingEnvironment env) 

   app.UseHttpsRedirection();
   app.UseCors("AllowAnyOrigin");    
   app.UseMvc();  
}

Let's move to the API project and create the service interface as IStudentInterface as below.


using input_restrictions_dal.Dto;

namespace input_restrictions_api.Service
{
    public interface IStudentService
    {
        MasterData GetMasterData();
    }
}


Let's implement the interface in StudentService class to populate masterdata.


using System; 
using System.Collections.Generic; 
using input_restrictions_dal.Dto; 
using input_restrictions_dal.Enum; 
using System.Linq;

namespace input_restrictions_api.Service 

  public class StudentService : IStudentService 
  { 
     public MasterData GetMasterData() 
     { 
        MasterData masterData = new MasterData 
        { 
          Gender = (from Gender g in Enum.GetValues(typeof(Gender)) 
                    select new 
                    { 
                       ID = Convert.ToInt32(g), 
                       Name = g.ToString() 
                    }).Select(s => new DropDownField() 
                                  { 
                                     Id = s.ID, 
                                     Value = s.Name 
                                   }).ToList(), 
          PostalCode = new List { 
             new PostalCodefield {Id =1, Code="00130", City = "Colombo"}, 
             new PostalCodefield { Id = 1, Code = "20000", City = "Kandy" }, 
             new PostalCodefield { Id = 1, Code = "80000", City = "Galle" } } 
        }; 
        return masterData; 
       } 
      } 
    }

Let's create StudentController class and implement data retrieval service method as below,
We are calling service methods created in the previous step, Service method is a GET request and we named it as masterdata. It produces two results when it succeeds returns OK status with Masterdata object and else NotFound. It's better to describe all the possibilities in a service method as above.


using Microsoft.AspNetCore.Mvc; 
using input_restrictions_api.Service; 
using input_restrictions_dal.Dto; 
using System.Net;

namespace input_restrictions_api.Controllers 

  [Route("api/[controller]")] 
  [ApiController] 
  public class StudentController : ControllerBase 
  { 

    private readonly IStudentService _studentService; 

    public StudentController() 
    { 
      _studentService = new StudentService(); 
    } 

    [HttpGet("masterdata")] 
    [ProducesResponseType(typeof(MasterData), (int)HttpStatusCode.OK)] 
    [ProducesResponseType((int)HttpStatusCode.NotFound)] 
    public ActionResult MasterData() 
    { 
       MasterData masterData = _studentService.GetMasterData(); 
       return Ok(masterData); 
    } 
 } 
}

Add Validation in the Client App


You can see the student creation form with angular model bindings in app.component.html, We have applied some directives to restrict the input in these controls. Let's discuss them in detail at the end of this post.


Let's open app.component.ts file and check OnInit method, it calls service method and pass data to the HTML page with angular model bindings


import { Component, OnInit } from '@angular/core'; 
import { MasterData } from './shared/masterdata.model'; 
import { DataService } from './shared/data.service'; 
import { Member } from './shared/member.model'; 

@Component({ 
 selector: 'app-root', 
 templateUrl: './app.component.html', 
 styleUrls: ['./app.component.css'] 
}) 

export class AppComponent implements OnInit {
  masterData: MasterData; 
  member: Member; 

  constructor(private dataService : DataService) {

 } 

 ngOnInit(){ 
   this.masterData = new MasterData(); 
   this.member = new Member(); 
   this.GetMasterData(); 


GetMasterData () { 
  this.dataService.GetMasterData().subscribe(  
     data => { 
        this.masterData = data; 
     }, 
     err => { 
        throw err; } 
    ); 


When Postal No changes, Postal Place should populate with the appropriate city as per the requirement, we have to implement dropdown change event as below.


onPostalNoChange(event) { 
  if (event == null) { 
    this.member.postalPlace = ''; 
  } 
  else { 
    this.masterData.postalCode.forEach(entry => { 
      if (entry.code == event.code) { 
         this.member.postalPlace = entry.city; 
        } 
     }); 
 } 
}

You can see the app.module file, all the imported modules and custom directives we created are added.


import { NgSelectModule } from '@ng-select/ng-select'; 
import { HttpClientModule } from '@angular/common/http'; 

import { LettersOnlyDirective} from './directives/letters.directive'; 
import {PhoneNoDirective} from './directives/phoneno.directive'; 
import {SSNDirective} from './directives/ssn.directive'; 
import {LettersNumbersOnly} from './directives/letters-numbers.directive'; 
import {DecimalNumberOnlyDirective} from './directives/decimal-number.directive';

Check data.service.ts file in the shared folder, it responsible to call service API methods as in GetMasterData method. You will see the value of api_url in environments file


import { HttpClient } from '@angular/common/http' 
import { Observable } from 'rxjs' 
import { MasterData } from "./masterdata.model"; 
import { environment } from "src/environments/environment"; 
import { Injectable } from '@angular/core'; 

@Injectable({ 
  providedIn: 'root' 
 }) 

export class DataService { 

  constructor(private http : HttpClient) {} 

  GetMasterData () : Observable<MasterData>{ 
    return this.http.get(environment.api_url + '/student/masterdata'); 
  } 
 }


Let's see the model classes in the client application. we have to map service method data in the frontend classes, so we created a MasterData class as shown below.


import { PostalCodeMasterData } from "./masterdata.postalcode.model";

export class MasterData {
    gender : Array<object>;
    postalCode : Array<PostalCodeMasterData>;
}

We have to create a typescript class to hold the postal code data


export class PostalCodeMasterData { 
   zipCodeId : number; 
   code : string; 
   city : string; 
}

Finally, we want to add a class to hold member model as below,


export class Member { 
   firstName: string; 
   lastName: string; 
   phone: string; 
   email: string; 
   ssn: string; 
   gender: string; 
   postalNo: number; 
   postalPlace: string; 
   addressLine1: string; 
   addressLine2: string; 
   gpa: string; 
   certificateIssued: boolean; 
}

We can restrict inputs in firstname and lastname fields using this directive, specials keys are allowed other than that.
It checks for a specific input as per the regular expression shown below.
It listens to key down and paste event to capture the inputs in that specific control.
As per the regular expression used, we can input only the letters simple or in capital letters.


//validate firstname and lastname 
import { Directive, ElementRef, HostListener} from '@angular/core'; 

@Directive({ 
  selector: '[lettersOnly]' 
}) 

export class LettersOnlyDirective{ 
  private regex: RegExp = new RegExp(/^[a-zA-Z]+$/g); 
  private specialKeys: Array = ['Backspace', 'Tab', 'End', 'Home']; 

  constructor(private el: ElementRef) {
  } 

  @HostListener('paste', ['$event']) onkeydown(e: any) { 
    var value = e.clipboardData.getData('Text'); 
    if (value && !String(value).match(this.regex)) { 
       event.preventDefault(); 
    } 
  } 

  @HostListener('keydown', ['$event']) 
  onKeyDown(event: KeyboardEvent) { 
     if (this.specialKeys.indexOf(event.key) !== -1) { 
        return; 
     } 

     let current: string = this.el.nativeElement.value; 
     let next: string = current.concat(event.key); 
     if (next && !String(next).match(this.regex)) { 
        event.preventDefault(); 
     } 
   } 
}

We can restrict inputs for a phone no filed using this directive, it allows only to enter + value and then numbers


//validate phone no 
import { Directive, ElementRef, HostListener } from '@angular/core'; 

@Directive({ 
  selector: '[phoneOnly]' 
}) 

export class PhoneNoDirective { 
  private regex: RegExp = new RegExp(/^(\+)[0-9]{0,11}$/g); 
  private specialKeys: Array = ['Backspace', 'Tab', 'End', 'Home']; 

  constructor(private el: ElementRef) {
  } 

  @HostListener('paste', ['$event']) onkeydown(e: any) { 
    var pastedvalue = e.clipboardData.getData('Text'); 
    var value = this.el.nativeElement.value + pastedvalue; 
    if (value && !String(value).match(this.regex)) { 
       event.preventDefault(); 
    } 
  } 

  @HostListener('keydown', ['$event']) 
  onKeyDown(event: KeyboardEvent) { 
    if (this.specialKeys.indexOf(event.key) !== -1) { 
       return; 
     } 
    let current: string = this.el.nativeElement.value; 
    let next: string = current.concat(event.key); 
    if (next && !String(next).match(this.regex)) { 
       event.preventDefault(); 
    } 
   } 
 }

Check this directive restricts ssn no in noregian format, please have a look for sample ssn nos, How to generate a ssn number in norway


//validate ssn 
import { Directive, ElementRef, HostListener } from '@angular/core'; 

@Directive({ 
  selector: '[ssnNumber]' 
}) 

export class SSNDirective { 
  private regex: RegExp = new RegExp(/^[0-9]{1,6}( ){0,1}([0-9]){0,5}$/g); 
  private specialKeys: Array = ['Backspace', 'Tab', 'End', 'Home']; 

  constructor(private el: ElementRef) { 
  } 

  @HostListener('paste', ['$event']) onkeydown(e: any) { 
    var pastedvalue = e.clipboardData.getData('Text'); 
    var value = this.el.nativeElement.value + pastedvalue; 
    if (value && !String(value).match(this.regex)) { 
       event.preventDefault(); 
    } 
  } 

  @HostListener('keydown', ['$event']) 
  onKeyDown(event: KeyboardEvent) { 
    if (this.specialKeys.indexOf(event.key) !== -1) { 
       return; 
     } 
     let current: string = this.el.nativeElement.value; 
     let next: string = current.concat(event.key); 
     if (next && !String(next).match(this.regex)) { 
       event.preventDefault(); 
     } 
   } 
 }

We can validate address fields with the given directive, it allows to enter letters and number only, no special characters


//validate address line 1 and 2 
import { Directive, ElementRef, HostListener } from '@angular/core'; 

@Directive({ 
  selector: '[lettersNumbersOnly]' 
}) 

export class LettersNumbersOnly { 
  private regex: RegExp = new RegExp(/^[a-zA-Z0-9 ]+$/g); 
  private specialKeys: Array = ['Backspace', 'Tab', 'End', 'Home']; 

  constructor(private el: ElementRef) { 
  } 

  @HostListener('paste', ['$event']) onkeydown(e: any) { 
    var value = e.clipboardData.getData('Text'); 
    if (value && !String(value).match(this.regex)) { 
       event.preventDefault(); 
    } 
  }
  
  @HostListener('keydown', ['$event']) 
  onKeyDown(event: KeyboardEvent) { 
    if (this.specialKeys.indexOf(event.key) !== -1) { 
      return; 
    } 
    let current: string = this.el.nativeElement.value; 
    let next: string = current.concat(event.key); 
    if (next && !String(next).match(this.regex)) { 
       event.preventDefault(); 
    } 
  } 
}

We can validate for decimal numbers like gpa value with following regular expression


//validate gpa
import { Directive, ElementRef, HostListener } from '@angular/core';

@Directive({
    selector: '[decimalnumberOnly]'
})

export class DecimalNumberOnlyDirective {
    //with decimals
    private regex: RegExp = new RegExp(/^[0-9]+(\.[0-9]*){0,1}$/g);
  private specialKeys: Array<string> = ['Backspace', 'Tab', 'End', 'Home'];

    constructor(private el: ElementRef) {
  }

@HostListener('paste', ['$event']) onkeydown(e: any) {
    var pastedvalue = e.clipboardData.getData('Text');
    var value = this.el.nativeElement.value + pastedvalue;
    if (value && !String(value).match(this.regex)) {
        event.preventDefault();
    }
}

@HostListener('keydown', ['$event'])
onKeyDown(event: KeyboardEvent) {
    if (this.specialKeys.indexOf(event.key) !== -1) {
        return;
    }
    let current: string = this.el.nativeElement.value;
    let next: string = current.concat(event.key);
    if (next && !String(next).match(this.regex)) {
        event.preventDefault();
    }
}
}

If you remember, we used api_url value from an environment variable, You can see it as given below.
We can use this file for development purpose and create a environment.prod.ts file directing the production environment.


export const environment = {
  production: false,
  api_url : 'http://localhost:50844/api'
};

You can see the folder structure in the service project as follows, It has API project with controllers, service classes, startup and appsettings file.


You can see front end solution structure with directives we explained, shared data models, service method classes and separate configuration files for different environments (development and production). The screen is rendered from app.component


Download


TechNet Gallery


You can download the sample code from here, Apply Input Restriction in Angular 6 

GitHub


You can clone the sample code from this repo, ng-input-restrictions 


Conclusion


In this article, it describes how to apply input restrictions to form controls using Angular 6. The sample code has used .NET Core Web API project to develop the service layer. We used different directives to achieve this.


References