Monday, May 29, 2017

ASP.NET Core : How to show a confirmation dialog with jquery

Introduction

This article explains how to show a confirmation dialog when a button clicks and a row clicks. It creates a web application using ASP.NET Core in Visual Studio 2017. It has used Jquery and Jquery ui librariies to create the confirmation dialog box.

Background 

If you are interested to create a web application in ASP.NET Core, refer to this article https://social.technet.microsoft.com/wiki/contents/articles/36340.asp-netcore-create-a-web-api-application.aspx

If you want to know how to secure a .NET Core web application with IdentityServer 4, go through this article, https://social.technet.microsoft.com/wiki/contents/articles/37169.secure-your-netcore-web-applications-using-identityserver-4.aspx

When you worry security of your web application and need to seure your application without doing much coding, go thorough this, It will demonstrate how to customize user authenticsation using ASP.NET Identity, https://social.technet.microsoft.com/wiki/contents/articles/37797.asp-net-identity-customize-user-authentication.aspx

If you are a newbie and want to touch Hello World! on .NET Core with a linux server, check this article, https://social.technet.microsoft.com/wiki/contents/articles/36330.net-core-with-a-linux-server-hello-world.aspx

If youwant to build open sourcse projects with .NET Core, plese check this article to know how to install .net core in a linux server. https://social.technet.microsoft.com/wiki/contents/articles/36318.install-netcore-in-a-linux-server.aspx

If you are a  open source guy and admire visual studio code on a Linux server, go through this article to know more about .NET Core web application runs on a linux server, https://social.technet.microsoft.com/wiki/contents/articles/36333.create-a-web-application-in-netcore-with-a-linux-server.aspx

If you love to use template generator in visual studio code and start developing a ,net core application, here it is try Yo command, https://social.technet.microsoft.com/wiki/contents/articles/36334.net-core-create-web-application-with-yeoman-template-generator.aspx

Create a Web application using ASP.NET Core in Visual Studio 2017

Let's create a web application using .NET Core in Visual Studio 2017. Student can submit their assignmnehnts to the system. Let's see how we can show a confirmation box when a student deletes and when an assignmnet detetes from the system

Craete a ASP.NET Core web applicarion

Create a new ASP.NEt Core web application like this,


Create Student Model

Let's create student model. Add a student class into Models folder.


public class Student 

 public int Id { get; set; } 
 public string Name { get; set; } 
 public int Age { get; set; } 
 public int Year { get; set; } 
}

Click on Controllers folder and add a new controller, this dialog box comes up, It allows you to add packages and references to your project as you need. It adds all the packages you need to work with entityframework database context, Let's select Minimal dependencies, since we dont need error pages and bunding features for our web application


After adding dependencises into your appplication, let's add a controller, select MVC controller with views, using Entity Framework


Select model class as student and create ane data context class as below


Click on Add, It will add StudentsController to your oproject


If you check the solution, along with studentscontroller, database context class is created as below


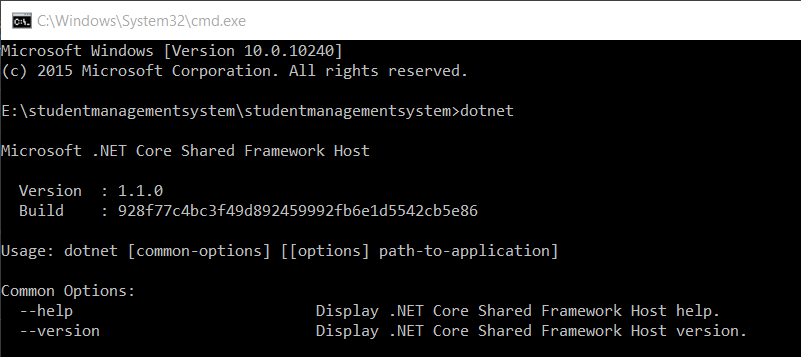
Now, let's create the database, go to solution explorer and right click on it, select Open Folder in File explorer, and open a cmd prompt from that location, run dotnet command, it shows .net core version


Run dotnet ef command to check whether Entityframework is avai;able, it says entityframework is not available,


Right click on web application and select Edit .csproj


Check .csproj, it shows all the available packages for your solution and tools, We need to ass EFCore tools to run dotnet-ef command, let's add it into tools section


<dotnetclitoolreference include="Microsoft.EntityFrameworkCore.Tools.DotNet" version="1.0.0">


Let's build the solution and run dotnet - ef command


Let's create student table in the database, create migrations using following command,


It will create student table script as follows,


Run database update command as below to run this script on our database,


student database iis created as below, view sql server object explorer and you can check student table is available


Let's run the application and navigates to the students page, click on create new and create few studensts


Show a confirmation box when a student edits

Let's try to show a confirmation dialog, when you try to edit a studemnt, Go to solution explorer and expand wwroot and navigate into jquey in lib folder, it sows jquery library, Let's refer itin our Edit view


Let's give save button a id, as btnSave, we can refer to it in our function,


Let's refer jquery file and create a method call when save button clicks as below, inn here it has stop executijing save action method in students controller.


script src="~/lib/jquery/dist/jquery.js"></script>
<script>
    $(function () {
        $('#btnSave').click(function (e) {
            e.preventDefault();
        });
    });
</script>


Add a confirm dialog template as belw,


<div id="confirmDialog" title="Save Student" hidden>
    <p>Do you want to save changes </p>
</div>


Let's give edit form an id and initialize confirm dialog as below,


we havent added jquery ui in edit view, let's add it, open bower.json file and add jquery-ui library


If you navigate to lib folder, you can see jquery-ui is installed


Let's refer jquery-ui in _layout view, run the applicatyion and see any errors are available in console tab

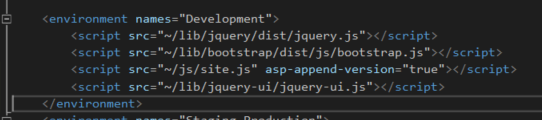
<script src="~/lib/jquery-ui/jquery-ui.js"></script>


Let's call confirmation dialog when hit on save button, 


Run the application and click on save button, it shows confirmation dialog as folllows, it doesnt have any styling so let's style it a bit


Add jquery-ui css file in layout page and it will take care about styling of the confirmation dialog box


Save layout page and refresh edit view, it shows confirmation box as follows, When you click on cancel button, dialog box closes. when you click on ok button, it submits the edit form and hit on Edit action result


Show a confirmation box when an assignmnet deletes

Crreate assingmnet model as follows,


 public class Assignment
    {

        public int Id { get; set; }

        public string Assignment { get; set; }

        public int Subject { get; set; }

        public int StudentId { get; set; }

        public virtual Student Student  { get; set; }

    }


Add assignmnets model to dbcontext as below,


Let's add mirations and update database like this, it will create assignmnet table in the database,You dont need to run migrations everytime you nmake a change intoi databse, set autiomaticmigrations to true , then it will apply database changes when application builds


Add Assignmnents controller like this, It will create assignmentsController with all CRUD operations and views


Create assignments as below, Itr's going to show a dropdown with student ids, lets leave it as it is, If you want you can list down student names


Add few assignmnets like this,


Let's change Student detail view a bit, we want to show assignmnets each user has submitted, We have to create a studentViewModel to display all assignmnets user has submitted


Change Student details methood like this, return StudentViewModel object to Details view with List of asignmnets student has submitted


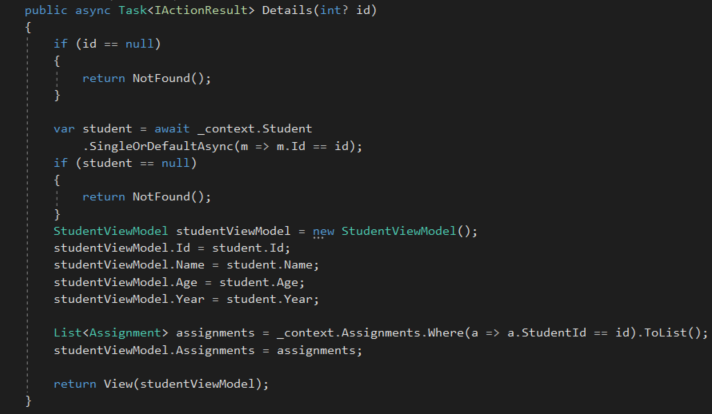
StudentViewModel studentViewModel = new StudentViewModel();
  studentViewModel.Id = student.Id;
  studentViewModel.Name = student.Name;
  studentViewModel.Age = student.Age;
  studentViewModel.Year = student.Year;

  List<Assignment> assignments = _context.Assignments.Where(a => a.StudentId ==                                                                                    id).ToList();
  studentViewModel.Assignments = assignments;

  return View(studentViewModel);


Pass wtudentviewmodel in details view and display student assignmnets as below, create a table for assignments and create an action link to delete an assignmnet student has sub,itted


<div>
    <h4>Student</h4>
    <hr />
    <dl class="dl-horizontal">
        <dt>
            @Html.DisplayNameFor(model => model.Name)
        </dt>
        <dd>
            @Html.DisplayFor(model => model.Name)
        </dd>
        <dt>
            @Html.DisplayNameFor(model => model.Age)
        </dt>
        <dd>
            @Html.DisplayFor(model => model.Age)
        </dd>
        <dt>
            @Html.DisplayNameFor(model => model.Year)
        </dt>
        <dd>
            @Html.DisplayFor(model => model.Year)
        </dd>
    </dl>
    <table class="table">
        <thead>
            <tr>
                <th style="display:none">

                </th>
                <th>
                    @Html.Display("Title")
                </th>
                <th>
                    @Html.Display("Subject")
                </th>
                <th>

                </th>
            </tr>
        </thead>
        @foreach (var item in Model.Assignments)
        {
            <tr>
                <td style="display:none">
                    @Html.HiddenFor(modelItem => item.Id)
                </td>
                <td>
                    @Html.DisplayFor(modelItem => item.Title)
                </td>
                <td>
                    @Html.DisplayFor(modelItem => item.Subject)
                </td>
                <td id="@item.Id">
                    @Html.ActionLink("Delete", "Delete", new { id = item.Id }, new { @id = "btnDelete" })
                </td>
            </tr>

        }
    </table>
</div>
<div>
    <a asp-action="Edit" asp-route-id="@Model.Id">Edit</a> |
    <a asp-action="Index">Back to List</a>
</div>


Add confirm dialog box template and jquery libry as below,


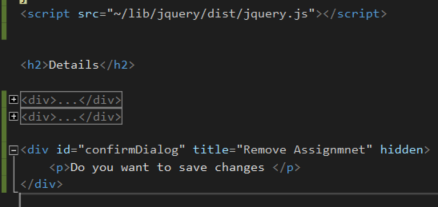
<div id="confirmDialog" title="Remove Assignmnet" hidden>
    <p>Do you want to save changes </p>
</div>


It's bit different how we handle delete button click in a list, $('a[id*=btnDelete]') jquery selector get a <a> tag with id btnDelete,

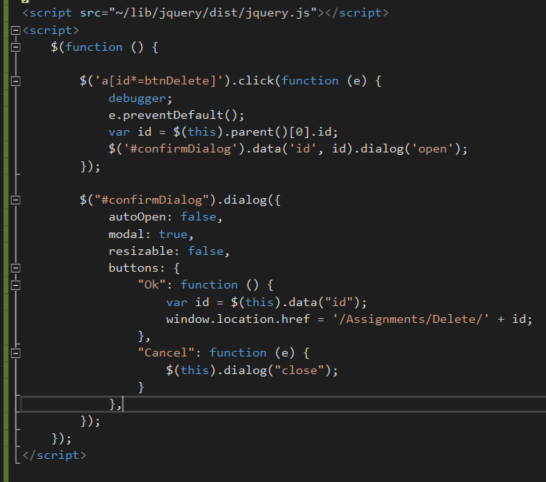
Its not straightforward to get id of an assignmmnet you want to delete,

When we delete a student we passed model ID , but in this example we need to get row id, when it clicks delete link, it retrieves id of the clicked row,

we clicked on delete link that means a td element in a row,

$(this).parent()[0].id is selecting the parent of that td element, that means clicked row id

We can pass a parameter to the confirm dialog by appending data property in a dialog box, $('#confirmDialog').data('id', id)

Wehn click on Ok button in the confirm dialog, it hit on Assignmnet delete action method


Download

Install front end libraries like Jquery, Jquery-ui using bower,


Go to solution explorer and open cmd from there, install bower packages as below, you have to navigate to the path where bower.json file is available


TechNet Gallery


Github


Conclusion

Article has shown how to show a confirmation dialog whan a button clicks in a gridview and as well as a single button in a view, We could implement this functionality using jquery selectors and jquery ui dialog box

See Also


References

Saturday, May 27, 2017

Send smtp email with Azure blob storage attatchments

Introduction

Smtp is the most common protocol to send messages over the internet. Smtp stands for Simple Mail Transfer Protocol. Smtp messages are secured using SSL by default, so no need to worry about security.

Azure Blob storage is going to store unstructured data as binary files, text files, any type of data in the cloud. It can store an image, document or a video as a blob, simply as an object. You can select a specific tier to store your blobs by referring to the pricing models of Azure blob storage.

Let's see how we can store a file in Azure blob storage and send it using smtp email.

Background

If you want to know how to send an email using smtp, Please go through this article, https://social.technet.microsoft.com/wiki/contents/articles/36282.c-create-a-simple-smtp-email-with-html-body.aspx

If you want to know how to send an email concurrently using a windows service, check this article, https://social.technet.microsoft.com/wiki/contents/articles/36288.how-to-fire-an-email-using-a-windows-service.aspx

Store files in the blob storage

This article is going to describe how to store an image, text file and a video in azure blob storage,

Create a storage account in Azure portal

Log in to Azure portal, https://portal.azure.com Click on More Services link as below, It will open up all available services in azure portal. click on Storage accounts


All storage accounts are displayed in here, currently this azure account doesn't have any storage accounts. Click on Create Storage accounts to create a new storage account.


Add a name to the storage account, in this example, used mailfilestore 

Deployment model is going to tell how your storage account is going to deploy and manage, select Resource manager as Deployment model

storage accounts created by Azure portal is deployed under Resource manager Deployment model, it has newer features in Azure, and accounts created by Azure classic portal is deployed under classic.
In Account kind, it says what type of a storage account you want to use, General purpose accounts are going to store blobs, files, tables and queues,If you select account type as blob storage, it stores only blobs.

If you select Blob storage as account type, it's going to disable premium performance, You need to go for premium performance, when you need low latency performance like accesing virtual machine disks and databses. In here we are going to access files stored in a storage, it's not very frequenly accessible, so go for standart performance, thats enough.

You need to select a way to replicate storage account to maintain high availability and durability.  Replication copies your data into a same data centre or another data centre. Let's select default replication method, Read access geo redundant storage (RA-GRS), in this replication method, it's going to replicate data into multiple data centres and data readds can be performed in secondary data centre as well.

In Access tier, you can specify how you can access stored data. You can select Hot Access tier for more frequent data access, Cool access tier for less frequenly accessed data like backups. In this exmple, let's select Hot access tier.

Storage service encryption is going to protect your data using encryption within data center
Select your subscription for storage account

create a new resource group or use an existing resource group

When you use a resource group, you can deploy and manage all your resources in that group separately.

select a region to store your storage account, let's select East Asia, since it's near for me 😀


Go to storage account and search for Access Keys and copy connection string of key1 in access keys, If you wonder why storage account has two access keys, Azure has recommended to regenerate access keys frequently in order to maintain security of your stored data. While you regenerating a one access key, you can use second access key to manage your storage withourt any issue, since you have two access keys.


Let's add some code to save your files in blob storage

Create a console application in Visual studio, we want to store storage connection-string as a configuration in our application. Create a configuration setting in app.config file as below.

<appSettings>

<add key="StorageConnectionstring"
value="DefaultEndpointsProtocol=https;AccountName=mailfilestore;AccountKey=pO+lfN4ycIRtC7LncRjUynQ94/Qk0tKnNupYfaXMclH1NCqxwDMXa05PyqwZ0FVaWNgVfVARF4xvCKWq+POkSQ==;EndpointSuffix=core.windows.net"/>


Create a class to handle blob storage saving part, In this example PropertyHandler class is going to do that. In PropertyHandler class, initialize a private variable to hold the storage connection string 


private static string storagekey = ConfigurationManager.AppSettings["StorageConnectionstring"]; 


Create a method to save to blob storage, and create an Azure storage account by passing the storage key parameter, 


public static void SaveBlobs () 
{
  var storageAccount = CloudStorageAccount.Parse(storagekey);

Create blob service client using azure storage account,


//create blob service client 
var blobClient = storageAccount.CreateCloudBlobClient();

add a configuration into app.config file to define the container,


<add key="container" value="testcontainer"/>


Define a container name to store files in azure storage account


private static string containerstring = ConfigurationManager.AppSettings["container"];

Create a reference to the container like this,


var container = blobClient.GetContainerReference(containerstring);

Create the blob container if it doesnt exist,


//create blob container container.CreateIfNotExists();

Set container permission to public, so any client can read your blob data, if you want to change access level, modify access policies on blob storage


container.SetPermissions( new BlobContainerPermissions { PublicAccess = BlobContainerPublicAccessType.Blob }); 

Go to created storage account and click on Overview section and you can see available containers, you'll see container you created as below, check access type of the container, it's Blob type


Save image to a blob storage

Let's add more coding to save an image to a blob storage,
Create a configuration to hold the image path in app.config file,


<add key="imagePath" value="C:\store\images.jpg"/>

access imagepath to get the path of a image, get file extention and append it to the file name.


string filePath = ConfigurationManager.AppSettings["imagePath"];
var extension = Path.GetExtension(filePath);

var filename = "image" + extension;

Get a reference to the blob container,


//Get a reference to block blob container
 var blockBlob = container.GetBlockBlobReference(filename);


upload the image to blob storage, don't forget to set the content type of the image as jpeg, and update blob properties after that.


using (var stream = File.OpenRead(filePath))
{
//upload file stream to block blob
blockBlob.UploadFromStream(stream);
blockBlob.Properties.ContentType = "image/jpeg";
blockBlob.SetProperties();
}

You can see complete code to save an imgae to a blonb storage


#region Save Image to a blob

string filePath = ConfigurationManager.AppSettings["imagePath"];
var extension = Path.GetExtension(filePath);
var filename = "image" + extension;

//Get a reference to block blob container
var blockBlob = container.GetBlockBlobReference(filename);

using (var stream = File.OpenRead(filePath))
{
//upload file stream to block blob
blockBlob.UploadFromStream(stream);
blockBlob.Properties.ContentType = "image/jpeg";
blockBlob.SetProperties();
}

#endregion


This code sample describes how to store a text file into blob storage, Get the configured file path, and store file in blob storage and set content type as text/plain


#region Save text file to a blob

filePath = ConfigurationManager.AppSettings["filePath"];
extension = Path.GetExtension(filePath);
filename = "file" + extension;

//Get a reference to block blob container
blockBlob = container.GetBlockBlobReference(filename);
using (var stream = File.OpenRead(filePath))
{
//upload file stream to block blob
blockBlob.UploadFromStream(stream);
blockBlob.Properties.ContentType = "text/plain";
blockBlob.SetProperties();
}

#endregion

You can save a video file to a blob storage as below,


#region Save video file to a blob

filePath = ConfigurationManager.AppSettings["vedioPath"];
extension = Path.GetExtension(filePath);
filename = "vedio" + extension;

//Get a reference to block blob container
blockBlob = container.GetBlockBlobReference(filename);
using (var stream = File.OpenRead(filePath))
{
//upload file stream to block blob
blockBlob.UploadFromStream(stream);
blockBlob.Properties.ContentType = "video/mpeg";
blockBlob.SetProperties();
}

#endregion

Go inside testcontainer and view available files in it,


If you want to open one of this file, select a file and you can see the url of it.


Send email with stored files as attachments

Define configuration settings used to send an email, In this example, used gmail server as email server with specific port. email from and to addresses are also defined as a configurable setting.

<add key="emailServer" value="smtp.gmail.com"/>
<add key="emailPort" value="587"/>
<add key="emailCredentialUserName" value="hansamaligamage@gmail.com"/>
<add key="emailCredentialPassword" value="SavingHope2016"/>
<add key="fromAddress" value="hansamaligamage@gmail.com"/>
<add key="mailTo" value="ham@tiqri.com"/>

Create a class to set email properties as below,


class Email
    {

        public string Subject { get; set; }
        public string[] MailRecipientsTo { get; set; }
        public string[] MailRecipientsCc { get; set; }
        public string Content { get; set; }
        public Attachment Image { get; set; }
        public Attachment File { get; set; }
        public Attachment Vedio { get; set; }

    }

In sample appliication, create a seperate class to hold send an email, create a method to send and email and create an instance from Email calss and set basic properties as below.


 public static void SendEmail ()
        {
            Email email = new Email();

            email.MailRecipientsTo = new string[] { ConfigurationManager.AppSettings["mailTo"] };
            email.MailRecipientsCc = new string[] { ConfigurationManager.AppSettings["mailTo"] };

            email.Subject = "test email";
            email.Content = "Hi, How are you doing ? " + "<br/><br/>";


Get Azure storage account reference by passing storage account connectionstring, create the blob client and get a reference to storage container,


CloudStorageAccount storageAccount = CloudStorageAccount.Parse(storagekey);
CloudBlobClient blobClient = storageAccount.CreateCloudBlobClient();
CloudBlobContainer container = blobClient.GetContainerReference("testcontainer");


Get a reference to image, we stored in testcontainer,


#region Image
CloudBlockBlob blob = container.GetBlockBlobReference("image.jpg");


Download file to a memeory stream, and set content type and create a new attatchment object from it.


var stream = new MemoryStream();
blob.DownloadToStream(stream);
stream.Seek(0, SeekOrigin.Begin);
ContentType content = new ContentType(MediaTypeNames.Image.Jpeg);
email.Image = new Attachment(stream, content);


As same as image, create a new attatchment from text file as well and set the content type as plain, if content type doesnt set properly, it will attatch the file as a invalid type of file.


#region text file

blob = container.GetBlockBlobReference("file.txt");

stream = new MemoryStream();
blob.DownloadToStream(stream);
stream.Seek(0, SeekOrigin.Begin);
content = new ContentType(MediaTypeNames.Text.Plain);
email.File = new Attachment(stream, content);

#endregion


create the video attatchment as well,


#region vedio file

 blob = container.GetBlockBlobReference("vedio.mp4");

  stream = new MemoryStream();
  blob.DownloadToStream(stream);
  stream.Seek(0, SeekOrigin.Begin);
  content = new ContentType("video/mpeg");
  email.Vedio = new Attachment(stream, content);

  #endregion

  SendMail(email);


Create a method to send email as below, its going to construct the email and sends it


private static void SendMail(Email email)
  {
     try
        {
             SmtpClient smtpClient = EmailClientBuilder();
             var emailMessage = MessageBuilder(email);
             smtpClient.Send(emailMessage);
         }
        catch (Exception ex)
         {
             throw ex;
          }
      }


Create a method to return smtpclient object, initialize a smtpclient instance and set email configurations as below.


 private static SmtpClient EmailClientBuilder()
        {
            string emailServer = ConfigurationManager.AppSettings["emailServer"];
            int emailPort = Convert.ToInt32(ConfigurationManager.AppSettings["emailPort"]);
            string emailCredentialUserName = ConfigurationManager.AppSettings["emailCredentialUserName"];
            string emailCredentialPassword = ConfigurationManager.AppSettings["emailCredentialPassword"];
            SmtpClient smtpClient = new SmtpClient(emailServer, emailPort);
            smtpClient.UseDefaultCredentials = false;
            smtpClient.Credentials = new System.Net.NetworkCredential(emailCredentialUserName, emailCredentialPassword);
            smtpClient.DeliveryMethod = SmtpDeliveryMethod.Network;
            smtpClient.EnableSsl = true;
            return smtpClient;
        }


In MessageBuilder method, populate MailMessage object using Email object we constructed earlier.


private static MailMessage MessageBuilder(Email email)
        {
            string fromAddress = ConfigurationManager.AppSettings["fromAddress"];

            MailMessage mail = new MailMessage();
            mail.From = new MailAddress(fromAddress);
            mail.Body = email.Content;
            mail.Subject = email.Subject;
            mail.IsBodyHtml = true;

            if (email.Image != null)
                mail.Attachments.Add(email.Image);
            if (email.File != null)
                mail.Attachments.Add(email.File);
            if (email.Vedio != null)
                mail.Attachments.Add(email.Vedio);

            foreach (var mailRecipient in email.MailRecipientsTo)
            {
                mail.To.Add(new MailAddress(mailRecipient));
            }

            return mail;
        }


Download

5.1 Tech Net Gallery

You can download the source code from Microsoft tech net gallery, https://gallery.technet.microsoft.com/Azure-blob-storage-files-985136db?redir=0

5.2 GitHub

You can clone git hub repository from here, https://github.com/hansamaligamage/blobstorageemailattatchment

Conclusion

Run the console application and check whether email is sent, You can see image, text file and video is attatched to the email as below. All the files are attatched with propert content types as we specified


In this article, We saw how to upload an image, text file and vedio to a blob storage and how to attatch them into a smtp mail message. Download the code sample and run it and see 

See Also


References