1 Introduction
IdentityServer is a open source framework for securing web applications and APIs using OpenID connect & OAuth 2
OpenID connect is a identity layer on top of OAuth 2.0 protocol. OpenID connect allows clients to verify the identity of its users based on a authentication process performed by an authorization server. Also OpenID Connect helps to retrieve authenticated user information for its clients.
OAuth 2.0 is a standard protocol for authorization. OAuth 2 provides authorization for web, desktop and mobile applications.
Demo application uses Identity Server 4 as the Authorization server. Using OpenID Connect, it's going to authenticate users.
OAuth 2.0 is providing authorization to its users.
Identity server 4 application is a self managed component. It's specifically designed for ASP.NET Core 1.1, Authorization server with Identity server couldn't manage as a self compiled application when working with ASP.NET and MVC, since ASP.NET framework and MVC is tightly coupled.
But Identity server 4 is mainly focused on ASP.NET Core, So It can use any UI technology in any environment, since .NET Core supports multiple platforms. We can integrate identity server with existing logins and applications, also an application based on Identity Server 3 can work with Identity Server 4 application.
When we use Identity Server as a authorization server, we have to change authentication related stuff only in there, all the existing applications can use its features to handle authentication and authorization.
Identity server 4 is supported for .NET Core applications as well as .NET full framework applications.
When we design security in a application main point is providing grants, Grants mean a way to specify how a client want to interact with authorization server, in our case with identity server.
OAuth 2 provides number of grant types.
For our demo application, in the beginning we have used in memory services, later we are using entity framework to manage data.
Create a new ASP.NET Core web application as below.
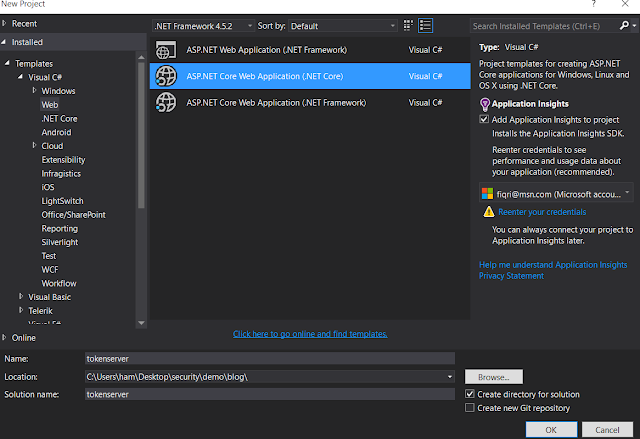
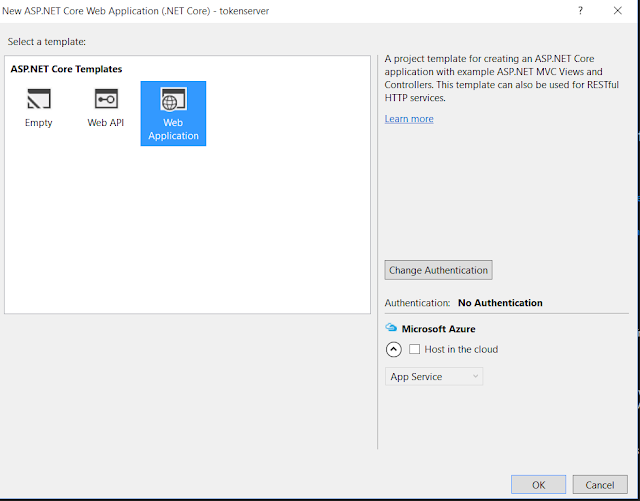
Select .NET Core web application with No Authentication
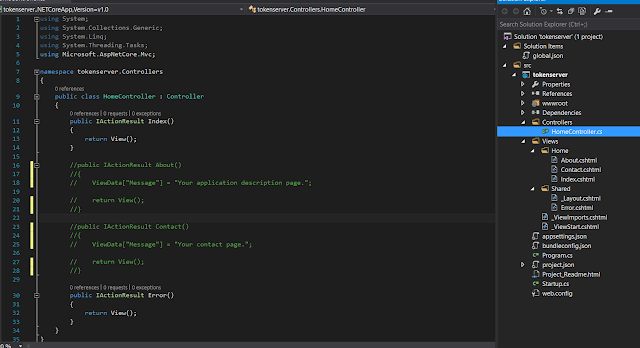
You can see the folder structure of the application as below, comment About and Contact methods from HomeController, we don't need those methods in token server.
Go to the properties of token server application and change the launch url to a familiar port. In this application we are running token server in a self hosted mode. When we run a .NETCore web application in a self managed way, it shows a console output, so we can track errors easily.

Add IdntityServer4 references into project.json file

public static List<Client> GetClients()
{
return new List<Client>
{
new Client
{
ClientId = "testWebClient",
ClientName = "testWebClient"
}
};
}
Run the application and see what happens. It gives us another error.

Use AddInMemoryResources method to attatch resources into identity server.
We should expose some resources in token server for a client to access.
Add a class to define necessary resources, Add resource name and description.
When we attach clients and API resources into identity server, all the generated tokens and grants will be stored in memory.

public static List<ApiResource> GetApiResources()
{
return new List<ApiResource>
{
new ApiResource
{
Name = "customAPI",
DisplayName = "Custom API",
Description = "Custom API Access",
Scopes = {new Scope("customAPI.read")}
}
};
}
Go to Index page in Home folder and change it like this.It's easy to identify token server with the client application.

Application shows like this in a web browser

Navigate to http://localhost:5000/.well-known/openid-configuration page and check available configurations in identity server.
This shows open id connect related configurations, It shows authorization endpoint, token endpoint, user info endpoint etc.
When testWebClient is going to connect to the token server, It uses these urls defined in OpenID Connect

Create client, .NET Core web application with default settings

Go to Startup method in client, In Configure method, add JwtSecurityTokenHandler instance.
When it shows a reference error, add suggested System.IdentityModel.Tokens.Jwt reference.
Clear all the default inbound claim types, By clearing inbound claims, we allow to use the new claims sent by token server.
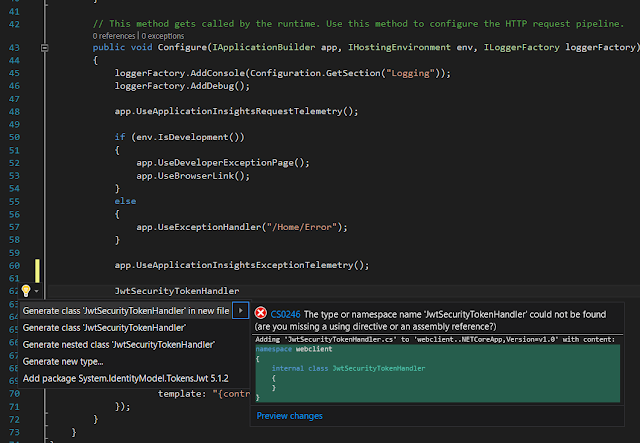
Add openid connect authentication to authenticate web client with identity server.
Add suggested package, This will automatically add "Microsoft.AspNetCore.Authentication.OpenIdConnect": "1.1.0" package into project.json file.

Add same client in web client application, as we registered in token server.


Add cookie authentication in Configure method.
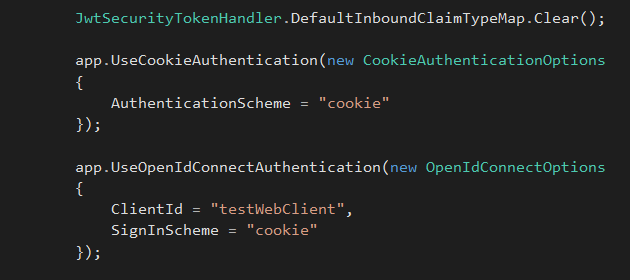
Client application throws 500 server error again. It says to add Provide Authority, MetadataAddress, Configuration, or ConfigurationManager to OpenIdConnectOptions, It asks to prode a Authority Url to identity token server. Let's try to add them.

Add Authority Url into Identityserver application, so openid can get the discovery document and use necessary urls for authentication. Give identityserver url to authenticate web application,

OpenID connect is a identity layer on top of OAuth 2.0 protocol. OpenID connect allows clients to verify the identity of its users based on a authentication process performed by an authorization server. Also OpenID Connect helps to retrieve authenticated user information for its clients.
OAuth 2.0 is a standard protocol for authorization. OAuth 2 provides authorization for web, desktop and mobile applications.
Demo application uses Identity Server 4 as the Authorization server. Using OpenID Connect, it's going to authenticate users.
OAuth 2.0 is providing authorization to its users.
Identity server 4 application is a self managed component. It's specifically designed for ASP.NET Core 1.1, Authorization server with Identity server couldn't manage as a self compiled application when working with ASP.NET and MVC, since ASP.NET framework and MVC is tightly coupled.
But Identity server 4 is mainly focused on ASP.NET Core, So It can use any UI technology in any environment, since .NET Core supports multiple platforms. We can integrate identity server with existing logins and applications, also an application based on Identity Server 3 can work with Identity Server 4 application.
When we use Identity Server as a authorization server, we have to change authentication related stuff only in there, all the existing applications can use its features to handle authentication and authorization.
Identity server 4 is supported for .NET Core applications as well as .NET full framework applications.
When we design security in a application main point is providing grants, Grants mean a way to specify how a client want to interact with authorization server, in our case with identity server.
OAuth 2 provides number of grant types.
- Client Credentials - used with api services, This is the simplest grant type, It's going to retrieve a access token for client, not for user
- Authorization code - is most commonly used grant type. application is capable of interacting with web browser and receive authorization code and use it.
- Resource owner password credentials - used with trusted applications, services that owned by service itself.
- Implicit - This type is suitable for browser based applications, can use with mobile apps as well. Implicit grant type follows redirection based flow. Let's look at Implicit grant type in our demo application
For our demo application, in the beginning we have used in memory services, later we are using entity framework to manage data.
2 Demo : Create Token Server
2.1 Token Server : Create ASP.NET Core web application

Select .NET Core web application with No Authentication
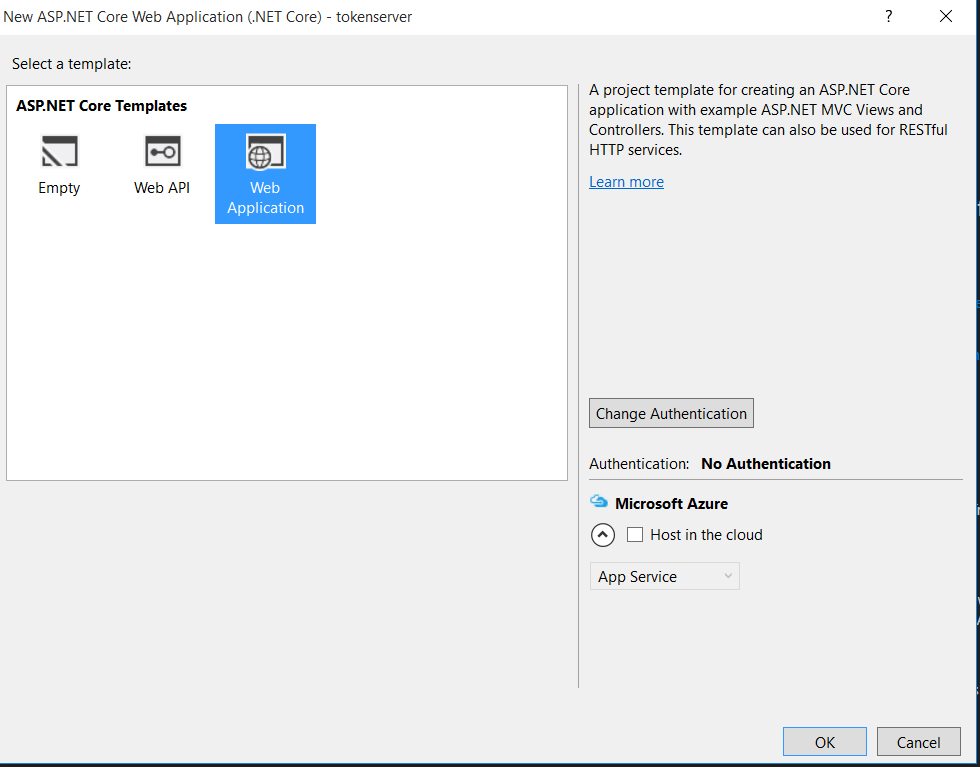
You can see the folder structure of the application as below, comment About and Contact methods from HomeController, we don't need those methods in token server.

2.2 Run Token server in self hosted mode
Go to the properties of token server application and change the launch url to a familiar port. In this application we are running token server in a self hosted mode. When we run a .NETCore web application in a self managed way, it shows a console output, so we can track errors easily.

2.3 Add IdentityServer 4 references into the token server
Add IdntityServer4 references into project.json file

"IdentityServer4": "1.1.0"
Add Identityserver services into web application as follows.

Configure the web request to use identityserver when processing the request.
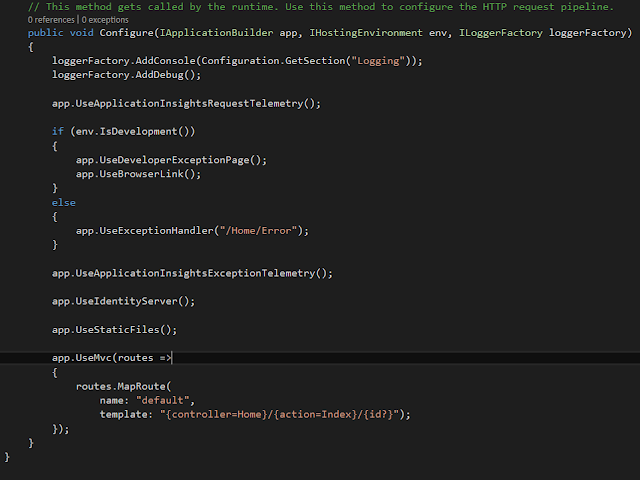
Run the application after adding Identity server, It shows following error in the console. It says application can't find a storage mechanism to store clients. Let's try to add clients into identity server.

For now we are using in memory services to provide data into the token server. Use AddInMemoryClients method to store clients in the application, pass collection of clients as a parameter into the method.
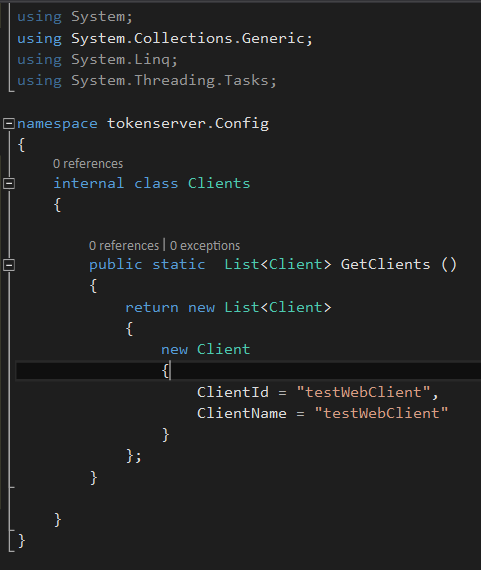
create a config folder to store all the in memory data for token server. Add a Client class into config folder and add few clients into the web application. We have to give a unique client id to connect with token server.

services.AddIdentityServer();
Configure the web request to use identityserver when processing the request.
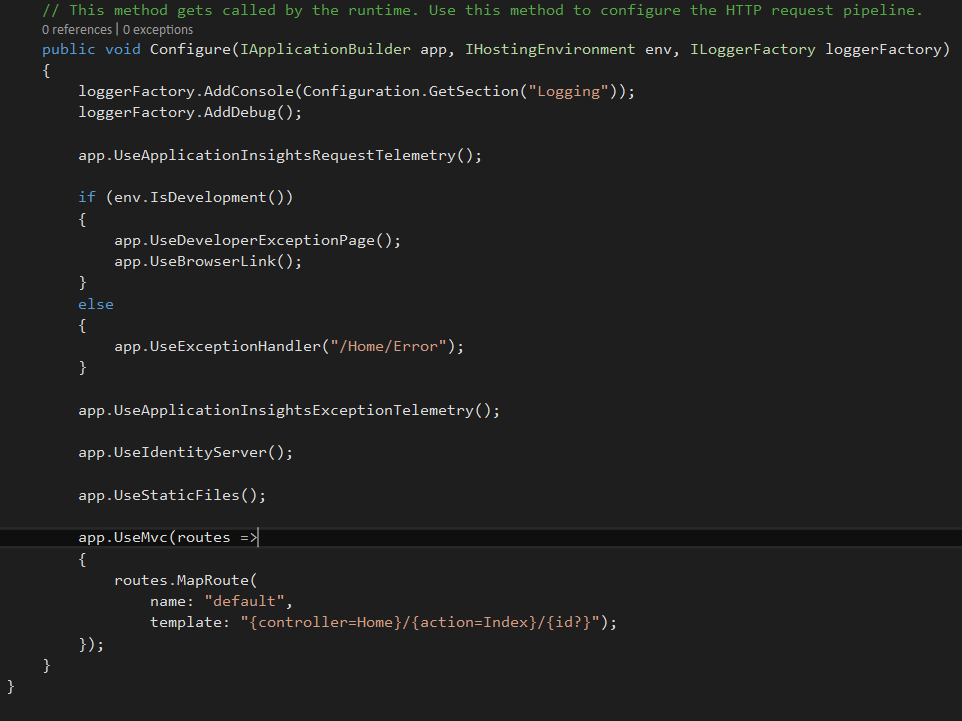
app.UseIdentityServer();
Run the application after adding Identity server, It shows following error in the console. It says application can't find a storage mechanism to store clients. Let's try to add clients into identity server.

2.4 Attach Clients into the token server
create a config folder to store all the in memory data for token server. Add a Client class into config folder and add few clients into the web application. We have to give a unique client id to connect with token server.
public static List<Client> GetClients()
{
return new List<Client>
{
new Client
{
ClientId = "testWebClient",
ClientName = "testWebClient"
}
};
}
In Startup class, attach clients into identity server method.


services.AddIdentityServer().AddInMemoryClients(Clients.GetClients()); Run the application and see what happens. It gives us another error.

2.5 Attach Resources into token server
Use AddInMemoryResources method to attatch resources into identity server.
We should expose some resources in token server for a client to access.
Add a class to define necessary resources, Add resource name and description.
When we attach clients and API resources into identity server, all the generated tokens and grants will be stored in memory.
public static List<ApiResource> GetApiResources()
{
return new List<ApiResource>
{
new ApiResource
{
Name = "customAPI",
DisplayName = "Custom API",
Description = "Custom API Access",
Scopes = {new Scope("customAPI.read")}
}
};
}
Add API resources into the identity server. Run the application and see what happens.

services.AddIdentityServer() .AddInMemoryClients(Clients.GetClients()) .AddInMemoryApiResources(Rsources.GetApiResources());
Go to Index page in Home folder and change it like this.It's easy to identify token server with the client application.
2.6 View Token server in a browser
Application shows like this in a web browser

Navigate to http://localhost:5000/.well-known/openid-configuration page and check available configurations in identity server.
This shows open id connect related configurations, It shows authorization endpoint, token endpoint, user info endpoint etc.
When testWebClient is going to connect to the token server, It uses these urls defined in OpenID Connect

3 Demo : Create Client application
3.1 Web Client : Create ASP.NET Core web application
Create client, .NET Core web application with default settings

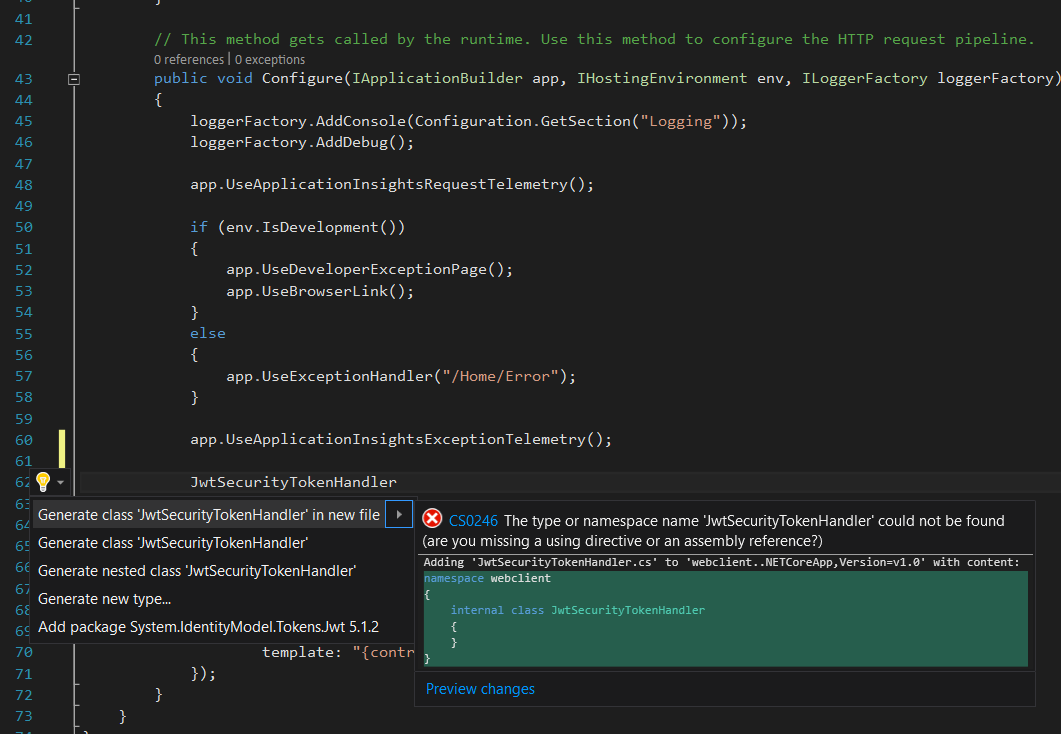
Go to Startup method in client, In Configure method, add JwtSecurityTokenHandler instance.
When it shows a reference error, add suggested System.IdentityModel.Tokens.Jwt reference.
Clear all the default inbound claim types, By clearing inbound claims, we allow to use the new claims sent by token server.
JwtSecurityTokenHandler.DefaultInboundClaimTypeMap.Clear();
3.2 Add OpenID Connect Authentication
Add openid connect authentication to authenticate web client with identity server.
Add suggested package, This will automatically add "Microsoft.AspNetCore.Authentication.OpenIdConnect": "1.1.0" package into project.json file.

Add same client in web client application, as we registered in token server.

app.UseOpenIdConnectAuthentication(new OpenIdConnectOptions { ClientId = "testWebClient" });
Run web cient application, It shows following error, options.SignInScheme is required.
Sign in scheme means authentication type to login with after successful authentication
Sign in scheme means authentication type to login with after successful authentication

3.3 Add Cookie middle ware Authentication
Configure the application to use cookie after user is authenticated in the system, We have to add cookie middle ware into the application.
In this demo cookie is used for local sign in, after user is authenticated.
Add Asp.net core cookie authentication reference into the application
In this demo cookie is used for local sign in, after user is authenticated.
Add Asp.net core cookie authentication reference into the application

Add cookie authentication in Configure method.
JwtSecurityTokenHandler.DefaultInboundClaimTypeMap.Clear();
app.UseCookieAuthentication(new CookieAuthenticationOptions { AuthenticationScheme = "cookie" });
app.UseOpenIdConnectAuthentication(new OpenIdConnectOptions { ClientId = "testWebClient", SignInScheme = "cookie" }); Client application throws 500 server error again. It says to add Provide Authority, MetadataAddress, Configuration, or ConfigurationManager to OpenIdConnectOptions, It asks to prode a Authority Url to identity token server. Let's try to add them.

Add Authority Url into Identityserver application, so openid can get the discovery document and use necessary urls for authentication. Give identityserver url to authenticate web application,

app.UseOpenIdConnectAuthentication(new OpenIdConnectOptions { ClientId = "testWebClient", SignInScheme = "cookie", Authority = "http://localhost:5000/" });
It gives another error!!, The MetadataAddress or Authority must use HTTPS unless
disabled for development by setting RequireHttpsMetadata=false.
It says, authority must use https, or else we need to set RequireHttpsMetadata=false, Let's see what we can do.

Add RequireHttpsMetadata=false, since we are connecting to a self managed mode token server.

Now client app is working fine, We haven't secured client application yet.
Add Authorize attribute into Contact() method as follows. To view Contact page, user needs to get authenticated first.
Add AspNetCore.Authorization reference as below and run the application.

When we navigate to the contact method, it shows following error in the console tab in browser. It's 401 - Unauthorized. Check the ResponseHeader

Copy ResponseHeader location and paste it into web browser, It navigates to connect method in token server.

Connect method in token server, navigate to the error method in token server. Let's try to extract actual error by implementing error method in home controller.

Create a ViewModels folder and add a ErrorViewModel class into it.
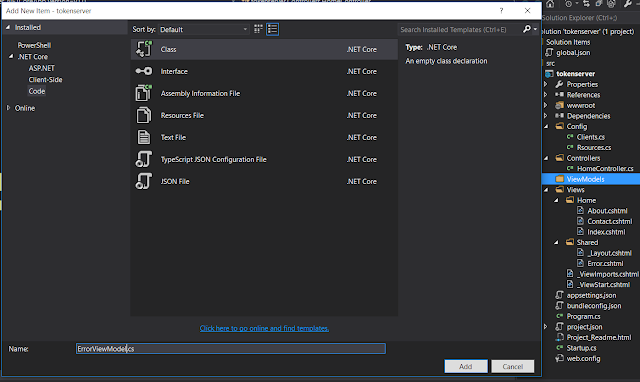
Let's add a property into ErrorViewModel class as below and add missing reference, IdentityServer4.Models

Change the Error method in Home controller to pass ErrorViewModel object to Error view.
In Error method, calls GetErrorContextAsync method on IIdentityServerInteractionService object by passing errorId as parameter.
Let's change Error view to show error message.
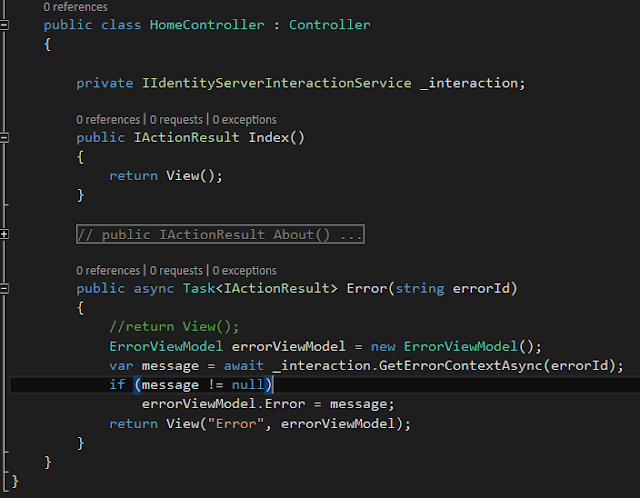
Create a IIdentityServerInteractionService instance and initialize it inside the constructor,
{
_interaction = interaction;
}
Change Error method to pass a ErrorViewModel object and add missing references, IdentityServer4.Services
public async Task<IActionResult> Error(string errorId)
{
//return View();
ErrorViewModel errorViewModel = new ErrorViewModel();
var message = await _interaction.GetErrorContextAsync(errorId);
if (message != null)
errorViewModel.Error = message;
return View("Error", errorViewModel);
}
It says, authority must use https, or else we need to set RequireHttpsMetadata=false, Let's see what we can do.

Add RequireHttpsMetadata=false, since we are connecting to a self managed mode token server.
3.4 Secure Client application
Now client app is working fine, We haven't secured client application yet.
Add Authorize attribute into Contact() method as follows. To view Contact page, user needs to get authenticated first.
Add AspNetCore.Authorization reference as below and run the application.

When we navigate to the contact method, it shows following error in the console tab in browser. It's 401 - Unauthorized. Check the ResponseHeader

Copy ResponseHeader location and paste it into web browser, It navigates to connect method in token server.

Connect method in token server, navigate to the error method in token server. Let's try to extract actual error by implementing error method in home controller.

4 Demo : Extend Token Server to implement authentication logic
4.1 Implement Error handling in token server
Create a ViewModels folder and add a ErrorViewModel class into it.
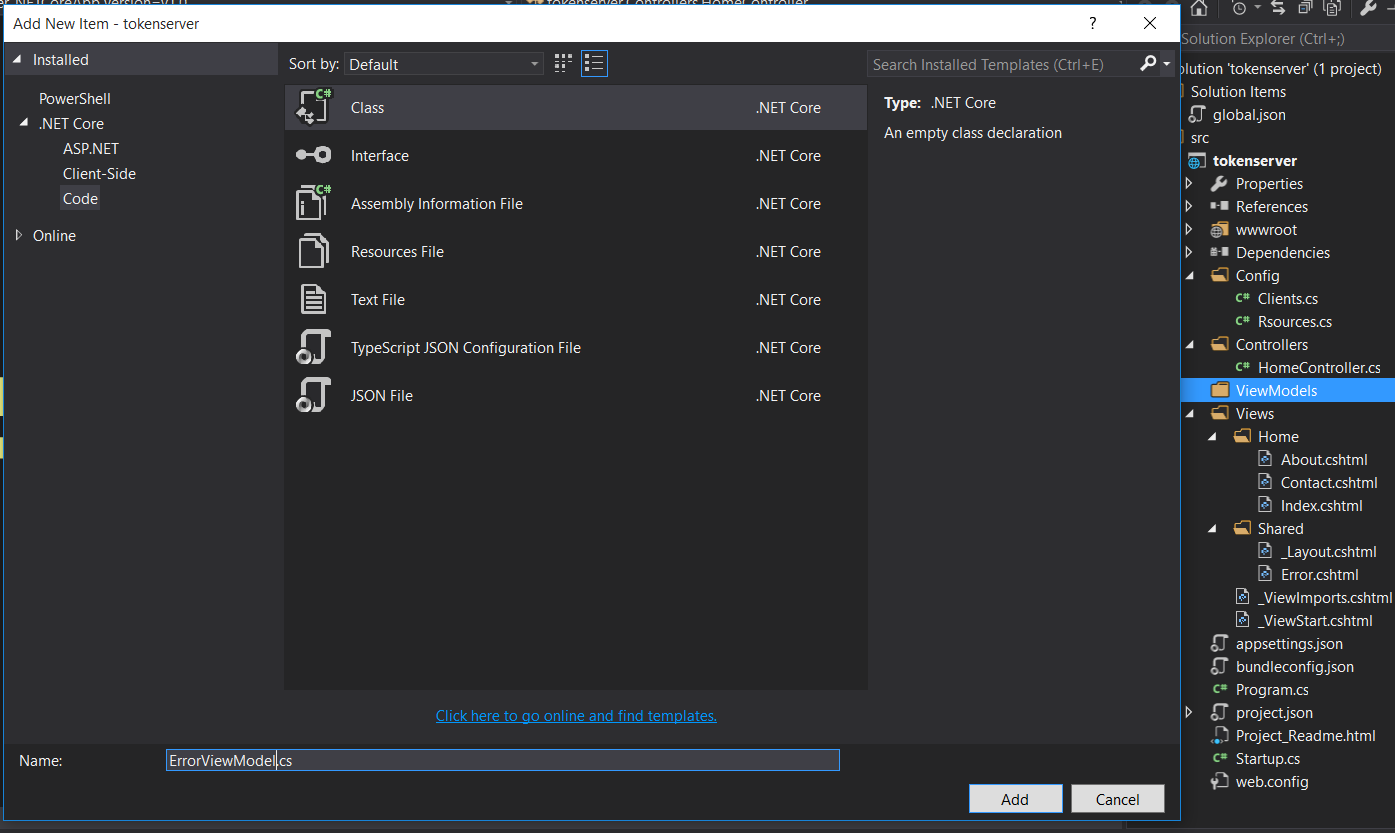
Let's add a property into ErrorViewModel class as below and add missing reference, IdentityServer4.Models
public class ErrorViewModel
{


    public ErrorMessage Error { get; set; }
}
Change the Error method in Home controller to pass ErrorViewModel object to Error view.
In Error method, calls GetErrorContextAsync method on IIdentityServerInteractionService object by passing errorId as parameter.
Let's change Error view to show error message.
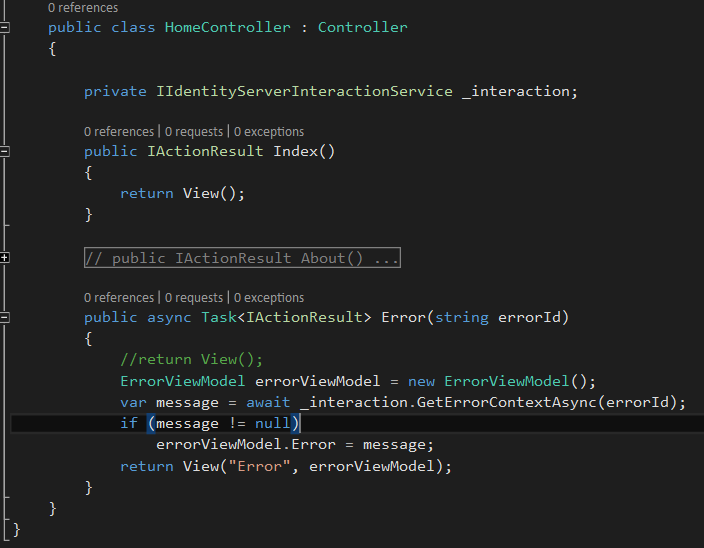
Create a IIdentityServerInteractionService instance and initialize it inside the constructor,
private IIdentityServerInteractionService _interaction;
{
_interaction = interaction;
}
Change Error method to pass a ErrorViewModel object and add missing references, IdentityServer4.Services
public async Task<IActionResult> Error(string errorId)
{
//return View();
ErrorViewModel errorViewModel = new ErrorViewModel();
var message = await _interaction.GetErrorContextAsync(errorId);
if (message != null)
errorViewModel.Error = message;
return View("Error", errorViewModel);
}
Go to Error view and change it to accommodate ErrorViewModel object. Let's try to find the error.

@model tokenserver.ViewModels.ErrorViewModel
@{
ViewData["Title"] = "Error";
}
<h1 class="text-danger">Error.</h1>
<p>Display Mode : @Model.Error.DisplayMode</p>
<p>Error : @Model.Error.Error</p>
<p>Request Id : @Model.Error.RequestId</p>
<p>Ui Locales : @Model.Error.UiLocales</p>
It shows a null reference exception in error view, We haven't initialized IIdentityServerInteractionService object, We'll try to add constructor method in HomeController class and initialize _interaction object.

Modified HomeController constructor shows as below.

@{
ViewData["Title"] = "Error";
}
<h1 class="text-danger">Error.</h1>
<p>Display Mode : @Model.Error.DisplayMode</p>
<p>Error : @Model.Error.Error</p>
<p>Request Id : @Model.Error.RequestId</p>
<p>Ui Locales : @Model.Error.UiLocales</p>
It shows a null reference exception in error view, We haven't initialized IIdentityServerInteractionService object, We'll try to add constructor method in HomeController class and initialize _interaction object.

Modified HomeController constructor shows as below.

public HomeController (IIdentityServerInteractionService interaction) { _interaction = interaction; }4.2 Unauthorized Client error message
Navigate to the connect/authorize method in token server with clientid and few other parameters. It shows error message as unauthorized_client Let's see what is the meaning of this error message is.
It requests connect/authorize method like this,
http://localhost:5000/connect/authorize?client_id=testWebClient&redirect_uri=http%3A%2F%2Flocalhost%3A51686%2Fsignin-oidc&response_type=id_token&scope=openid%20profile&response_mode=form_post&nonce=636219056464568201.MTdmYzNjYmEtYjk4ZS00NGYxLTkyMWItYmU4ZjQxODI1MDFhODUxYTM0NDEtOGYzZi00OTJhLWFmMzItYmIyYmZmY2VmODZl&state=CfDJ8MeCoi8GpxJIs7vvrrar_Ui9pbOp4HvMWuBDIxuslpFuSyVA9PdZ2i1MEEBD9uNXUp66qe10Dtg2dFv3hJ0dCGYMYweaj9GSb1X3MKi5cg5Vb6y9kFOBPJPOS6DNjqArZNXnWFwtSLb4SwaShtDutvA1f-CPWNeh9aoIHsQGaFVi8Qb4wTmLWCQGRvDsOzvrSx0o8CV4ob7osTdnS54EY-pgcXkcPjoiLhG-dvaZUyWW5M6SIEaHaorK-iQHHiCW5f3E7t0VSLlW3X2fpp4y4443tEWssEZUN7cJmPCLbMYMifufwAITe5aIXBQ_nwpVjwaeomoqas1AOgrhOvJqxPs
Token server method is, /connect/authorize
parameters passed into method is,
Client application tries to authorize with connect/authorize method in token server, It passes clientId we specified in token server, It says response type as id_token, response mode as form_post, and scope as openId and profile.
If you check what is redirect uri means, for testWebClient token server is going to redirect it to client's /signin-oidc method. that method is automatically get created.
In token server clients, we have specified only clientid and name, We haven't configured a grant type for our client,
Grant type means, how a client wants to interact with identityserver. We are using OpenIDConnect to talk with token server,
Let's see available grant types for a client to identity server.
In our testWebClient has used Hybrid Grant type up to now, Let's add Implicit Grant type into our client and see how it goes.

public static List<Client> GetClients ()
{
return new List<Client>
{
new Client
{
ClientId = "testWebClient",
ClientName = "testWebClient",
AllowedGrantTypes = GrantTypes.Implicit,
RedirectUris = new List<string> { "http://localhost:51686/signin-oidc" },
PostLogoutRedirectUris = new List<string> { "http://localhost:51686/" },
AllowedScopes = new List<string>
{
IdentityServerConstants.StandardScopes.OpenId,
IdentityServerConstants.StandardScopes.Profile,
IdentityServerConstants.StandardScopes.Email
}
}
};
}
Run the application, It shows another error as Invalid scope,

Scopes says what client can acces, Eventhough we have passed client scopes, we haven't mentioned token server side scopes.
scopes are modeled as resources in identiy server. Identity server has two different type of scopes. Identity Resources & API resources.
Identty resource allows to model a scope that returns bunch of claims, claims means protected values.
API resources going to model access to a protected resource, an API service
Let's add Identity resources and API resources into our application.
We have added IdentityResources to our application, Let's see what they are,
OpenId, Profile and Email are standard openId connect scopes aded referring to Identity server. These values will be returned after authentication.
Next we added a custom identity resource as role that returns role claims for authenticated user.

public static List<IdentityResource> GetIdentityResources()
{
return new List<IdentityResource>
{
new IdentityResources.OpenId(),
new IdentityResources.Profile(),
new IdentityResources.Email(),
new IdentityResource
{
Name = "role",
UserClaims = new List<string> {"role" }
}
};
}
public static List<ApiResource> GetApiResources()
{
return new List<ApiResource>
{
new ApiResource
{
Name = "customAPI",
DisplayName = "Custom API",
Description = "Custom API Access",
Scopes = new List<Scope>
{
new Scope("customAPI.read"),
new Scope("customAPI.write")
},
UserClaims = new List<string> {"role"},
ApiSecrets = new List<Secret> {new Secret("scopeSecret".Sha256())},
}
};
}
It requests connect/authorize method like this,
http://localhost:5000/connect/authorize?client_id=testWebClient&redirect_uri=http%3A%2F%2Flocalhost%3A51686%2Fsignin-oidc&response_type=id_token&scope=openid%20profile&response_mode=form_post&nonce=636219056464568201.MTdmYzNjYmEtYjk4ZS00NGYxLTkyMWItYmU4ZjQxODI1MDFhODUxYTM0NDEtOGYzZi00OTJhLWFmMzItYmIyYmZmY2VmODZl&state=CfDJ8MeCoi8GpxJIs7vvrrar_Ui9pbOp4HvMWuBDIxuslpFuSyVA9PdZ2i1MEEBD9uNXUp66qe10Dtg2dFv3hJ0dCGYMYweaj9GSb1X3MKi5cg5Vb6y9kFOBPJPOS6DNjqArZNXnWFwtSLb4SwaShtDutvA1f-CPWNeh9aoIHsQGaFVi8Qb4wTmLWCQGRvDsOzvrSx0o8CV4ob7osTdnS54EY-pgcXkcPjoiLhG-dvaZUyWW5M6SIEaHaorK-iQHHiCW5f3E7t0VSLlW3X2fpp4y4443tEWssEZUN7cJmPCLbMYMifufwAITe5aIXBQ_nwpVjwaeomoqas1AOgrhOvJqxPs
Token server method is, /connect/authorize
parameters passed into method is,
- client_id = testWebClient
- redirect_uri = http%3A%2F%2Flocalhost%3A51686%2Fsignin-oidc
- response_type = id_token
- scope = openid%20profile
- response_mode = form_post
- nonce = 636219056464568201.MTdmYzNjYmEtYjk4ZS00NGYxLTkyMWItYmU4ZjQxODI1MDFhODUxYTM0NDEtOGYzZi00OTJhLWFmMzItYmIyYmZmY2VmODZl&state=CfDJ8MeCoi8GpxJIs7vvrrar_Ui9pbOp4HvMWuBDIxuslpFuSyVA9PdZ2i1MEEBD9uNXUp66qe10Dtg2dFv3hJ0dCGYMYweaj9GSb1X3MKi5cg5Vb6y9kFOBPJPOS6DNjqArZNXnWFwtSLb4SwaShtDutvA1f-CPWNeh9aoIHsQGaFVi8Qb4wTmLWCQGRvDsOzvrSx0o8CV4ob7osTdnS54EY-pgcXkcPjoiLhG-dvaZUyWW5M6SIEaHaorK-iQHHiCW5f3E7t0VSLlW3X2fpp4y4443tEWssEZUN7cJmPCLbMYMifufwAITe5aIXBQ_nwpVjwaeomoqas1AOgrhOvJqxPs
Client application tries to authorize with connect/authorize method in token server, It passes clientId we specified in token server, It says response type as id_token, response mode as form_post, and scope as openId and profile.
If you check what is redirect uri means, for testWebClient token server is going to redirect it to client's /signin-oidc method. that method is automatically get created.
In token server clients, we have specified only clientid and name, We haven't configured a grant type for our client,
Grant type means, how a client wants to interact with identityserver. We are using OpenIDConnect to talk with token server,
Let's see available grant types for a client to identity server.
- Implicit Grant type - Implicit grant type is used for user authentication or access token requests. Access tokens are transmitted via browser.
- Authorization Code - This supports for client authentication and It retrieves tokens from back channel and provide it to the fornt channel.
- Hybrid type - is a combination of Implicit and authorization code flow. In our application it says, response type as id_token, In here it has used Hybrid grant type. This method is recommended for native application that want to retrive access tokens and use for server side application and desktop/mobile applications.
- ClientCredintials - this is the simplest grant type and used for serever to server communication, client needs to authenticate with tooken server by passing client id and secret. after client authentication, it gets a access token back.
- Resource Owner Password - This allows to request a token behalf of a user with username and password, It's more user oriented, not base on a client
- Refresh tokens - This method allows requesting access tokesns without user interaction, ms=ost suitable for long runnning api calls. application needs to specify offlline-access to use this method.
In our testWebClient has used Hybrid Grant type up to now, Let's add Implicit Grant type into our client and see how it goes.
Add few more client properties into client specified in token server.
- Allowed Grant Type as Implicit - set the allowed interaction with the token service, since access tokens are transmitted via browser and application focus on for authentication and access token requests
- Redirect Uri means to where identity and access tokens needs to sent, It is pointing to /signin-oidc
- Scopes are going to define which resources client is allowed to access, After getting authenticated, clients can access set of resiurces which was protected. We basiclay add scopes similar to identity data as userID, name, email address. OPenId means, subject id, profile contains first name and last name etc.

public static List<Client> GetClients ()
{
return new List<Client>
{
new Client
{
ClientId = "testWebClient",
ClientName = "testWebClient",
AllowedGrantTypes = GrantTypes.Implicit,
RedirectUris = new List<string> { "http://localhost:51686/signin-oidc" },
PostLogoutRedirectUris = new List<string> { "http://localhost:51686/" },
AllowedScopes = new List<string>
{
IdentityServerConstants.StandardScopes.OpenId,
IdentityServerConstants.StandardScopes.Profile,
IdentityServerConstants.StandardScopes.Email
}
}
};
}
4.3 Invalid Scope error message
Run the application, It shows another error as Invalid scope,

Scopes says what client can acces, Eventhough we have passed client scopes, we haven't mentioned token server side scopes.
scopes are modeled as resources in identiy server. Identity server has two different type of scopes. Identity Resources & API resources.
Identty resource allows to model a scope that returns bunch of claims, claims means protected values.
API resources going to model access to a protected resource, an API service
Let's add Identity resources and API resources into our application.
We have added IdentityResources to our application, Let's see what they are,
OpenId, Profile and Email are standard openId connect scopes aded referring to Identity server. These values will be returned after authentication.
Next we added a custom identity resource as role that returns role claims for authenticated user.
public static List<IdentityResource> GetIdentityResources()
{
return new List<IdentityResource>
{
new IdentityResources.OpenId(),
new IdentityResources.Profile(),
new IdentityResources.Email(),
new IdentityResource
{
Name = "role",
UserClaims = new List<string> {"role" }
}
};
}
Let's add API Resources as well. We have added a api customAPI to protect. This API includes two different scopes that can requested using customAPI.read and customAPI.write User role claim will be added to any token with this scope along with scope secret.

public static List<ApiResource> GetApiResources()
{
return new List<ApiResource>
{
new ApiResource
{
Name = "customAPI",
DisplayName = "Custom API",
Description = "Custom API Access",
Scopes = new List<Scope>
{
new Scope("customAPI.read"),
new Scope("customAPI.write")
},
UserClaims = new List<string> {"role"},
ApiSecrets = new List<Secret> {new Secret("scopeSecret".Sha256())},
}
};
}
Let's attatch Identity Resources into Identty servre in startup method.
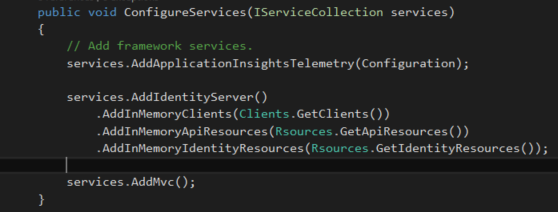
services.AddIdentityServer() .AddInMemoryClients(Clients.GetClients()) .AddInMemoryApiResources(Rsources.GetApiResources()) .AddInMemoryIdentityResources(Rsources.GetIdentityResources());
Run the application, when hit on contact link, it moves into connect/authorize method. In response it states 302 - Found, and redirects to /account/login as mentioned in location property of response header.

When we click on login method entry in console, it shows as below. It redirects to /account/login method. In token server, login method is not yet implemented. Let's implement it.
Add AccountController into Controllers folder,
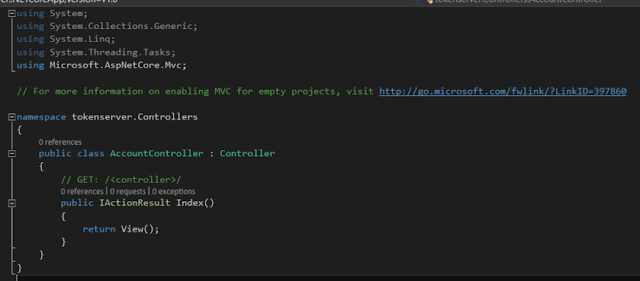
Let's implement Login method in Account controller, Login method requires returnUrl as a parameter,

[HttpGet]
public IActionResult Login (string returnUrl)
{
return View();
Create Account folder in Views folder and add Login view into Views folder.
We need to create a form to login, add username and password fields in view.
Add LoginViewModel class in ViewModels folder and define properties in it as below.

public class LoginViewModel
{
[Required]
public string UserName { get; set; }
[Required]
[DataType(DataType.Password)]
public string Password { get; set; }
[Display(Name = "Remember me?")]
public bool RememberMe { get; set; }
public string ReturnUrl { get; set; }
}
Go to Login view, and add username and passwords fields along with remember me option, In asp.net form post action is configured to be Login method.
We have to add Login action method in Account controller with LoginViewModel

@model tokenserver.ViewModels.LoginViewModel
<section>
<form asp-controller="Account" asp-action="Login"
asp-route-returnurl="@ViewData["ReturnUrl"]" method="post"
class="form-horizontal">
<h4>Use a local account to log in.</h4>
<hr />
<div asp-validation-summary="All" class="text-danger"></div>
<input type="hidden" asp-for="ReturnUrl" />
<div class="form-group">
<label asp-for="UserName" class="col-md-2 control-label"></label>
<div class="col-md-10">
<input asp-for="UserName" class="form-control" />
<span asp-validation-for="UserName" class="text-danger"></span>
</div>
</div>
<div class="form-group">
<label asp-for="Password" class="col-md-2 control-label"></label>
<div class="col-md-10">
<input asp-for="Password" class="form-control" />
<span asp-validation-for="Password" class="text-danger"></span>
</div>
</div>
<div class="form-group">
<div class="col-md-offset-2 col-md-10">
<div class="checkbox">
<label asp-for="RememberMe">
<input asp-for="RememberMe" />
@Html.DisplayNameFor(m => m.RememberMe)
</label>
</div>
</div>
</div>
<div class="form-group">
<div class="col-md-offset-2 col-md-10">
<button type="submit" class="btn btn-default">Log in</button>
</div>
</div>
<p>
<a asp-action="Register"
asp-route-returnurl="@ViewData["ReturnUrl"]">
Register as a new user?</a>
</p>
<p>
<a asp-action="ForgotPassword">Forgot your password?</a>
</p>
</form>
</section>
</div>
</div>
private UserManager<IdentityUser> _userManager;
private IIdentityServerInteractionService _interaction;
public AccountController(UserManager<IdentityUser> userManager, IIdentityServerInteractionService interaction)
{
_userManager = userManager;
_interaction = interaction;
}
[HttpPost]
public async Task<IActionResult> Login (LoginViewModel loginViewModel)
{
if(ModelState.IsValid)
{
var identityUser = await _userManager.FindByNameAsync(loginViewModel.UserName);
if(identityUser != null
&& await _userManager.CheckPasswordAsync(identityUser, loginViewModel.Password))
{
AuthenticationProperties properties = null;
if(loginViewModel.RememberMe)
{
properties = new AuthenticationProperties
{
IsPersistent = true
};
}
await HttpContext.Authentication.SignInAsync(identityUser.Id, identityUser.UserName);
if (_interaction.IsValidReturnUrl(loginViewModel.ReturnUrl))
return Redirect(loginViewModel.ReturnUrl);
return Redirect("~/");
}
ModelState.AddModelError("", "Invalid username or password.");
}
return View(loginViewModel);
}
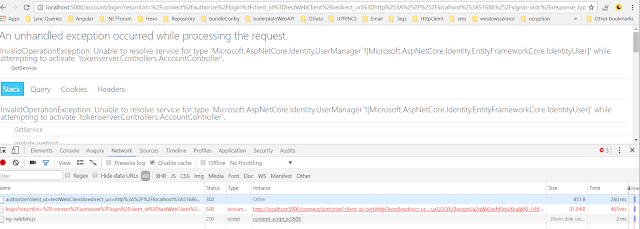
Run the application and provide user credintials and hit on login button and this error comes up. It says unable to resolve service for type Usermanager
Add identity configuration service into ConfigureService method. Add Microsoft.AspNetCore.Identity.EntityFrameworkCore reference to resolve reference errors.
Enable ASP.NET identity to request pipeline in Configure mthod just above identityserver() method
We have added entityframework type of store to save identity information. Let's add database context and connection string to the store. Add missing reference as Microsoft.EntityFrameworkCore
We have to create ApplicationDbContext class to hold db objects, let's add it. Inherit Application Db Context class from Identity Db Context and call base class method in constructor.
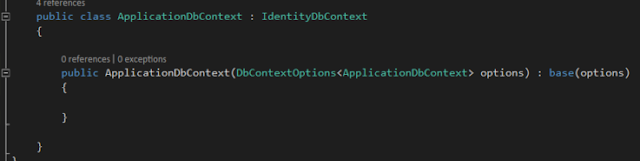
internal class ApplicationDbContext : IdentityDbContext
{
public ApplicationDbContext (DbContextOptions<ApplicationDbContext> options) : base(options)
{
}
}
Startup method implementation as follows,

Run the application and try to login to the system, It says following error It says application cant open the database. We haven't created the database yet. Lets try to created it.

EFCore supports to implements clients, scpopes and persistant grant store using relational database provider, because of that in each and every deploy, database will not get created. since we are using a datase to persist.
Create a seperate method in startup class to define database contexts
Persisted Grant Db Context is going to define all grant types application use.
Migrate and apply changes in Persisted Grant Db Context, Add IdentityServer4.EntityFramework.DbContexts and using System.Reflection
to provide context related information
Comment out all inmemory data management and add context for persisted grants.
Go to Persisted Grant Db Context and view tables available in it. Grant types will be stored in here,
Let's run migrations on Persisted Grant Db Context, Go to cmd and go to solution path and type dotnet ef It says no executable find for dotnet-ef

Add "Microsoft.EntityFrameworkCore.Tools": "1.1.0-preview4-final" in dependencies section in project.json file
Add "Microsoft.EntityFrameworkCore.Tools.DotNet": "1.1.0-preview4-final"
in tools section since we are using dotnet - ef tools
run dotnet ef and verify we can run ef migrations from cmd
run dotnet ef migrations add InitialIdentityServerMigration -c PersistedGrantDbContext command to migrate Persisted grant db context,
Check solution folder Migrations folder is created
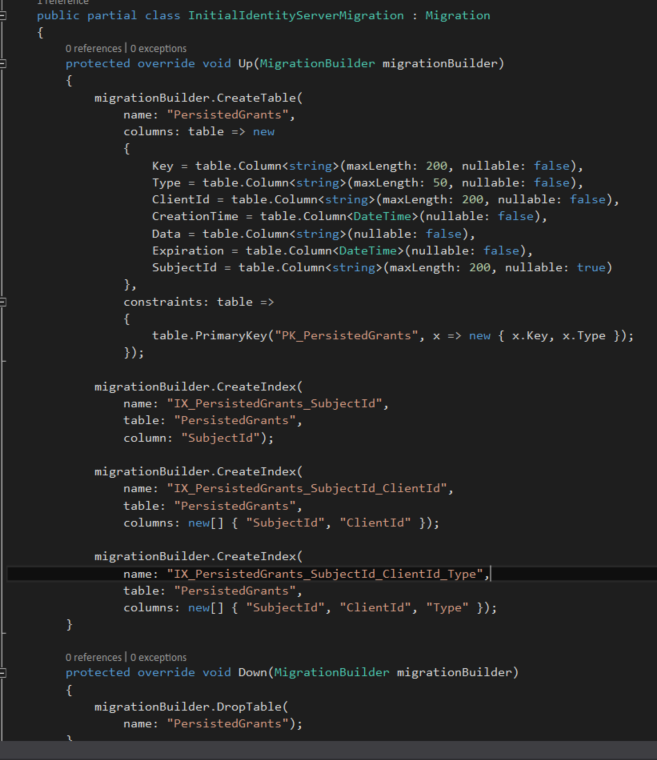
Open InitialIdentityServerMigration class and see what's there, Persisted Grants table is getting created from Persisted grant db context.
Before runing the application call databse context cration methods in configure method,

{
using (var scope = app.ApplicationServices
.GetService<IServiceScopeFactory>().CreateScope())
{
scope.ServiceProvider
.GetRequiredService<PersistedGrantDbContext>().Database.Migrate();
}
Let's run the application and see what happens, Persisted Grants table is created,
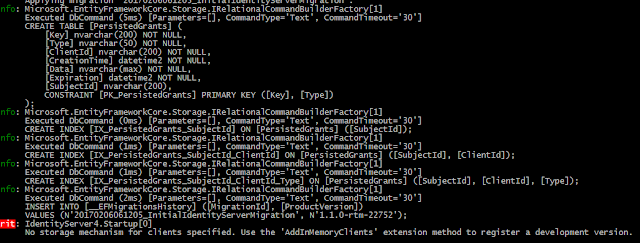
When we run the application, it gives an error, We haven't attached clients from our db context, Only grant types were created, Let's create clients as well
Add Configuration Db context into application scope
Attach configuration db context in startup method.
Run run dotnet ef migrations add InitialIdentityServerMigration -c ConfigurationDbContext to create Configuration database context.

Open InitialIdentityServerMigration class for configurations and check what are the available tables, Api resources, Clients, Identity resources etc.

Run the application to see changes, Token server runs without any issue,
Check the console window, API resources, Identity Resources and Clients tables are getting created.
View SQL Server object explorer and database is created, Available tables are seen like this. but Users table is not there

Let's add required services to create users table.
scope.ServiceProvider.GetRequiredService<ApplicationDbContext>().Database.Migrate();

Open InitialIdentityServerMigration for application db context, It shows users, roles etc
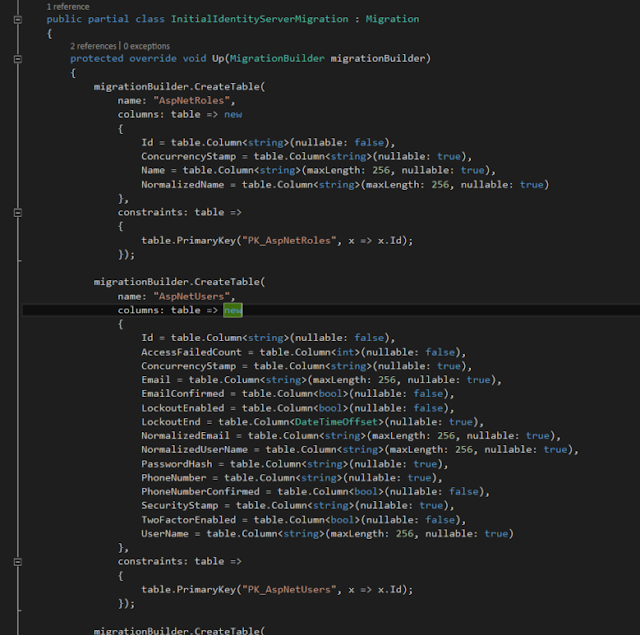
Run the application and see what happens, ASpnet users , roles are created, Refresh the database in
SQL server object explorer
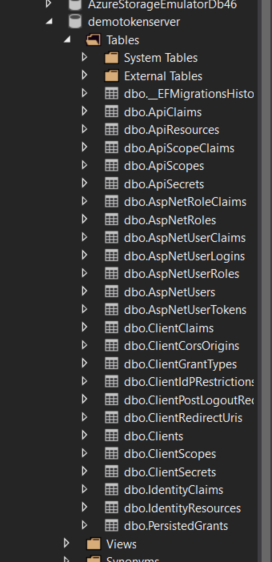
Let's add some data into these tables,
Get instance from configuration database context and add Clients, API resources and Identity resources as follows.

var context = scope.ServiceProvider.GetRequiredService<ConfigurationDbContext>();
if (!context.Clients.Any())
{
foreach (var client in Clients.GetClients())
{
context.Clients.Add(client.ToEntity());
}
context.SaveChanges();
}
if (!context.IdentityResources.Any())
{
foreach (var resource in Rsources.GetIdentityResources())
{
context.IdentityResources.Add(resource.ToEntity());
}
context.SaveChanges();
}
if (!context.ApiResources.Any())
{
foreach (var resource in Rsources.GetApiResources())
{
context.ApiResources.Add(resource.ToEntity());
}
context.SaveChanges();
}
Run the application, and data is inserted into the tables, Clients are inserted in clients table, In SQL server object explorer, right click on the clients table and select view data.

Add users into the application,

Run the application, and see what happens, After successfully login to the application it shows an error in consent method.
Consent controller is not defined by token server, let's add it
Add ConsentController into controllers folder. create Consent folder in Views folder and create index view in consent folder.
Go to consent index view and add this line of code.
Run the client and Identity server application. It shows consent view after a successful login. We have authorized contact page with identity server 4.

We can create a api/service application, when designing security for a web api, for every api request, we should check request is from an authenticated client or not. in each and every request, it passes an access token and validate the access token.
Create a new client with client credential grant types

new Client
{
ClientName = "client",
ClientId = "client",
AllowedGrantTypes = GrantTypes.ClientCredentials,
ClientSecrets = { new Secret("secret".Sha256()) },
AllowedScopes = { "customAPI.read"}
Change data records insert method as follows,
foreach (var client in Clients.GetClients())
{
if(context.Clients.FirstOrDefault(c => c.ClientId == client.ClientId) == null)
context.Clients.Add(client.ToEntity());
}
context.SaveChanges();
Go to Startup class and modify configure services method to return temperory sign in credintilas.
services.AddIdentityServer()
//.AddInMemoryClients(Clients.GetClients())
//.AddInMemoryApiResources(Rsources.GetApiResources())
//.AddInMemoryIdentityResources(Rsources.GetIdentityResources())
//.AddInMemoryUsers(Users.GetUsers())
.AddOperationalStore(store => store.UseSqlServer(connectionString, options => options.MigrationsAssembly(migrationsAssembly)))
.AddConfigurationStore(store => store.UseSqlServer(connectionString, options => options.MigrationsAssembly(migrationsAssembly)))
.AddTemporarySigningCredential();
Run the token server and try to connect to the token server using postman, Go to http://localhost:5000/connect/token, Add parameters as below.
It sends us an access token, We can use this token to call service methods/ api methods.

Go to a JWT token decoder and check what is available in JSON web token,


When we click on login method entry in console, it shows as below. It redirects to /account/login method. In token server, login method is not yet implemented. Let's implement it.

4.4 Implement Login method in Account Controller
Add AccountController into Controllers folder,

Let's implement Login method in Account controller, Login method requires returnUrl as a parameter,
[HttpGet]
public IActionResult Login (string returnUrl)
{
return View();
} Create Account folder in Views folder and add Login view into Views folder.
We need to create a form to login, add username and password fields in view.
Add LoginViewModel class in ViewModels folder and define properties in it as below.
public class LoginViewModel
{
[Required]
public string UserName { get; set; }
[Required]
[DataType(DataType.Password)]
public string Password { get; set; }
[Display(Name = "Remember me?")]
public bool RememberMe { get; set; }
public string ReturnUrl { get; set; }
}
Go to Login view, and add username and passwords fields along with remember me option, In asp.net form post action is configured to be Login method.
We have to add Login action method in Account controller with LoginViewModel

@model tokenserver.ViewModels.LoginViewModel
<div class="row">
<div class="col-md-8"><section>
<form asp-controller="Account" asp-action="Login"
asp-route-returnurl="@ViewData["ReturnUrl"]" method="post"
class="form-horizontal">
<h4>Use a local account to log in.</h4>
<hr />
<div asp-validation-summary="All" class="text-danger"></div>
<input type="hidden" asp-for="ReturnUrl" />
<div class="form-group">
<label asp-for="UserName" class="col-md-2 control-label"></label>
<div class="col-md-10">
<input asp-for="UserName" class="form-control" />
<span asp-validation-for="UserName" class="text-danger"></span>
</div>
</div>
<div class="form-group">
<label asp-for="Password" class="col-md-2 control-label"></label>
<div class="col-md-10">
<input asp-for="Password" class="form-control" />
<span asp-validation-for="Password" class="text-danger"></span>
</div>
</div>
<div class="form-group">
<div class="col-md-offset-2 col-md-10">
<div class="checkbox">
<label asp-for="RememberMe">
<input asp-for="RememberMe" />
@Html.DisplayNameFor(m => m.RememberMe)
</label>
</div>
</div>
</div>
<div class="form-group">
<div class="col-md-offset-2 col-md-10">
<button type="submit" class="btn btn-default">Log in</button>
</div>
</div>
<p>
<a asp-action="Register"
asp-route-returnurl="@ViewData["ReturnUrl"]">
Register as a new user?</a>
</p>
<p>
<a asp-action="ForgotPassword">Forgot your password?</a>
</p>
</form>
</section>
</div>
</div>
Run the application, It shows Login screen in the browser.
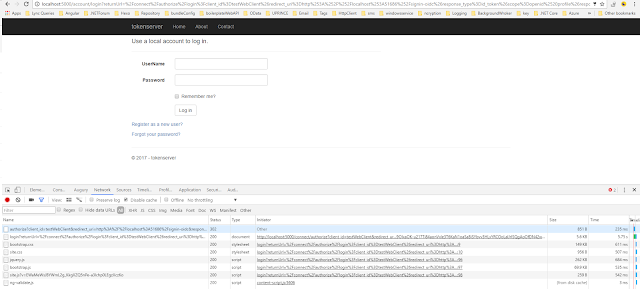
Let's add users to login into the system, Create a user class and add Username and password fields. InMemoryUser class is implemented in IdentityServer4.Services.InMemory, this is not supported in IdentityServer4 1.1.0 , It's supported in 1.0.0-rc5. Let's add that into project.json file.


internal class Users
{
public static List<InMemoryUser> GetUsers ()
{
return new List<InMemoryUser>
{
new InMemoryUser
{
Username = "hansamali",
Password = "hansamali"
}
};
}
}
services.AddIdentityServer()
.AddInMemoryClients(Clients.GetClients())
.AddInMemoryApiResources(Rsources.GetApiResources())
.AddInMemoryIdentityResources(Rsources.GetIdentityResources())
.AddInMemoryUsers(Users.GetUsers());
Create Login Post method in Account controller,
In this method, we are using IdentityUser in UserManager Store which used to manage persistance in an appalication.
Create UserManager instance, add required reference as Microsoft.AspNetCore.Mvc
UserManager instance needs to return IdentityUser,
Add required references as Microsoft.AspNetCore.Identity.EntityFrameworkCore
initialize userManager instance in AccountController constructor.

In UserManager instance, call FindByNameAsync method, It's asynchronous function, we need to use await before it. so we have to change method signature to async, Since async method return type shoud be void or Task<IHttpActionResult> change return type accordingly.
Retrieve identity User by passing user name, and check user password is valid by passing password along with user.
Create a AuthenticationProperties instance and add necessary reference for it, Microsoft.AspNetCore.Http.Authentication.
Set Authentication properties to store authentication details across multiple requests with IsPersistance true property.
call SignInAsync method with identity user id and username, We need to ensure return url is valid to redirect to authorized endpoint, to check validation we have to create a instance from IIdentityServerInteractionService instance and initialize it.


4.5 Attach Users into the token server
Let's add users to login into the system, Create a user class and add Username and password fields. InMemoryUser class is implemented in IdentityServer4.Services.InMemory, this is not supported in IdentityServer4 1.1.0 , It's supported in 1.0.0-rc5. Let's add that into project.json file.
internal class Users
{
public static List<InMemoryUser> GetUsers ()
{
return new List<InMemoryUser>
{
new InMemoryUser
{
Username = "hansamali",
Password = "hansamali"
}
};
}
}
Let's attach users into identity server,

services.AddIdentityServer()
.AddInMemoryClients(Clients.GetClients())
.AddInMemoryApiResources(Rsources.GetApiResources())
.AddInMemoryIdentityResources(Rsources.GetIdentityResources())
.AddInMemoryUsers(Users.GetUsers());
4.6 Implement User Login POST method in Account Controller
Create Login Post method in Account controller,
In this method, we are using IdentityUser in UserManager Store which used to manage persistance in an appalication.
Create UserManager instance, add required reference as Microsoft.AspNetCore.Mvc
UserManager instance needs to return IdentityUser,
Add required references as Microsoft.AspNetCore.Identity.EntityFrameworkCore
initialize userManager instance in AccountController constructor.
private UserManager _userManager;
public AccountController(UserManager userManager) { _userManager = userManager; }
In UserManager instance, call FindByNameAsync method, It's asynchronous function, we need to use await before it. so we have to change method signature to async, Since async method return type shoud be void or Task<IHttpActionResult> change return type accordingly.
Retrieve identity User by passing user name, and check user password is valid by passing password along with user.
Create a AuthenticationProperties instance and add necessary reference for it, Microsoft.AspNetCore.Http.Authentication.
Set Authentication properties to store authentication details across multiple requests with IsPersistance true property.
call SignInAsync method with identity user id and username, We need to ensure return url is valid to redirect to authorized endpoint, to check validation we have to create a instance from IIdentityServerInteractionService instance and initialize it.

private UserManager<IdentityUser> _userManager;
private IIdentityServerInteractionService _interaction;
public AccountController(UserManager<IdentityUser> userManager, IIdentityServerInteractionService interaction)
{
_userManager = userManager;
_interaction = interaction;
}
[HttpPost]
public async Task<IActionResult> Login (LoginViewModel loginViewModel)
{
if(ModelState.IsValid)
{
var identityUser = await _userManager.FindByNameAsync(loginViewModel.UserName);
if(identityUser != null
&& await _userManager.CheckPasswordAsync(identityUser, loginViewModel.Password))
{
AuthenticationProperties properties = null;
if(loginViewModel.RememberMe)
{
properties = new AuthenticationProperties
{
IsPersistent = true
};
}
await HttpContext.Authentication.SignInAsync(identityUser.Id, identityUser.UserName);
if (_interaction.IsValidReturnUrl(loginViewModel.ReturnUrl))
return Redirect(loginViewModel.ReturnUrl);
return Redirect("~/");
}
ModelState.AddModelError("", "Invalid username or password.");
}
return View(loginViewModel);
}
Run the application and provide user credintials and hit on login button and this error comes up. It says unable to resolve service for type Usermanager

4.7 Create Database
Add identity configuration service into ConfigureService method. Add Microsoft.AspNetCore.Identity.EntityFrameworkCore reference to resolve reference errors.
services.AddIdentity<IdentityUser, IdentityRole>().AddEntityFrameworkStores<ApplicationDbContext>();app.UseIdentity();We have added entityframework type of store to save identity information. Let's add database context and connection string to the store. Add missing reference as Microsoft.EntityFrameworkCore
string connectionString = @"Data Source=(LocalDb)\MSSQLLocalDB;database=demotokenserver;trusted_connection=yes;"; services.AddDbContext<ApplicationDbContext>(options => options.UseSqlServer(connectionString));
internal class ApplicationDbContext : IdentityDbContext
{
public ApplicationDbContext (DbContextOptions<ApplicationDbContext> options) : base(options)
{
}
}
Startup method implementation as follows,

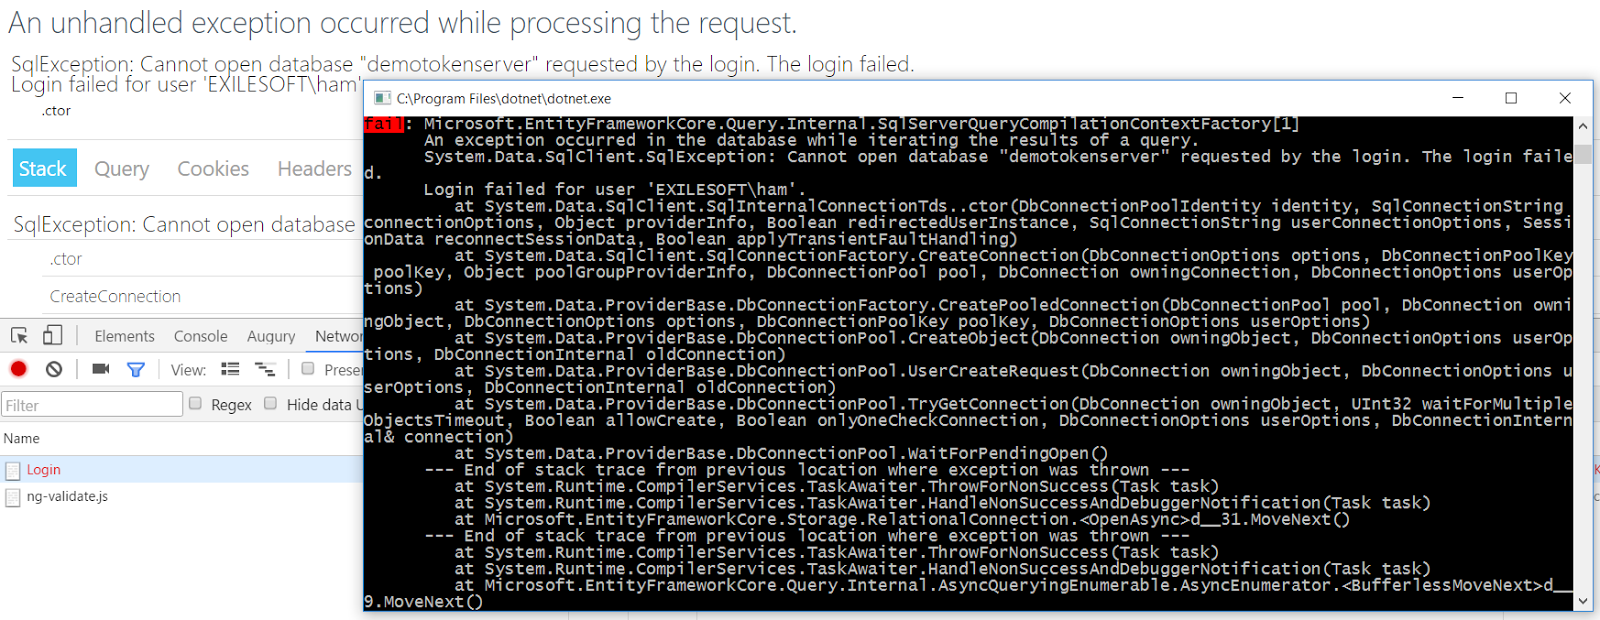
Run the application and try to login to the system, It says following error It says application cant open the database. We haven't created the database yet. Lets try to created it.
4.8 Add Database Migrations
EFCore supports to implements clients, scpopes and persistant grant store using relational database provider, because of that in each and every deploy, database will not get created. since we are using a datase to persist.
Create a seperate method in startup class to define database contexts
Persisted Grant Db Context is going to define all grant types application use.
Migrate and apply changes in Persisted Grant Db Context, Add IdentityServer4.EntityFramework.DbContexts and using System.Reflection
to provide context related information
scope.ServiceProvider.GetRequiredService().Database.Migrate();
Comment out all inmemory data management and add context for persisted grants.
var migrationsAssembly = typeof(Startup).GetTypeInfo().Assembly.GetName().Name; services.AddIdentityServer()
//.AddInMemoryClients(Clients.GetClients())
//.AddInMemoryApiResources(Rsources.GetApiResources())
//.AddInMemoryIdentityResources(Rsources.GetIdentityResources())
//.AddInMemoryUsers(Users.GetUsers());
.AddOperationalStore(store => store.UseSqlServer(connectionString, options => options.MigrationsAssembly(migrationsAssembly)));Go to Persisted Grant Db Context and view tables available in it. Grant types will be stored in here,
Let's run migrations on Persisted Grant Db Context, Go to cmd and go to solution path and type dotnet ef It says no executable find for dotnet-ef

Add "Microsoft.EntityFrameworkCore.Tools": "1.1.0-preview4-final" in dependencies section in project.json file
Add "Microsoft.EntityFrameworkCore.Tools.DotNet": "1.1.0-preview4-final"
in tools section since we are using dotnet - ef tools
run dotnet ef and verify we can run ef migrations from cmd
run dotnet ef migrations add InitialIdentityServerMigration -c PersistedGrantDbContext command to migrate Persisted grant db context,
Check solution folder Migrations folder is created
Open InitialIdentityServerMigration class and see what's there, Persisted Grants table is getting created from Persisted grant db context.
Before runing the application call databse context cration methods in configure method,

{
using (var scope = app.ApplicationServices
.GetService<IServiceScopeFactory>().CreateScope())
{
scope.ServiceProvider
.GetRequiredService<PersistedGrantDbContext>().Database.Migrate();
}
} Let's run the application and see what happens, Persisted Grants table is created,
When we run the application, it gives an error, We haven't attached clients from our db context, Only grant types were created, Let's create clients as well

Add Configuration Db context into application scope
scope.ServiceProvider.GetRequiredService<ConfigurationDbContext>().Database.Migrate();services.AddIdentityServer()
//.AddInMemoryClients(Clients.GetClients())
//.AddInMemoryApiResources(Rsources.GetApiResources())
//.AddInMemoryIdentityResources(Rsources.GetIdentityResources())
//.AddInMemoryUsers(Users.GetUsers());
.AddOperationalStore(store => store.UseSqlServer(connectionString, options => options.MigrationsAssembly(migrationsAssembly)))
.AddConfigurationStore(store => store.UseSqlServer(connectionString, options => options.MigrationsAssembly(migrationsAssembly)));Run run dotnet ef migrations add InitialIdentityServerMigration -c ConfigurationDbContext to create Configuration database context.

Open InitialIdentityServerMigration class for configurations and check what are the available tables, Api resources, Clients, Identity resources etc.

Run the application to see changes, Token server runs without any issue,
Check the console window, API resources, Identity Resources and Clients tables are getting created.
View SQL Server object explorer and database is created, Available tables are seen like this. but Users table is not there
Let's add required services to create users table.
scope.ServiceProvider.GetRequiredService<ApplicationDbContext>().Database.Migrate();

Open InitialIdentityServerMigration for application db context, It shows users, roles etc

Run the application and see what happens, ASpnet users , roles are created, Refresh the database in
SQL server object explorer
Let's add some data into these tables,
Get instance from configuration database context and add Clients, API resources and Identity resources as follows.

var context = scope.ServiceProvider.GetRequiredService<ConfigurationDbContext>();
if (!context.Clients.Any())
{
foreach (var client in Clients.GetClients())
{
context.Clients.Add(client.ToEntity());
}
context.SaveChanges();
}
if (!context.IdentityResources.Any())
{
foreach (var resource in Rsources.GetIdentityResources())
{
context.IdentityResources.Add(resource.ToEntity());
}
context.SaveChanges();
}
if (!context.ApiResources.Any())
{
foreach (var resource in Rsources.GetApiResources())
{
context.ApiResources.Add(resource.ToEntity());
}
context.SaveChanges();
}
Run the application, and data is inserted into the tables, Clients are inserted in clients table, In SQL server object explorer, right click on the clients table and select view data.

Add users into the application,

var usermanager = scope.ServiceProvider.GetRequiredService<UserManager<IdentityUser>>();
if (!usermanager.Users.Any())
{
   foreach (var inMemoryUser in Users.GetUsers())
   {
      var identityUser = new IdentityUser(inMemoryUser.Username)
      {
         Id = inMemoryUser.Subject
      };


      foreach (var claim in inMemoryUser.Claims)
      {
         identityUser.Claims.Add(new IdentityUserClaim<string>
         {
             UserId = identityUser.Id,
             ClaimType = claim.Type,
             ClaimValue = claim.Value,
          });
        }


        usermanager.CreateAsync(identityUser, "Password123!").Wait();

            }

       }


 }
4.9 Add Consent View
Run the application, and see what happens, After successfully login to the application it shows an error in consent method.
Consent controller is not defined by token server, let's add it
Add ConsentController into controllers folder. create Consent folder in Views folder and create index view in consent folder.
Go to consent index view and add this line of code.
Run the client and Identity server application. It shows consent view after a successful login. We have authorized contact page with identity server 4.
5 Demo : Create Client application - Service/API application
5.1 Connect to a client using client credentials
We can create a api/service application, when designing security for a web api, for every api request, we should check request is from an authenticated client or not. in each and every request, it passes an access token and validate the access token.
Create a new client with client credential grant types
new Client
{
ClientName = "client",
ClientId = "client",
AllowedGrantTypes = GrantTypes.ClientCredentials,
ClientSecrets = { new Secret("secret".Sha256()) },
AllowedScopes = { "customAPI.read"}
} Change data records insert method as follows,
foreach (var client in Clients.GetClients())
{
if(context.Clients.FirstOrDefault(c => c.ClientId == client.ClientId) == null)
context.Clients.Add(client.ToEntity());
}
context.SaveChanges();
Go to Startup class and modify configure services method to return temperory sign in credintilas.
services.AddIdentityServer()
//.AddInMemoryClients(Clients.GetClients())
//.AddInMemoryApiResources(Rsources.GetApiResources())
//.AddInMemoryIdentityResources(Rsources.GetIdentityResources())
//.AddInMemoryUsers(Users.GetUsers())
.AddOperationalStore(store => store.UseSqlServer(connectionString, options => options.MigrationsAssembly(migrationsAssembly)))
.AddConfigurationStore(store => store.UseSqlServer(connectionString, options => options.MigrationsAssembly(migrationsAssembly)))
.AddTemporarySigningCredential();
- grant_type as client_credentials
- scope as customAPI.read
- client_id as client
- client_secret as secret
- username as hansamali
- password as 123456
It sends us an access token, We can use this token to call service methods/ api methods.

Go to a JWT token decoder and check what is available in JSON web token,

6 Download
6.1 Tech Net Gallery
You can download source code from here, https://gallery.technet.microsoft.com/Secure-a-NETCore-web-4b16c717
6.2 GitHub
You can find the same application in github, https://github.com/hansamaligamage/ASP.NETCoreSecurity
7 Conclusion
This article explains how to secure a ASP.NET Core web application using Identity Server 4, At first it describes how to create a self managed centralized authorization server using ASP.NET Core web application and Identity Server 4, to manage resources like clients, users and grants it uses in memory stores and then move into SQL server database with ASP.NET Identity and access it through EntityframeworkCore. A service application, API service also can connect to the authorization server and get an access token and get authenticated itself.
8 See Also
If you want to know more about .NET Core, check these articles
- Install .NETCore in a Linux server
- .NET Core with a Linux server: Hello World!
- Create a web application in.NETCore with a Linux server
- .NET Core: Create web application with Yeoman template generator
- Create a Web API application in ASP.NETCore
9 References
- Introduction to Identity
- IdentityServer 4
- Building Secure Web APIs with ASP.NET Core
- Web API Design - Security
- Security in ASP.NET 5 and MVC 6
- Security and Authorization in .NET Core World
- ASP.NET Core Authorization with Barry Dorrans
- Advanced ASP.NET Core Authorization with Barry Dorrans
- IdentityServer 4 repository
- Implementing custom password policy using ASP.NET Identity