Thursday, June 30, 2016

Create a simple smtp email with html body

Smtp Email


Smtp Client


To create a smtp client, we need to specify a smtp host and port, port is an optional parameter.
for some Smtp clients, we need to provide credintials. we need a NetworkCredintial instance for that. We can use Secure Socket Layer (SSL) to encrypt the connection.


var client = new SmtpClient(host, Convert.ToInt32(port))
   {
      UseDefaultCredentials = true,
      Credentials = new NetworkCredential(username, password),
       EnableSsl = true
  };


This shows how to instantiate a smtp client, If you are using gmail, host is smtp.gmail.com or else some specific smtp server. If port is available, specify the port.

Mail Message

After working with Smtp client, then we need is MailMessage object.


    MailMessage message = new MailMessage();
    message.From = new MailAddress(fromAddress);
    foreach (string address in toAddress)
      message.To.Add(address);
    message.Subject = subject;
    message.Body = body;
    message.IsBodyHtml = true;

MailMessage from and to should be MailAddress instances.

In this example we used IsBodyHtml attribute, to notify mail body can be a html string.

Complete code is shown below


public static bool SendEmail(string host, int port, string username, string password, string fromAddress, List toAddress, string subject, string body) 


 bool emailSent = false; 

 MailMessage message = new MailMessage(); 
 message.From = new MailAddress(fromAddress); 

foreach (string address in toAddress) 
  message.To.Add(address); 
message.Subject = subject; 
message.Body = body; 
message.IsBodyHtml = true; 

var client = new SmtpClient(host, Convert.ToInt32(port)) 

  UseDefaultCredentials = true, 
  Credentials = new NetworkCredential(username, password), 
  EnableSsl = true 
}; 

try 

  client.Send(message); 
  emailSent = true; 
  logger.Info(string.Format("Email sent from {0} to {1}", fromAddress, 
               string.Join(",", toAddress))); 

catch (Exception ex) 

  emailSent = false; 
  logger.Error(ExceptionHandler.ToLongString(ex)); 


return emailSent; 

}

Downloads


TechNet Gallery


GitHub


Sunday, May 29, 2016

Log messages using NLog framework

Many of the systems, we develop today needs some kind of a logging/tracing mechanism to identify issues or any kind of information.

NLog


NLog is a free logging framework to log various kind of messages into a specified place. We can use NLog in a .NET environment, as well as with Xamarin and Windows phone.

 Logging


If we want to log a message from our application, We can use EventViewer without any libraries. But If we want to share the log file with someone else and analyse it in the future, we can't do that with Eventviewer.
So we have to go for a logging framework if we want to write messages into a file or a database.

Logging Frameworks


We can use any of these frameworks for logging purpose, Log4net, NLog, ELMAH, Microsoft Enterprise Library, NSpring.

ELMAH is a web logging framework, All the other frameworks can be used with any .NET type of application.

 When we use NLog or Log4net for logging, it takes just few minutes to integrate it to the application, But performancewise its not the same. NLog is much faster than Log4net and as well as all the above mentioned logging frameworks.

 NSpring also easy to setup, but it requires more coding to log a message. With a large scale enterprise application, It will be tedious to work with NSpring.

 Microsoft Enterprise Library (EntLib) is much faster, But need heavy configurations and coding to work with it. ELMAH is a web logger, It's going to log the messages into a xml file by default.

 If you application needs file logging and more performance, better to go with NLog or NSpring. We can use Log4net also, it's not that much faster, but easy to setup and use it in the application


Install NLog


Latest stable version of NLog is NLog 4.3.5.
With Nuget Package manager, I installed NLog,

NLog installation

NLog Targets


 NLog targets are used to show, store or pass the message into another destination.  Some commonly used NLog targets are shown below,
 * Console : writes message to a console window.
 * Event Log : writes message to event viewer.
 * Debugger : writes messagee to the attatched debugger.
 * File : writes log message to a file.
 * Database : store log message in database.
 * Memory : can write log message into a arraylist in memory.
 * Mail : send log message by email.
 * Method call : For log message, calls specific static method.
 * Network : send log message over a network.
 * Service : calls a web service for each log message.

And if these targets dont satisfy your requirements, you can create your own targets as well, (custom target)

Target Layout


 Target layout means how our log message is going to display, in which format, which order. We can create custom layout renders as well. Commonly used layouts are as follows,
 * ${callsite} : Class name, method name or source information of the log message.
 * ${callsite-linenumber} : line no of call site source.
 * ${date} : date and time
 * ${exception} : exception details
 * ${level} : log level
 * ${logger} : logger name
 * ${longdate} : date and time in long format.
 * ${message} : log message.
 * ${stacktrace} : stack trace

NLog rules


 NLog rules are called as a log routing table. It's going to matches with a target and writes into a log with specified layout. Some of the attributes in NLog rules,

 * name : logger name,
 * minlevel : minimum log level for a rule to match
 * maxlevel : maximum log level for a rule to match
 * level : single log level for a rule to match
 * levels : comma seperated list of logs for a rule to match
 * write to : comma seperated list of targets to be written when a rule matches
 * final : no further rules are processed when this rule matches
 * enabled : going to disable/enable rules

Nlog levels


 One thing to note, In these level attribute, log messages are ordered from type. Trace is the minlevel log type, then Debug, Info, Warn, Error and Fatal.

 * Trace level can be used when we need to notify the begining and end of a method
 * Debug logs, we can identify whether session is expired, user is authenticated
 * Info logs are used for more generic scenarios like, Email sent.
 * Warn level can be used to notify warnings
 * Error logs are used for exceptions and when application crashes.
 * Fatal logs are highest level, used for most important cases.

Let's see what's in action


 In configuration file, I have configured log type and log level, I have used file logging, Trace as a minimum logging level.


 In code, I have written like this,


Let's check how it's written in the log file


In output, we can see the layout has been applied, ${longdate} ${callsite} ${callsite-linenumber} ${date} ${level} ${message}

How to use multiple targets


Let's see how to add multiple targets for logging


In configuration file, i added two targets, one is to log into a file, other target is to log into a console window


 File logging output is same as previous output, console output is seems like this. In console logging, I used a different layout like this, ${date} ${callsite} ${level} ${message} and minimmum log level is added as Warning level, So output got changed like this.

Download

TechNet Gallery

GitHub

References

Friday, April 22, 2016

LINQ comes to rescue!


LINQ comes to rescue!

Today, I'm going to explain a very small but tricky code part, We daily see this, but never give it a second glance, because of that we miss this in many places :)

Let's first create a simple class


we have list of cars, like this.


I want to set 'Milege' property as  '100' when year is '2015' 
so, what's the method comes into your mind ?
for loop, foreach or while loop, Iterations are not so good when it comes to the performance.

With the help of LINQ, we can perform the filtering and modification both in just one line :)

In LINQ world, we have many operations to filter, to projection, to modify and many more.

Here is the solution from LINQ,


Yes, It's difficult to read the code though, But if you have performance concerns, and want to write the program with few lines of code, You can get use of this LINQ query.

Thursday, March 3, 2016

ODATA Reads with Parameters

Data READs with Parameters


In this post, We'll focus on how to read a OData service with a parameter.

Service method with a parameter


Now, we'll see how to retrieve data with a parameter,

Url in the browser


In the browser, we can see only filtered students. in the url, append the parameter with the values.

Power Query Window


From the Power Query window, we can see the dataset like this.

Saturday, February 20, 2016

ODATA Reads


Data READs


Let's start with a newer version of ODATA to access data from a existing service, In this solution I have used Web API 2.2 with ODATA v4

ODATA v4 package

Visual Studio has a built in package to create ODATA v4 services, Package contains all the libraries required to create a ODATA v4 endpoint.

Integrate ODATA v4 package into solution

We can add the necessary OData package into solution like this, Select Microsoft ASP.NET Web API 2.2 for OData v4.0


All the relevant libraries are installing 


Register the OData endpoint 

Register the service endpoint in Register method of the WebApiConfig file


In line no 22, I have exposed the Student entity, Data read method is implemented in the OData controller (StudentController)

Student Controller implements OData Controller


StudentController inherits from OData Controller, So all the CRUD operations can be implemented in this controller.

How it works in the browser

now ping to the OData endpoint,


We can see all the available entities in the endpoint with metadata

Read Students


By appending entity (Student) into url, we can read the student data

Read Data types

We can read the data types of student using the $metadata tag

Excel 2016 with OData v4

We already know office is not only for manipulating documents, We can perform many advanced queries with Excel.
Excel supports to fetch data from different other sources, newer update is OData sources 


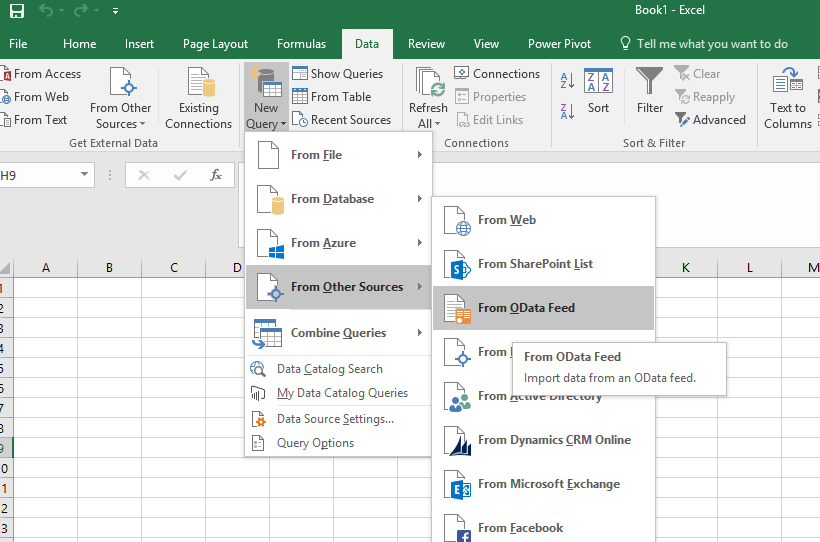
In excel 2016, We can connect to a OData source like this,

But we get an error!!!!!!

It clearly says OData v3 or any earlier data feeds only can be integrated with Excel 2016 :)
But, for your information, 
With Office 2016 as well as the 2013, we can integrated OData v3 

Excel 2013 & OData v4 ? 

With Excel 2013, ODATA v4 is not compatible. But we can use a V3 format service with Excel 2013.


 Excel 2016 with OData v4 - Power Query

With ODATA v4, we can't use ODATA source option, But we have Power Query option to analyse data.


In the Data tab, we have many options to fetch data from different other sources, We can select 'From OData Feed' option.

We can use Office 2016 Power Query option with OData v4.

Power Query Editor

This is the query editor, we can select/remove columns, can remove duplicates, group by a column, create a new column based on a mathematical function and much more advanced operations.

In the next section, we'll see how to read data by passing a value 😀

I could create a github repo for this code sample, Please feel free to check it, https://github.com/hansamaligamage/ODATAExample


Saturday, January 9, 2016

ODATA Features

ODATA

ODATA is a open data protocol to access data using REST architecture. ODATA is a Microsoft standard, but available with Android & IOS platforms as well. ODATA supports for JSON and Atom formats. With the help of ODATA , we can access data in variety of sources like relational databases, Web sites, File systems and Content Management Systems.

ODATA has more features than REST!

REST is an architectural pattern to implement a service, But with ODATA it's going to provide more features to more sources like File systems, Content Management Systems.
ODATA services supports for query options like filter, select, expand, order by and many more.
As per our requirement, we can filter the result set, order as we want. And we can skip some rows, Even we can select the top row as well.

It's 2016!!!!

Microsoft has introduced variety of features with Office 2016, We can implement a simple power BI solution just with Excel itself, If your old REST services are using ODATA protocol :)

ODATA Versions so far 

After ODATA V2 and ODATA V3, Now ODATA V4 has been released as a major release.
If you want to build a open data service, we can use ODATA v4 with WebAPI 2.2 as a solution,