Introduction
In this demonstration, We try to create a basic ASP.NET web application. By default User class is created and Register/Login methods are implemented. Let's see how we can add new properties to User class and customize Register method as we want.
No Authentication - When application don't need any type of user authentication, go for this type.
Individual User Accounts - When the application needs to store user information in a sql server database and allows to login to the app using stored data or else using existing credentials in facebook, google, microsoft or other third party provider.
Work & School Account - If you want to authenticate application users through azure, active directory or office 360, better to go with account type authentication
Windows Authentication - When you want to authenticate users with their windows login, use this type. It's mostly suitable for internal/organizational applications
In this application, we plan to store user information in a sql server database and enable user registration and user login.
Run the application and check Register & Login pages.
In Package Manager Console, type Enable-Migrations command to add migration classes.
<add name="DefaultConnection"
connectionString="Data Source=.; Initial Catalog=userAuthentication;Integrated Security=True" providerName="System.Data.SqlClient" />
Expand AspNetUsers table and check available columns in the table.
Type a short (weak) password to test the length complexity of a password, It shows a message as follows. In default password policy, password should be at least 6 characters lengthier.
Hit on Register button after entering password longer than 6 characters, It shows the following error. In default password policy, It has stated password should have at least non letter or digit character, password should have at least one digit and at least one uppercase character.
Type a valid password into the password field and view the record inserted in the AspNetUsers table. user email field is recorded in Email and UserName column, password is stored as a hash value in PasswordHash column, unique user Id field is inserted per user.
Go to ApplicationUserManager class in IdentityConfig, change the PasswordValidator property, set length to 10 characters.
Go to the Create method in ApplicationUserManager class, In PasswordValidator property, set password length to 10 characters.
Run the project and try with a weak password. Password should have at least 10 characters, If not validations errors comes up.
Create password history class to hold password history information. Password history table will be created from this class. Open IdentityModel class and create PasswordHistory class inside it.
Change the ApplicationUser class to hold password history. Initiate password history list inside the constructor.
Open IdentityConfig class and go to ApplicationUserManager class and initialize a variable to hold password history limit.
Add user and password hash into PasswordHistory table.
}
Try to change password, enter one of previous passwords from most recent 3 passwords. If below error message comes, we have successfully prohibited it.
We need to add DisplayName and Active fields into ApplicationUser, class. Let's see how we can do this. Go to ApplicationUser class in IdentityModel.cs file. Add attributes you want. (Active & DisplayName properties.) Update the database after adding new properties.
Add a reference to Account class in ApplicationUser.
public class ApplicationUser : IdentityUser
{
public int AccountId { get; set; }
public virtual Account Account { get; set; }
Add Account table into database context class as follows. Go to IdentityModel class and add Account table into ApplicationDbContext class.
public class ApplicationDbContext : IdentityDbContext
{
Create a web application
In this demo application, I'm using Visual Studio 2015 with .NET framework 4.5.2. and MVC5.
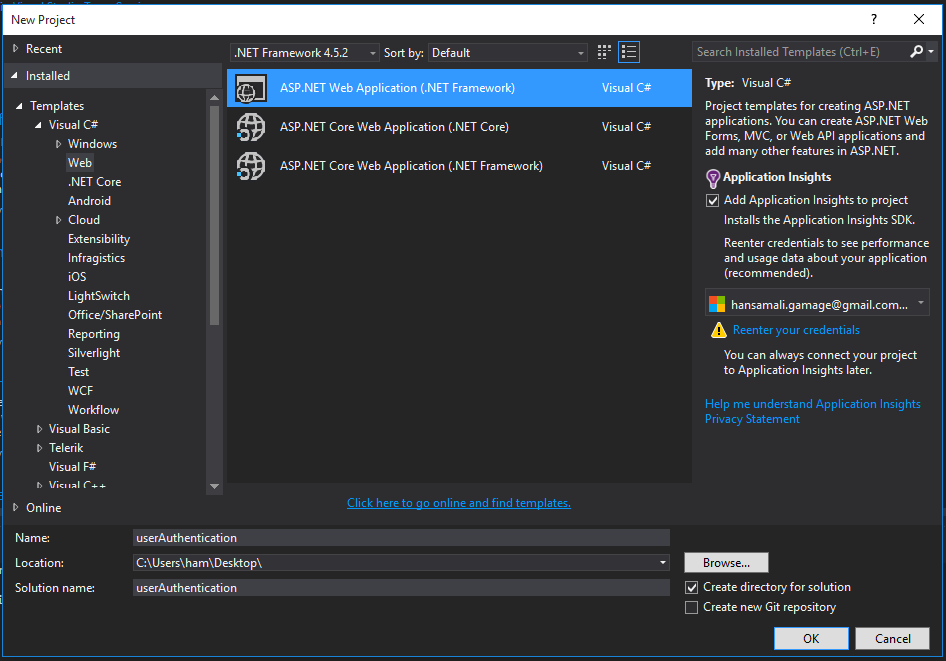
Create a web application by clicking on File -> New Project, Then following dialog appears.
Create a web application by clicking on File -> New Project, Then following dialog appears.
 |
| Create a new ASP.NET Web application |
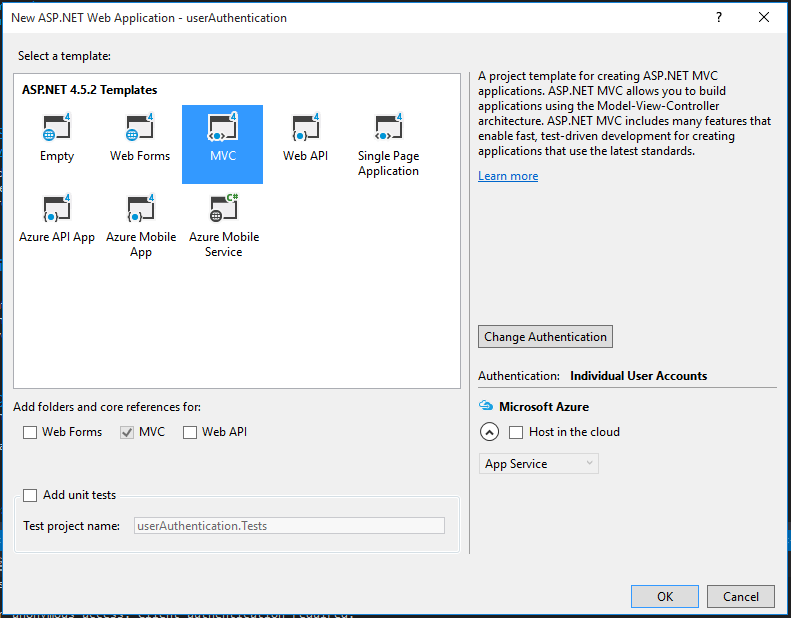
Select MVC as the template to create the application. Don't change the authentication, leave it as it is. Default authentication is Individual User accounts.
 |
| Select 'MVC' template |
ASP.NET application can have 4 type of authentication, default authentication type is Individual User accounts. For this demonstration, use default authentication type.
Let's see available user authentication types.
Let's see available user authentication types.
No Authentication - When application don't need any type of user authentication, go for this type.
Individual User Accounts - When the application needs to store user information in a sql server database and allows to login to the app using stored data or else using existing credentials in facebook, google, microsoft or other third party provider.
Work & School Account - If you want to authenticate application users through azure, active directory or office 360, better to go with account type authentication
Windows Authentication - When you want to authenticate users with their windows login, use this type. It's mostly suitable for internal/organizational applications
In this application, we plan to store user information in a sql server database and enable user registration and user login.
 |
| authentication types in a web application |
Web Application Structure
application structure looks like this.
 |
| web application structure |
Run the application and check Register & Login pages.
Create the database
Enable Migrations for the application
In the visual studio main menu, Go to Tools -> Nuget Package Manager -> Package Manager Console,In Package Manager Console, type Enable-Migrations command to add migration classes.
 |
| Enable migrations |
Define the connectionstring
Add the connectionstring in web.config file, point it to the sql server database.
 |
| Define the connectionstring for sql server database |
<add name="DefaultConnection"
connectionString="Data Source=.; Initial Catalog=userAuthentication;Integrated Security=True" providerName="System.Data.SqlClient" />
Update the database
Set AutomaticMigrationsEnabled property to true, By default it's false. Run the update command in package manager console, Database will be created.
 |
| Update the database |
Database is Created
Open the Sql server management studio and view the database.
 |
| database is created |
Expand AspNetUsers table and check available columns in the table.
 |
| AspNtUsers table |
Authentication implementation in the application
Register a new user in the application
Run the application and go to the User registration page. Register yourself in the application
 |
| User registration |
Type a short (weak) password to test the length complexity of a password, It shows a message as follows. In default password policy, password should be at least 6 characters lengthier.
 |
| password length complexity |
Hit on Register button after entering password longer than 6 characters, It shows the following error. In default password policy, It has stated password should have at least non letter or digit character, password should have at least one digit and at least one uppercase character.
 |
| password complexity policy |
Type a valid password into the password field and view the record inserted in the AspNetUsers table. user email field is recorded in Email and UserName column, password is stored as a hash value in PasswordHash column, unique user Id field is inserted per user.
 |
| records in AspNetUsers table |
Customize Password Policies
In this application, We have used ASP.NET Identity 2.2.1 to implement user authentication. Let's see how we can override these existing password policies.
Change the password length complexity to 10 characters
By default when we create a web application with Identity 2, user password length complexity is 6 characters. Let's try to change it to 10 characters.
App_Start folder holds ASP.NET MVC configurations from MVC4 onwards. In previous versions of MVC, all the MVC configurations were defined in Global.asax file.
App_Start folder contains BundleConfig, FilterConfig, IdentityConfig, RouteConfig and Startup.Auth classes.
Bundle Config registers css and javascript files in the application, then they can be minified.
Filter Config contains all the filters getting applied to action methods and controllers.
Identity Config file holds all ASP.NET identity related details like, how user authentication process happens.
Route Config file defines ASP.NET routes in a web application, It has a default route to manage the urls in the application.
Startup.Auth class holds user authentication settings, In this example, it has defined a user manager and sign-in manager with necessary requirements.
Go to ApplicationUserManager class in IdentityConfig, change the PasswordValidator property, set length to 10 characters.
 |
| constructor in ApplicationUserManager class |
public class ApplicationUserManager : UserManager<ApplicationUser>
{
     public ApplicationUserManager(IUserStore<ApplicationUser> store) : base(store)
     {
        PasswordValidator = new MinimumLengthValidator(10);
     }
Go to the Create method in ApplicationUserManager class, In PasswordValidator property, set password length to 10 characters.
 |
| Change PasswordValidator property to accomadate 10 characters length password |
// Configure validation logic for passwords
In viewmodels, change the password length property as below.
We have to change length of the password field in these view models. Go to AccountViewModel class and change the Password length in RegisterViewModel & ResetPasswordViewModel classes. In ManageViewModel class, change SetPasswordViewModel & ChangePasswordViewModel classes.
 manager.PasswordValidator = new PasswordValidator
 {
   RequiredLength = 10,
   RequireNonLetterOrDigit = true,
   RequireDigit = true,
   RequireLowercase = true,
   RequireUppercase = true,
  };
In viewmodels, change the password length property as below.
We have to change length of the password field in these view models. Go to AccountViewModel class and change the Password length in RegisterViewModel & ResetPasswordViewModel classes. In ManageViewModel class, change SetPasswordViewModel & ChangePasswordViewModel classes.
 |
| Change password field length to 10 characters |
[Required] [StringLength(100, ErrorMessage = "The {0} must be at least {2} characters long.", MinimumLength = 10)] [DataType(DataType.Password)] [Display(Name = "Password")] public string Password { get; set; }Run the project and try with a weak password. Password should have at least 10 characters, If not validations errors comes up.
 |
| set password length to 10 characters |
Change password Complexity - Password must have at least one special character and one number
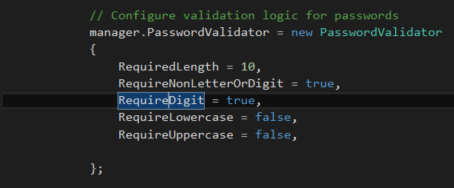
Go to ApplicationUserManager class in IdentityConfig class. Change Password validation property as below. Password requires a special character and a number.
 |
| change password validation logic |
// Configure validation logic for passwordsmanager.PasswordValidator = new PasswordValidator { RequiredLength = 10, RequireNonLetterOrDigit = true, RequireDigit = true, RequireLowercase = false, RequireUppercase = false, };
Run the application and check whether password complexity works fine.
 |
| password complexity check |
Password history validation - User can't enter last 3 passwords again.
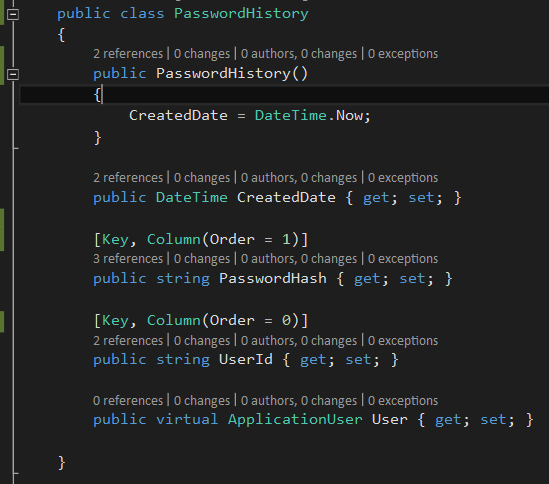
When user change password or reset password we can check whether he is using his old passwords by referring to the history records of his passwords. By default this feature is not implemented. Let's try to implement it.Create password history class to hold password history information. Password history table will be created from this class. Open IdentityModel class and create PasswordHistory class inside it.
 |
| password history table |
public class PasswordHistory {
public PasswordHistory() { CreatedDate = DateTime.Now; }
public DateTime CreatedDate { get; set; }
[Key, Column(Order = 1)] public string PasswordHash { get; set; }
[Key, Column(Order = 0)] public string UserId { get; set; }
public virtual ApplicationUser User { get; set; }
}Change the ApplicationUser class to hold password history. Initiate password history list inside the constructor.
 |
| modify ApplicationUser class to hold password history information |
public class ApplicationUser : IdentityUser { public ApplicationUser () : base () { PasswordHistory = new List<PasswordHistory>(); }
public virtual List PasswordHistory { get; set; }
Open IdentityConfig class and go to ApplicationUserManager class and initialize a variable to hold password history limit.
 |
| ApplicationUserManager class |
public class ApplicationUserManager : UserManager { private const int PASSWORD_HISTORY_LIMIT = 3;
Write a method to check whether new password is same as recent three passwords. If entered password is same as recent 3 passwords returns true, otherwise false.
 |
| check whether password is valid according to the criterias |
private async Task IsPasswordHistory (string userId, string newPassword) { var user = await FindByIdAsync(userId); if (user.PasswordHistory.OrderByDescending(o => o.CreatedDate) .Select(s => s.PasswordHash) .Take(PASSWORD_HISTORY_LIMIT) .Where(w => PasswordHasher.VerifyHashedPassword(w, newPassword) != PasswordVerificationResult.Failed).Any()) return true; return false; } Add user and password hash into PasswordHistory table.
 |
| Insert to password history table |
public Task AddToPasswordHistoryAsync(ApplicationUser user, string password) { user.PasswordHistory.Add(new PasswordHistory() { UserId = user.Id, PasswordHash = password }); return UpdateAsync(user); }
Write a method to change the password.
 |
| change password method |
public override async Task ChangePasswordAsync (string userId, string currentPassword, string newPassword) { if (await IsPasswordHistory(userId, newPassword)) return await Task.FromResult(IdentityResult.Failed("Cannot reuse old password")); var result = await base.ChangePasswordAsync(userId, currentPassword, newPassword); if(result.Succeeded) { ApplicationUser user = await FindByIdAsync(userId); user.PasswordHistory.Add(new PasswordHistory() { UserId = user.Id, PasswordHash = PasswordHasher.HashPassword(newPassword) }); return await UpdateAsync(user); } return result; }
Try to change password, enter one of previous passwords from most recent 3 passwords. If below error message comes, we have successfully prohibited it.
 |
| cannot reuse old passwords |
We have customized password policies according to our need. Let's see how we can customize existing User to hold new attributes.
Change table structure in ApplicationUser class
Add/Remove properties in ApplicationUser class
Let's say we want to add few properties into ApplicationUser class. If we look at existing properties for user class, It shows like this. |
| columns in AspNetUsers table |
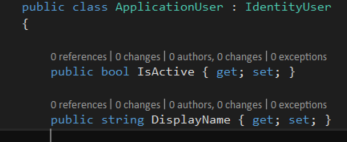
We need to add DisplayName and Active fields into ApplicationUser, class. Let's see how we can do this. Go to ApplicationUser class in IdentityModel.cs file. Add attributes you want. (Active & DisplayName properties.) Update the database after adding new properties.
 |
| Add properies into ApplicationUser class |
public class ApplicationUser : IdentityUser { public bool IsActive { get; set; } public string DisplayName { get; set; }
Add a Foreign Key into ApplicationUser class
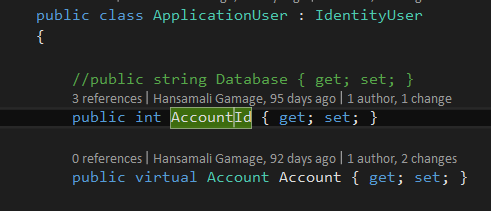
We want to add AccountId property as a foreign key into ApplicationUser class. Create Account class as below. It should have a collection of users. We have to update the database after adding new properies.
 |
| Account class |
public class Account { public int Id { get; set; } public string Name { get; set; } public virtual ICollection Users { get; set; } }Add a reference to Account class in ApplicationUser.
 |
| ApplicationUser class with reference to AccountId |
public class ApplicationUser : IdentityUser
{
public int AccountId { get; set; }
public virtual Account Account { get; set; }
Add Account table into database context class as follows. Go to IdentityModel class and add Account table into ApplicationDbContext class.
 |
| Application db context class |
public class ApplicationDbContext : IdentityDbContext
{
public ApplicationDbContext()
: base("DefaultConnection", throwIfV1Schema: false)
{
}
public static ApplicationDbContext Create()
{
return new ApplicationDbContext();
}
public DbSet
Add new properties into RegisterViewModel
Let's try to add new properties into RegisterViewModel class, Id, DisplayName and Active fields.
 |
| RegisterViewModel class |
public class RegisterViewModel {
public string Id { get; set; }
[Required] [EmailAddress] [Display(Name = "Email")] public string Email { get; set; }
[Required] [Display(Name = "Display Name")] public string DisplayName { get; set; }
[Required] [StringLength(100, ErrorMessage = "The {0} must be at least {2} characters long.", MinimumLength = 10)] [DataType(DataType.Password)] [Display(Name = "Password")] public string Password { get; set; }
[DataType(DataType.Password)] [Display(Name = "Confirm password")] [Compare("Password"
, ErrorMessage = "The password and confirmation password do not match.")] public string ConfirmPassword { get; set; }
[Display(Name = "Active")] public bool IsActive { get; set; }
}
Since we add new fields into Register view model, we have to add DisplayName, Active and Id fields into Register.cshtml view.
 |
| Add new fields into Register view |
@Html.HiddenFor(model => model.Id)
<div class="form-group">
@Html.LabelFor(model => model.DisplayName, htmlAttributes: new { @class = "control-label col-md-2" })
<div class="col-md-10">
@Html.EditorFor(model => model.DisplayName, new { htmlAttributes = new { @class = "form-control" } })
</div>
</div>
@Html.LabelFor(model => model.DisplayName, htmlAttributes: new { @class = "control-label col-md-2" })
<div class="col-md-10">
@Html.EditorFor(model => model.DisplayName, new { htmlAttributes = new { @class = "form-control" } })
</div>
</div>
<div class="form-group">
@Html.LabelFor(model => model.IsActive, htmlAttributes: new { @class = "control-label col-md-2" })
<div class="col-md-12">
@Html.CheckBoxFor(model => model.IsActive, new { htmlAttributes = new { @class = "form-control" } })
</div>
</div>
@Html.LabelFor(model => model.IsActive, htmlAttributes: new { @class = "control-label col-md-2" })
<div class="col-md-12">
@Html.CheckBoxFor(model => model.IsActive, new { htmlAttributes = new { @class = "form-control" } })
</div>
</div>
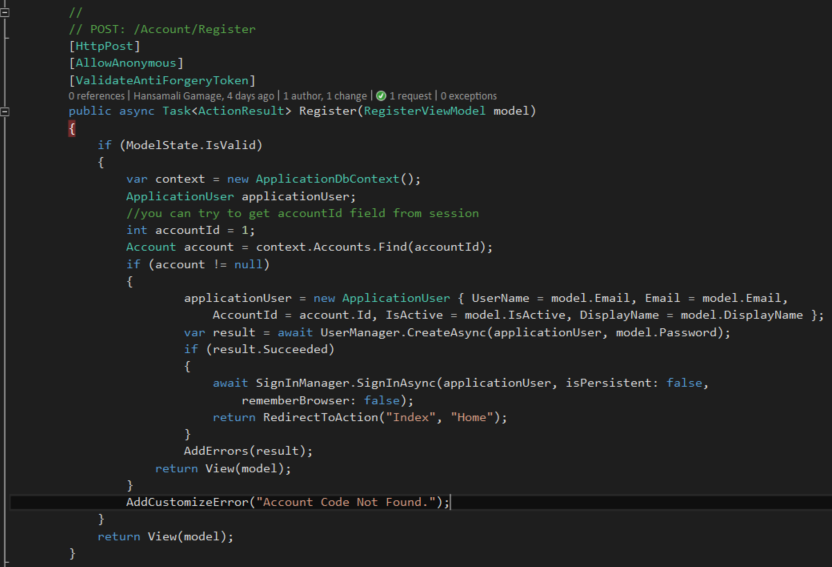
We have to change Register method bit according to our requirements. Go to Register method in Account controller. In this code sample, accountId field is coded as 1. If application can't find a valid account, it should show an error message. If account is found, create user in the system. If user creation is successful, sign in the user into the application, If not show validation messages.
 |
| Register method in Account controller |
// // POST: /Account/Register [HttpPost] [AllowAnonymous] [ValidateAntiForgeryToken] public async Task Register(RegisterViewModel model) { if (ModelState.IsValid) { var context = new ApplicationDbContext(); ApplicationUser applicationUser; //you can try to get accountId field from session int accountId = 1; Account account = context.Accounts.Find(accountId); if (account != null) { applicationUser = new ApplicationUser { UserName = model.Email, Email = model.Email, AccountId = account.Id, IsActive = model.IsActive, DisplayName = model.DisplayName}; var result = await UserManager.CreateAsync(applicationUser, model.Password); if (result.Succeeded) { await SignInManager.SignInAsync(applicationUser, isPersistent: false, rememberBrowser: false); return RedirectToAction("Index", "Home"); } AddErrors(result); return View(model); } AddCustomizeError("Account Code Not Found."); } return View(model); }
To display customized errors like 'Account Code Not Found.', We have to write a helper method as below.
 |
| helper method to catch model errors |
private void AddCustomizeError(string error) { ModelState.AddModelError(error, error); }
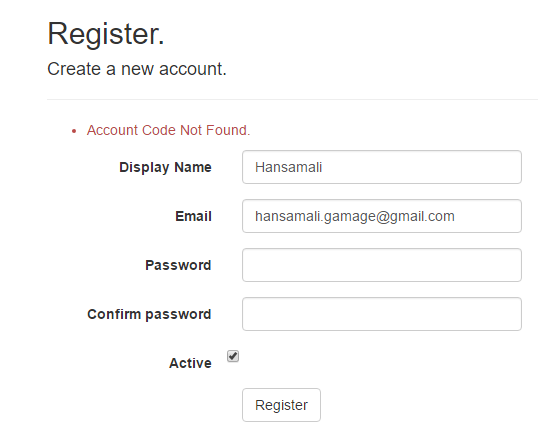
Try to register a new user into the system, It shows following error message. It's a customized message, added into model state. Run some test scenarios and check whether all the other validations messages are showing properly.
 |
| User registration - Account code not found |
Go to Configuration class and add this line of code in Seed method.
 |
| Seed method in Configuration class |
protected override void Seed(userAuthentication.Models.ApplicationDbContext context) { context.Accounts.AddOrUpdate(account => account.Name,
new Account { Name = "Account1" }, new Account { Name = "Account2" }, new Account { Name = "Account3" }); }Now try to login to the system. After you logged in, view the database. You can see DisplayName and Active coulmns in the AspNetUser table.
 |
| account and AspNetUsers table |
We could add columns to Users table as per our requirement and managed to customize the Register method in Account controller.
Download
Tech Net Gallery
- You can get the full source code from here, https://gallery.technet.microsoft.com/Customize-User-Authenticati-662132ce
GitHub
- You can clone the code from github repo, https://github.com/hansamaligamage/user-authentication
References
- https://docs.microsoft.com/en-us/aspnet/core/security/authentication/identity
- https://github.com/IdentityServer/IdentityServer2
- https://www.asp.net/identity/overview/getting-started/introduction-to-aspnet-identity
- https://blogs.msdn.microsoft.com/webdev/2015/04/07/asp-net-identity-2-2-1/


