This article is going to describe how to create a function app on .NET Core and publish it into Azure, this function app url is going to act as a notification url. In Graph API, we are going to use subscription API, to subscribe to SentItems folder in mail box, whenever we are going to send an email, function app gets notification about the changes and mail details.
2 Background
- If you love to start with .NET Core on a Linux server, check what are the basic things you have to do, Install .NETCore in a Linux server
- Say Hello from .NET Core application in a Linux server,
.NET Core with a Linux server: Hello World!
- If you are interested in open source platforms and want to try out .NET Core application development in Linux, try with these steps, .NETCore:
Create a web application with a Linux server
- If you want to know how to create a ASP.NET Core service application check this article, ASP.NETCore: Create
a Web API application
- If you want to show a loading panel on the screen using ASP.NET Core, go through this article, ASP.NET Core : How to show
a loading panel in a page
- If you like to use template generators for .NET Core this is the ideal article for you, .NET Core: Create web
application with Yeoman template generator
- When you are developing ASP.NET Core web applications, security is a crucial thing, follow this article to know more about it, Secure
your .NETCore web applications using IdentityServer 4
- Check how to show a confirmation dialog with jquery from this post, ASP.NET Core : How to show a confirmation dialog
with jquery
- If you want to try out advanced features in jquery dialog on top of .NET Core, this will be a great article for you, ASP.NET Core
: Advanced JQuery dialog actions
- If you are interested on user authentication & ASP.NET Identity follow this link, ASP.NET
Identity: Customize User Authentication
- If you are interested to know about Azure storage, blobs check this article, Send smtp email with Azure blob storage attachments
-
3 Prerequisites
- In this article, we are going to create a function in Visual Studio 2017 with .NET Core 2.0 version, If you want to update your .NET Core version, check here
.NET Core latest version
- Then we are going to publish the function app to Azure, if you dont have a azure subscription, try to get a free account to test this sample application,
Azure free account
- We used postman to test our function, Get postsman
4 Create Azure Function App
Let's see how we can create a
function app in
Visual Studio on top of
.NET Core and how to publish it to
Azure
4.1 Create basic solution in Visual Studio
Open Visual Studio, I have installed
Visual Studio 2017 Enterprise edition with
version 15.6.6
Go to
File -> New -> Project, You will see
New Project window like this, Select
Azure Functions to create a Azure Function project. Give it a
name and a
location and click
OK, In this sample I created it as
SendEmailTrigger
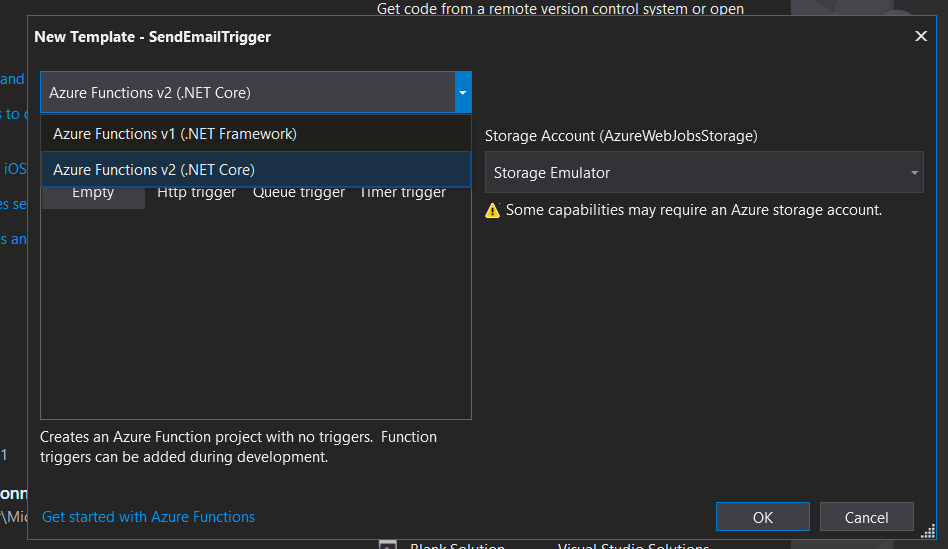
You can see a window to select a function template as below, It shows two different versions of
Azure Functions v1 &
v2,
Azure Functions v1 built with
.NET Framework and its generally available, and
Azure Function v2 goes with
.NET Core and at the time of writing this article, its available only in preview.
Major difference in
Azure Function run time
v1 and
v2 is,
v1 doesn't support cross platform development and hosting options.
v1 supports development and deployments in
portal or in
windows. But
v2 runs on
.NET Core, that means it can run on all the platforms including
mac OS and
Linux.
When it comes to language support for both versions,
v1 supports for
C#, Javascript and F#, v2 supports for those 3 languages &
Java.
In
v1, it supports for
Python,
Php,
Typescript,
Batch commands,
Bash and
powershell in experimental level and those languages are not available in
version 2
When it comes to bindings, cool feature is, binding extensions can be versioned and released independently, since
v2 has decoupled run time and bindings, So we can upgrade to a newer version of an extension
Version 2 has introduced many new bindings based on
Microsoft Graph (
Excel, OneDrive, Outlook email, Graph events, Graph auth tokens), In this post we are going to discuss about
Microsoft Graph Excel binding in
.NET Core
For our example, select
Azure Functions V2 (.NET Core) as below
You can see the available templates as below, select
Http trigger from the list,
In this example, for
Storage account, leave the default value as it is, or else we can add already existing
storage account in azure by clicking on
browse option.
Storage account is used to store function files, logging information and also
blobs,
queues or
tables if your function use them.
In this example, selected
Anonymous as access rights, it doesn't require any authentication to call the function.
If you select
Functional level access, you have to pass
function key in each and every request that can be managed from the
azure portal, that's the safest way, but for now will go with
anonymous.
In
Admin access level with function key, it will return
401 - no authentication, we have to pass
host key if we go with
Admin access level
When you hit on
OK, it will show a dialog to update
Azure Function CLI tools as below if you dont have the latest tool set,
In this example, it installs
Azure Function CLI tools 1.0.12
You can see the solution like this, It has created a function in
Function1 class file
You can see
Httptrigger is created in
Function1 class and you can notice
authorization level is
anonymous.
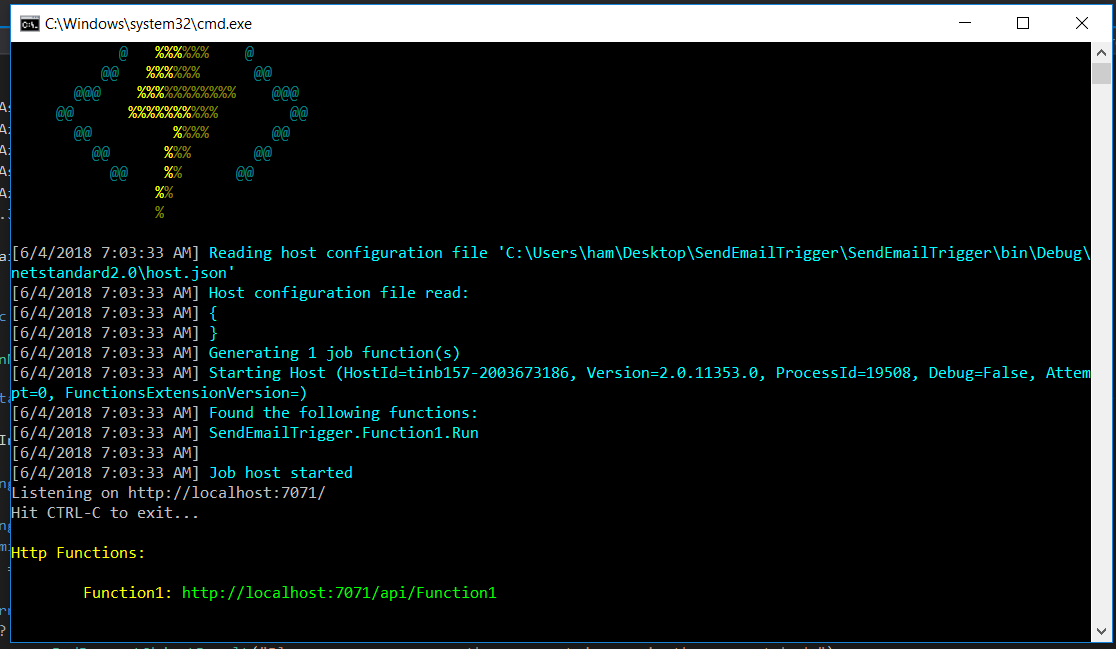
Run the project, click on
Debug -> Start without Debugging, it will show a
cmd window like this, At first, It's going to check whether any configurations available in
host.json file. You can access the function in given url as below
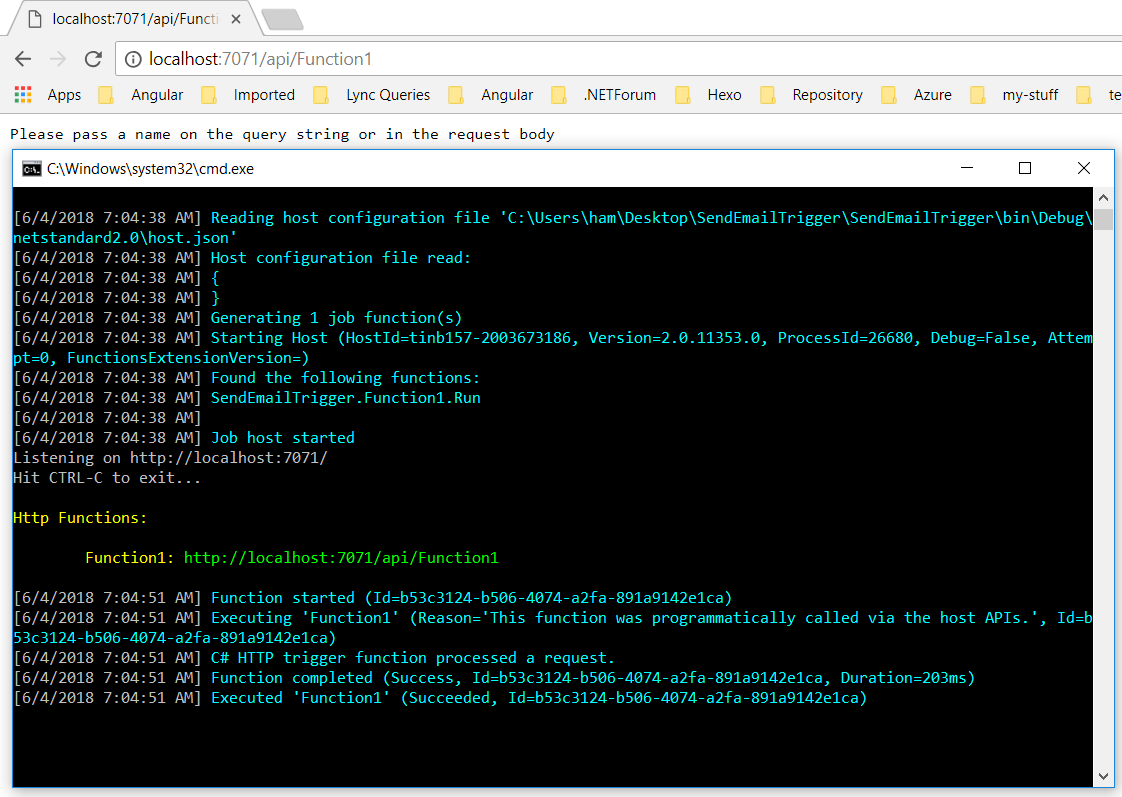
4.2 Call the function from browser
Let's call the function from browser and it shows function output as below. We haven't passed name parameter when calling the function, it returns a bad request as this. If you look at the cmd, it shows the logging information on function execution like this
Change function name
Function1 to
EmailTrigger and run the solution, it has changed the function url as below
4.3 Call the function from postman
Open
postman and call function, provide name parameter in function url, it will show output like this
4.4 Host your function in Azure
Let's publish this function to Azure. In
solution explorer, click on solution file and select
publish option
You will see a window to
publish your function, Since we are going to create an application from the beginning, select
Create New option
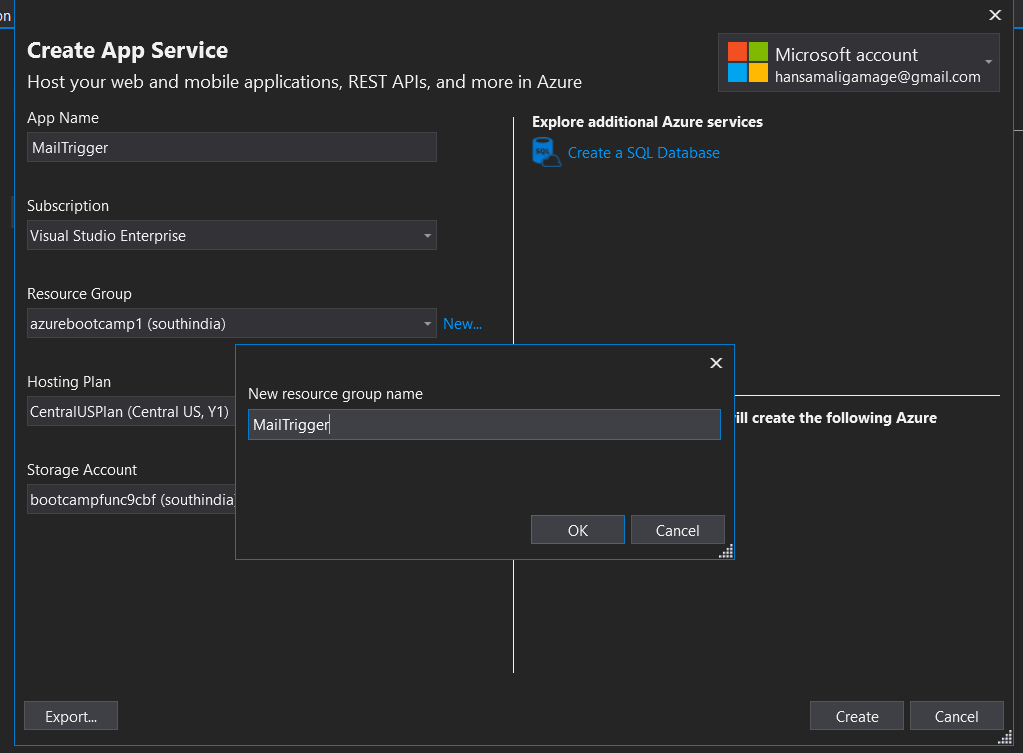
You will see this window to create the app service, You can give a name to your application and select azure subscription
In
Resource group section, click on
New, it will prompt you a dialog box as below. You can give a name to the
resource group and click on OK
Resource group is a collection of resources that are grouped together for easy management. When you work with an application, you can group all resources relevant to the application in a one place and remove all of then in a single click by deleting the resource group
Click on
New link under
Hosting Plan, you get a screen like this, You can give a name to
App Service Plan and a
Location to host the hosting plan
You can select
Consumption for size requirement, In
Consumption plan, resources are dynamically added to your application as per requirements, and you only pay for the time your function app runs, If you go with the other size options, it will act as a
App Service plan, that means your function app runs on a dedicated VM similar to
Web apps,
API apps and
mobile apps, your function app is always running.
Click on
New in
Storage Account section, you will get a window like this.
You can give a
storage account name and select a
account type, lets go with basic,
standard account
Finally we are good to go, We can see a
resource group,
hosting plan,
storage account and
function app is getting created with the configurations we provided, Let's hit the
create button !
You can see the publish summary along with the function url in following window,
You will get a prompt to update the version of the function app, since we use
Function v2, we have to change the version to
beta
Click on
Output window, you will see details on function app publish
4.5 View function configuration in Azure
Open Azure portal, click on
All resources
Go to
All resource groups drop down and filter from
MailTrigger, you will see available resources as below,
function app,
service plan &
storage account
Click on
MailTrigger App service, it will open a window like this. You can see the
subscription of the function app,
resource group,
location,
url to access the function and
service plan we selected
Go to
Function app settings, you will see
runtime version is assigned to beta
Go to
Application settings from
overview section of the function app, you can see
FUNCTIONS_EXTENSION_VERSION has been changed to
beta
You can see available functions in
MailTrigger function app, click on
EmailTrigger function, you get a window like this, it shows
function.json file contains
bindings,
authorization details and
entry point to the application
Click on
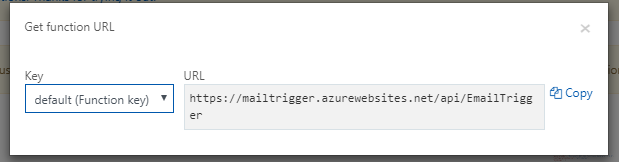
Get function URL and you can copy the function url. We can notice
MailTrigger is the
Function App, under that it shows function
EmailTrigger that we are going to test
Go to
postman, we can test published function as below, pass
name parameter and check the output in the body section
Click on
Run button, after you call the
function from
postman, you can see the
function log as below.
You have published the
function in to
azure and its running perfectly, Let's move in to
Graph API
5 Create application in Graph API
Microsoft Graph is the API for Microsoft 365 that provides access to all the data available in Office 365, we can connect to mail, calendar, contacts, documents, directories, users. Microsoft Graph exposes APIs for Azure Active Directory, Office 365 services like Sharepoint, OneDrive, Outlook, Exchange, Microsoft Team services, OneNote, Planner, Excel
You can find a picture i copied from Microsoft Graph overview
5.1 Create first application with Microsoft Graph
Go to
Microsoft Graph and click on
Quick Starts, you will get a window like this
You can build a simple application by following below steps, let's try it out
In the first step, let's select
ASP.NET MVC from the list
Click on the button to register your application in the portal, You need to have a
Microsoft account or a
school or work type of account
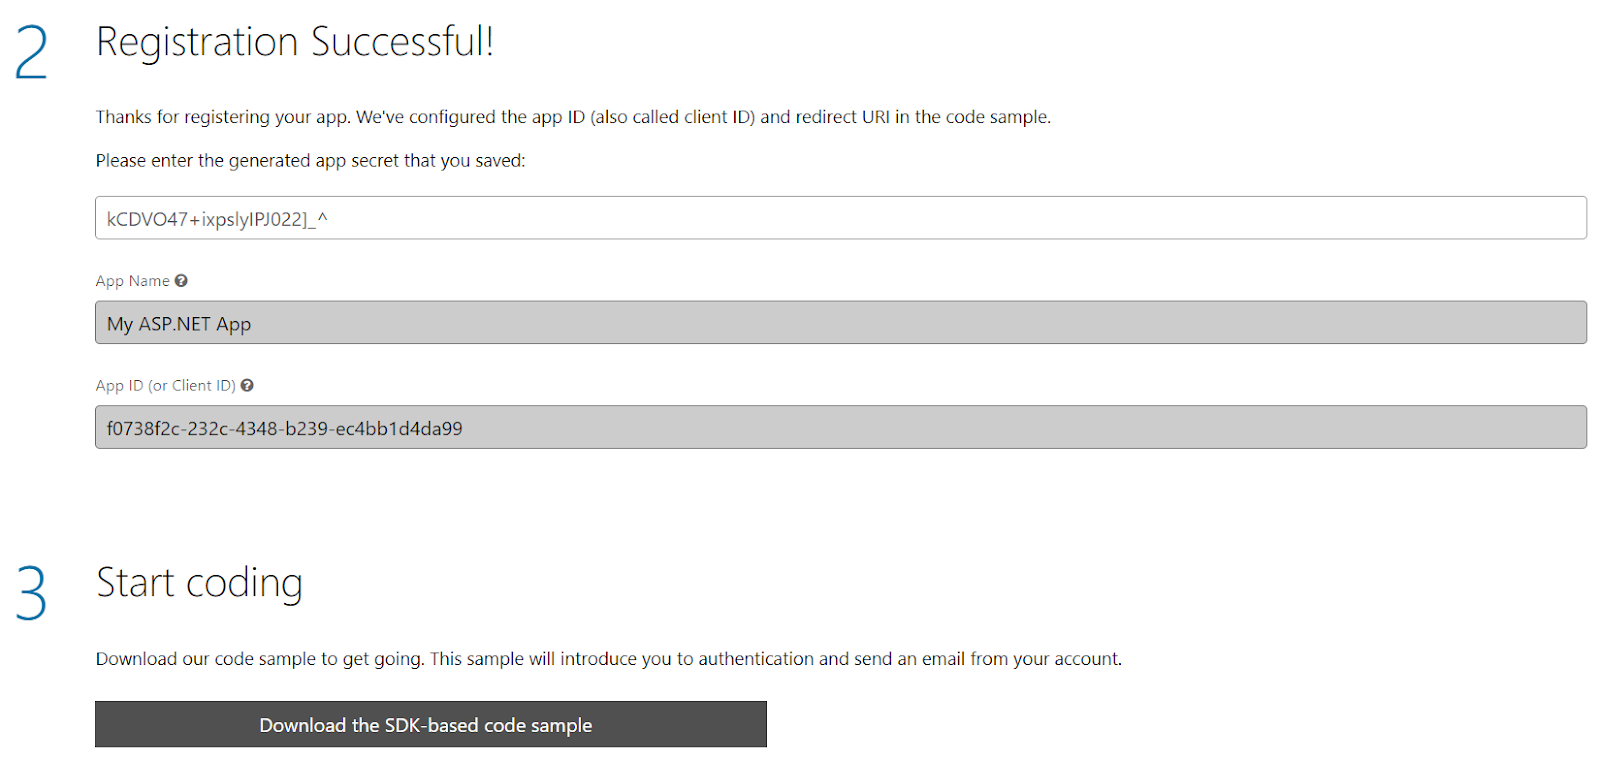
You can see the
app secret, will copy it for future references. After that click on the button, you will get redirected to the
Quick Start page
Paste
app secret into the below text box and download the generated code sample
You can see the downloaded code sample as below
In 4th step, click on
Application Registration Portal to configure your new application
You can see available applications under your account, click on application name
Go to
Microsoft Graph Permissions to add few
application permissions to access email, Click on
Add button in
Application Permissions section
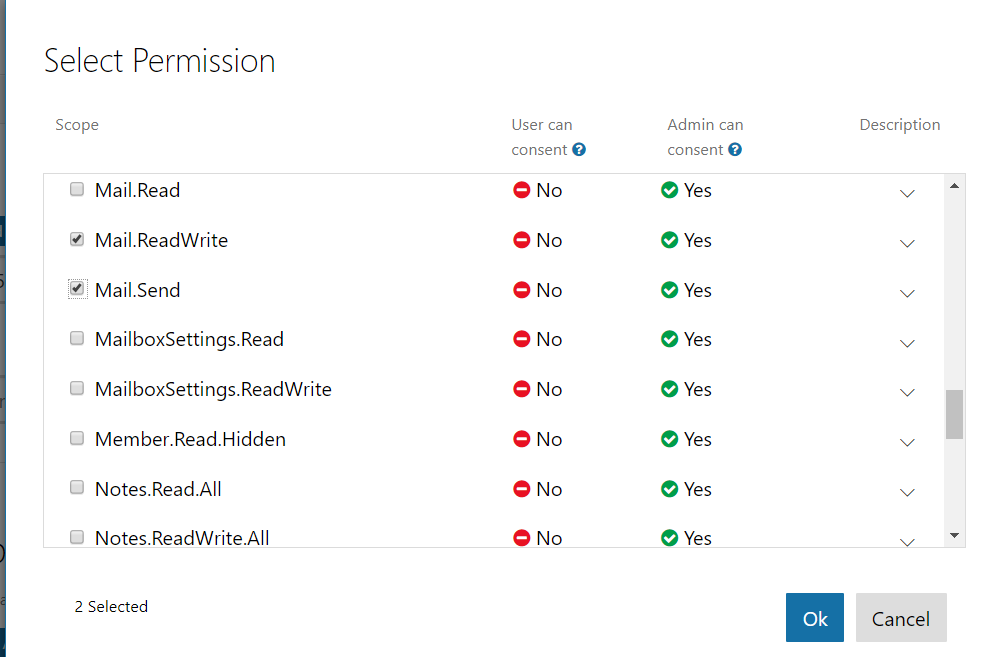
You can see available
permissions to select for an application, Calendar, call, mail and user permissions
We have to assign permissions to read email and send email, select
Mail.ReadWrite &
Mail.Send permissions to assign to the application and save changes
You can see
Mail related permissions are allocated to the application as below. Azure function is running without any user interaction, so it should have these permissions
5.2 What is Graph Explorer
Go to
Microsoft Graph and navigate to
Graph Explorer, You can query available data in
Office 365 from here, Let's run few queries and check its output
Check following image, even without signing in we can run these queries and check the result, You can access your personnel data with these api calls
Graph explorer is a http request tool for issuing request against
Microsoft graph
Click on
my photo GET request from sample queries
We can click on
Run Query, you will get the result as the profile photo with status code
200, In this sample queries we are using Megan Bowen's account
Let's click on
my profile, it will show profile details of the logged in user
If you want to access other available APIs, click on
show more samples
You will get a window like this with available APIs and data you can view, You can access to
emails,
Calendar,
Contacts,
Excel,
OneDrive etc
5.3 Explore Subscription API
A subscription allows a client app to receive notification about changes to data in
Microsoft Graph.
Subscriptions are available for
Mail,
Events,
Outlook Contacts,
Conversations,
OneDrive,
Users & Groups in Azure Active Directory
You can login with your
Microsoft account,
work or school account, Let's create a
subscription to a
webhook with our
function url, In here we are going to create a web hook subscription to check on
SentItems folder in your mail box. You can find the API reference to create a
subscription as below
POST https://graph.microsoft.com/v1.0/subscriptions
Content-type: application/json
{
"changeType": "created,updated",
"notificationUrl": "https://webhook.azurewebsites.net/api/send/myNotifyClient",
"resource": "me/mailFolders('Inbox')/messages",
"expirationDateTime":"2016-11-20T18:23:45.9356913Z",
"clientState": "subscription-identifier"
}
When we are going to create the subscription, at first its going to validate the subscription by calling POST request on notification url,
https://webhook.azurewebsites.net/api/send/myNotifyClient?validationToken=<token> Its going to validate passed
validationtoken
So let's change our function app to validate the
validationtoken and return it
Change
Run method to validate the
token, Let's change
Run method to call
validate method and returns
text response, Note that we changed function
authorization level to
function level
[FunctionName("EmailTrigger")]
public static HttpResponseMessage Run([HttpTrigger(AuthorizationLevel.Function, "get", "post", Route = null)]HttpRequestMessage req, TraceWriter log)
{
log.Info("C# HTTP trigger function processed a requesttt.");
string validationToken;
if (GetValidationToken(req, out validationToken))
{
return PlainTextResponse(validationToken);
}
return new HttpResponseMessage();
}
Let's implement token validation method as follows, We have to import
Microsoft.AspNetCore.WebUtilities to do that
private static bool GetValidationToken(HttpRequestMessage req, out string token)
{
var query = QueryHelpers.ParseQuery(req.RequestUri.Query);
token = query.FirstOrDefault(w => w.Key == "validationToken").Value;
return !string.IsNullOrEmpty(token);
}
Let's return
validation token after code validation succeeds like this
private static HttpResponseMessage PlainTextResponse(string text)
{
HttpResponseMessage response = new HttpResponseMessage()
{
StatusCode = HttpStatusCode.OK,
Content = new StringContent(text, System.Text.Encoding.UTF8, "text/plain")
};
return response;
}
Let's publish latest function app to azure
After publishing function app to azure, you can see
function.json file
authLevel has been changed to
function
5.4 Configure subscription API on mail box
Let's go to
Graph Explorer and try to create a
subscription, we have implemented our function to return
validationtoken when it has a valid
token, so lets see how it works
You can see, we got
201 success status code, subscription is created and response is returned with an identifier
We have calles POST /subscriptions request with following json body, note that
expiration date should be within 36 hours from now
{
"changeType": "created,updated",
"notificationUrl": "https://mailtrigger.azurewebsites.net/api/EmailTrigger? code=rxUodDSB3cdrlVrFgCfT4SiC9eOBKqwxDNsAcmgndHQIpEWepYgx5w==",
"resource": "me/mailFolders('SentItems')/messages",
"expirationDateTime":"2018-06-13T18:23:45.9356913Z",
"clientState": "subscription-identifier"
}
We passed
https://mailtrigger.azurewebsites.net/api/EmailTrigger?code=rxUodDSB3cdrlVrFgCfT4SiC9eOBKqwxDNsAcmgndHQIpEWepYgx5w== as notificationUrl,
When its creating the subscription, it sends a request to validate the subscription with following url,
https://mailtrigger.azurewebsites.net/api/EmailTrigger?validationToken=rxUodDSB3cdrlVrFgCfT4SiC9eOBKqwxDNsAcmgndHQIpEWepYgx5w==
If you ping the local url in
postman, you can see it as below, it returns
validationtoken in the response
Let's change
Run method in
function to process
SentItems mail folder changes, Change
Run method signature as a
async method and add new code lines to process changes in mail box
public static async Task Run([HttpTrigger(AuthorizationLevel.Function, "get", "post", Route = null)]HttpRequestMessage req, TraceWriter log)
var response = await ProcessWebhookNotificationsAsync(req, log, async hook =>
{
   return await CheckForSubscriptionChangesAsync(hook.SubscriptionId, hook.Resource, log);
            });
return response;
Implement
ProcessWebhookNotificationsAsync method to process the request body, for the time being lets log the body of the request, so we can understand what kind of a notification comes
private static async Task ProcessWebhookNotificationsAsync(HttpRequestMessage req, TraceWriter log, Func> processSubscriptionNotification)
{
// Read the body of the request and parse the notification
string content = await req.Content.ReadAsStringAsync();
 log.Verbose($"Raw request content: {content}");
            return   req.CreateResponse(HttpStatusCode.NoContent);
}
Let's implement
CheckForSubscriptionChangesAsync method to return a bool value as below
private static async Task CheckForSubscriptionChangesAsync(string subscriptionId, string resource, TraceWriter log)
{
return true;
}
Let's publish the function app and lets see what type of a notification comes when we send an email, i sent this simple email and its available in
SentItems folder
You can see the function log as below
Let's extract the notification message and analyze it further, When the subscribed resource changes, it sends notification data as below, You can see the resource url like this, it shows something with user messages,
Users/5856adc9-b5f4-4c7c-b972-b61c85eb1a75/Messages/AAMkAGNkYmExZTUyLTY2ZWEtNDMwZC1hN2ZiLTAyNGY2NjNhMTYyNgBGAAAAAABRKYBMmikcRpuYs9cJmo5oBwAspzQl_QVxTLNPv1rnaRExAAAAAAEJAAAspzQl_QVxTLNPv1rnaRExAAIvUGydAAA=
2018-06-12T05:14:13.896 [Debug] Raw request content: {"value":[
{
"subscriptionId":"74d1bb75-fcbf-4ab1-acaf-d2cf10cfcb85",
"subscriptionExpirationDateTime":"2018-06-13T18:23:45.9356913+00:00",
"changeType":"created",
"resource":"Users/5856adc9-b5f4-4c7c-b972-b61c85eb1a75/Messages/AAMkAGNkYmExZTUyLTY2ZWEtNDMwZC1hN2ZiLTAyNGY2NjNhMTYyNgBGAAAAAABRKYBMmikcRpuYs9cJmo5oBwAspzQl_QVxTLNPv1rnaRExAAAAAAEJAAAspzQl_QVxTLNPv1rnaRExAAIvUGydAAA=",
"resourceData":
{
"@odata.type":"#Microsoft.Graph.Message",
"@odata.id":"Users/5856adc9-b5f4-4c7c-b972-b61c85eb1a75/Messages/AAMkAGNkYmExZTUyLTY2ZWEtNDMwZC1hN2ZiLTAyNGY2NjNhMTYyNgBGAAAAAABRKYBMmikcRpuYs9cJmo5oBwAspzQl_QVxTLNPv1rnaRExAAAAAAEJAAAspzQl_QVxTLNPv1rnaRExAAIvUGydAAA=", "@odata.etag":"W/\"CQAAABYAAAAspzQl+QVxTLNPv1rnaRExAAMIFQ3f\"", "id":"AAMkAGNkYmExZTUyLTY2ZWEtNDMwZC1hN2ZiLTAyNGY2NjNhMTYyNgBGAAAAAABRKYBMmikcRpuYs9cJmo5oBwAspzQl_QVxTLNPv1rnaRExAAAAAAEJAAAspzQl_QVxTLNPv1rnaRExAAIvUGydAAA="
},
"clientState":"subscription-identifier"
},
{
"subscriptionId":"11937f92-0520-4f44-bf8a-5c32b6cbd7aa",
"subscriptionExpirationDateTime":"2018-06-13T18:23:45.9356913+00:00",
"changeType":"created",
"resource":"Users/5856adc9-b5f4-4c7c-b972-b61c85eb1a75/Messages/AAMkAGNkYmExZTUyLTY2ZWEtNDMwZC1hN2ZiLTAyNGY2NjNhMTYyNgBGAAAAAABRKYBMmikcRpuYs9cJmo5oBwAspzQl_QVxTLNPv1rnaRExAAAAAAEJAAAspzQl_QVxTLNPv1rnaRExAAIvUGydAAA=",
"resourceData":
{
"@odata.type":"#Microsoft.Graph.Message",
"@odata.id":"Users/5856adc9-b5f4-4c7c-b972-b61c85eb1a75/Messages/AAMkAGNkYmExZTUyLTY2ZWEtNDMwZC1hN2ZiLTAyNGY2NjNhMTYyNgBGAAAAAABRKYBMmikcRpuYs9cJmo5oBwAspzQl_QVxTLNPv1rnaRExAAAAAAEJAAAspzQl_QVxTLNPv1rnaRExAAIvUGydAAA=", "@odata.etag":"W/\"CQAAABYAAAAspzQl+QVxTLNPv1rnaRExAAMIFQ3f\"", "id":"AAMkAGNkYmExZTUyLTY2ZWEtNDMwZC1hN2ZiLTAyNGY2NjNhMTYyNgBGAAAAAABRKYBMmikcRpuYs9cJmo5oBwAspzQl_QVxTLNPv1rnaRExAAAAAAEJAAAspzQl_QVxTLNPv1rnaRExAAIvUGydAAA="
},
"clientState":"subscription-identifier"
},
Graph subscription notifies the new email messages as above, lets try to process them in following method, pass the notification string to
WebhookNotification class and process it

private static async Task ProcessWebhookNotificationsAsync(HttpRequestMessage req, TraceWriter log,
            Func> processSubscriptionNotification)
{
// Read the body of the request and parse the notification
string content = await req.Content.ReadAsStringAsync();
log.Verbose($"Raw request content: {content}");
var webhooks = JsonConvert.DeserializeObject(content);
if (webhooks?.Notifications != null)
{
// Since webhooks can be batched together, loop over all the notifications we receive and process them separately.
foreach (var hook in webhooks.Notifications)
{
log.Info($"Hook received for subscription: '{hook.SubscriptionId}' Resource: '{hook.Resource}', changeType: '{hook.ChangeType}'");
try
{
await processSubscriptionNotification(hook);
}
catch (Exception ex)
{
log.Error($"Error processing subscription notification. Subscription {hook.SubscriptionId} was skipped. {ex.Message}", ex);
}
}
// After we process all the messages, return an empty response.
return req.CreateResponse(HttpStatusCode.NoContent);
}
else
{
log.Info($"Request was incorrect. Returning bad request.");
return req.CreateResponse(HttpStatusCode.BadRequest);
}
}
Add
WebhookNotification helper class with array of notifications
private class WebhookNotification
{
[JsonProperty("value")]
public SubscriptionNotification[] Notifications { get; set; }
}
Add new class called
SubscriptionNotification to hold the notification details
private class SubscriptionNotification
{
[JsonProperty("clientState")]
public string ClientState { get; set; }
[JsonProperty("resource")]
public string Resource { get; set; }
[JsonProperty("subscriptionId")]
public string SubscriptionId { get; set; }
[JsonProperty("changeType")]
public string ChangeType { get; set; }
}
Change the implementation in
CheckForSubscriptionChangesAsync method, It needs to get the
accesstoken to connect to
Graph API and retrieve the
email body. Let's see how we can get an
accesstoken later in this post.
You can create a
httpclient and provide
Graph API base url with
resource url we got from the notification in
function app, after getting the response, we can extract the
subject and
content properties like this
private static async Task CheckForSubscriptionChangesAsync(string resource, TraceWriter log)
{
bool success = false;
// Obtain an access token
string accessToken = System.Environment.GetEnvironmentVariable("AccessToken", EnvironmentVariableTarget.Process);
log.Info($"accessToken: {accessToken}");
HttpClient client = new HttpClient();
// Send Graph request to fetch mail
HttpRequestMessage request = new HttpRequestMessage(HttpMethod.Get, "https://graph.microsoft.com/v1.0/" + resource);
request.Headers.Authorization = new AuthenticationHeaderValue("Bearer", accessToken);
HttpResponseMessage response = await client.SendAsync(request).ConfigureAwait(continueOnCapturedContext: false);
log.Info(response.ToString());
if (response.IsSuccessStatusCode)
{
var result = await response.Content.ReadAsStringAsync();
JObject obj = (JObject)JsonConvert.DeserializeObject(result);
string subject = (string)obj["subject"];
log.Verbose($"Subject : {subject}");
string content = (string)obj["body"]["content"];
log.Verbose($"Email Body : {content}");
success = true;
}
return success;
}
You can see the complete
Run method as follows, At the first run,
Graph API is going to send a request to
function app with
validationtoken, if it returns the
token again, its a valid notification url. Then its going to register a
web hook subscription with
function app url.
When email sent from your mail box, it sends a notification to registered
web hook url and from
function app its going to process the notification
[FunctionName("EmailTrigger")]
public static async Task Run([HttpTrigger(AuthorizationLevel.Function, "get", "post",
Route = null)]HttpRequestMessage req, TraceWriter log)
{
log.Info("C# HTTP trigger function processed a request.");
string validationToken;
if (GetValidationToken(req, out validationToken))
{
return PlainTextResponse(validationToken);
}
//Process each notification
var response = await ProcessWebhookNotificationsAsync(req, log, async hook =>
{
return await CheckForSubscriptionChangesAsync(hook.Resource, log); }); return response; }
5.5 Generate access token & run the application
Open
postman, go to
Authorization tab, you will see
Type drop down, from there select
OAuth 2.0
Click on
Get New Access Token button to get an access token to connect to
Graph API
You can see a window like this, we have to give
authorization urls and application specific details to get an
access token, You can give a name for this token, in this example it's
AADGraph
You have to provide the
Auth URL as
https://login.microsoftonline.com/common/oauth2/v2.0/authorize that used to be the
redirect url in
office 365 app registration
Access token URL should be
https://login.microsoftonline.com/common/oauth2/v2.0/token with token endpoint
If you remember, we registered an application to connect to
Office365 as shown below
You have to find your Application Id & client secret, Let's navigate to application details as below, Copy
Application Id &
Application secret, If you cant remember the
secret, you can click on
Generate New Password and you will get a new secret
You have to provide a value for scope,
https://graph.microsoft.com/mail.readwrite, we have to get read write permission in your mail box. you can leave the
Grant type value as it is,
Authorization Code and click on
Request Token
You will prompt to this screen, select your account
You can see access token and expiry time as below, click on
Use Token to get the
access token
Then you can see
Authorization key &
token is added in
headers section as below
If you remember, in our function app log, we found resource url is written like this,
Users/5856adc9-b5f4-4c7c-b972-b61c85eb1a75/Messages/AAMkAGNkYmExZTUyLTY2ZWEtNDMwZC1hN2ZiLTAyNGY2NjNhMTYyNgBGAAAAAABRKYBMmikcRpuYs9cJmo5oBwAspzQl_QVxTLNPv1rnaRExAAAAAAEJAAAspzQl_QVxTLNPv1rnaRExAAIvUGydAAA=
Let's try to get the email message with this url & registered
access token, We have to get the
Graph API url
https://graph.microsoft.com/v1.0/ and append the mail message url to that
You can see the email message along with some metadata
We have to provide this
access token as a configuration to our
function app You can see
AccessToken is added to
Application settings as below
We have provided the
access token to connect to your email box and read email content, Let's see how it actually works with
Function App, Open your app and click on
Run, it shows
400 as response code since we haven't got any notifications
Let's send an email like this to test our function app
You can see the
function log window like this, it has printed email subject as below
Email body is printed with all the stylle changes like this
6 Download
6.1 TechNet Gallery
Source code can be downloaded from here,
.NET Core app tracks changes in mail box
6.2 GitHub
You can clone this repository from git hub
Track mail box changes using Graph API on .NET Core
7 Conclusion
In this article, we created a function in .NET Core and published it into
Azure Function App. We used subscription API in Microsoft Graph to subscribe to a resource, in this example resource is
SentItems folder in mail box. When we send an email from our mail box it will notify to the published function with email details, We used a preview version of Azure Function App on top of
.NET Core
We had to pass an authentication token to read an email, to retrieve the token should ping to
redirect url in Office 365 app registration, Graph application id, password with required scope
8 References