Introduction
This article explains how to show a confirmation dialog when a button clicks and a row clicks. It creates a web application using ASP.NET Core in Visual Studio 2017. It has used Jquery and Jquery ui librariies to create the confirmation dialog box.
Background
If you are interested to create a web application in ASP.NET Core, refer to this article https://social.technet.microsoft.com/wiki/contents/articles/36340.asp-netcore-create-a-web-api-application.aspx
If you want to know how to secure a .NET Core web application with IdentityServer 4, go through this article, https://social.technet.microsoft.com/wiki/contents/articles/37169.secure-your-netcore-web-applications-using-identityserver-4.aspx
When you worry security of your web application and need to seure your application without doing much coding, go thorough this, It will demonstrate how to customize user authenticsation using ASP.NET Identity, https://social.technet.microsoft.com/wiki/contents/articles/37797.asp-net-identity-customize-user-authentication.aspx
If you are a newbie and want to touch Hello World! on .NET Core with a linux server, check this article, https://social.technet.microsoft.com/wiki/contents/articles/36330.net-core-with-a-linux-server-hello-world.aspx
If youwant to build open sourcse projects with .NET Core, plese check this article to know how to install .net core in a linux server. https://social.technet.microsoft.com/wiki/contents/articles/36318.install-netcore-in-a-linux-server.aspx
If you are a open source guy and admire visual studio code on a Linux server, go through this article to know more about .NET Core web application runs on a linux server, https://social.technet.microsoft.com/wiki/contents/articles/36333.create-a-web-application-in-netcore-with-a-linux-server.aspx
If you love to use template generator in visual studio code and start developing a ,net core application, here it is try Yo command, https://social.technet.microsoft.com/wiki/contents/articles/36334.net-core-create-web-application-with-yeoman-template-generator.aspx
Create a Web application using ASP.NET Core in Visual Studio 2017
Let's create a web application using .NET Core in Visual Studio 2017. Student can submit their assignmnehnts to the system. Let's see how we can show a confirmation box when a student deletes and when an assignmnet detetes from the system
Craete a ASP.NET Core web applicarion
Create a new ASP.NEt Core web application like this,
Create Student Model
Let's create student model. Add a student class into Models folder.
public class Student { public int Id { get; set; } public string Name { get; set; } public int Age { get; set; } public int Year { get; set; } }
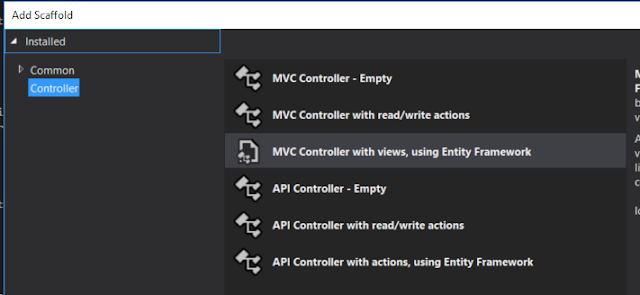
After adding dependencises into your appplication, let's add a controller, select MVC controller with views, using Entity Framework
Select model class as student and create ane data context class as below
Click on Add, It will add StudentsController to your oproject
If you check the solution, along with studentscontroller, database context class is created as below
Now, let's create the database, go to solution explorer and right click on it, select Open Folder in File explorer, and open a cmd prompt from that location, run dotnet command, it shows .net core version
Run dotnet ef command to check whether Entityframework is avai;able, it says entityframework is not available,
Right click on web application and select Edit .csproj
Check .csproj, it shows all the available packages for your solution and tools, We need to ass EFCore tools to run dotnet-ef command, let's add it into tools section
<dotnetclitoolreference include="Microsoft.EntityFrameworkCore.Tools.DotNet" version="1.0.0">
Let's build the solution and run dotnet - ef command
Let's create student table in the database, create migrations using following command,
It will create student table script as follows,
Run database update command as below to run this script on our database,
student database iis created as below, view sql server object explorer and you can check student table is available
Let's run the application and navigates to the students page, click on create new and create few studensts
Show a confirmation box when a student edits
Let's try to show a confirmation dialog, when you try to edit a studemnt, Go to solution explorer and expand wwroot and navigate into jquey in lib folder, it sows jquery library, Let's refer itin our Edit viewLet's give save button a id, as btnSave, we can refer to it in our function,
Let's refer jquery file and create a method call when save button clicks as below, inn here it has stop executijing save action method in students controller.
script src="~/lib/jquery/dist/jquery.js"></script>

<script>

    $(function () {

        $('#btnSave').click(function (e) {

            e.preventDefault();

        });

    });

</script>
Add a confirm dialog template as belw,
<div id="confirmDialog" title="Save Student" hidden>

    <p>Do you want to save changes </p>

</div>
we havent added jquery ui in edit view, let's add it, open bower.json file and add jquery-ui library
If you navigate to lib folder, you can see jquery-ui is installed
Let's refer jquery-ui in _layout view, run the applicatyion and see any errors are available in console tab
<script src="~/lib/jquery-ui/jquery-ui.js"></script>
Let's call confirmation dialog when hit on save button,
Run the application and click on save button, it shows confirmation dialog as folllows, it doesnt have any styling so let's style it a bit
Add jquery-ui css file in layout page and it will take care about styling of the confirmation dialog box
Save layout page and refresh edit view, it shows confirmation box as follows, When you click on cancel button, dialog box closes. when you click on ok button, it submits the edit form and hit on Edit action result
Show a confirmation box when an assignmnet deletes
Crreate assingmnet model as follows,
 public class Assignment

    {


        public int Id { get; set; }


        public string Assignment { get; set; }


        public int Subject { get; set; }


        public int StudentId { get; set; }


        public virtual Student Student  { get; set; }


    }
Let's add mirations and update database like this, it will create assignmnet table in the database,You dont need to run migrations everytime you nmake a change intoi databse, set autiomaticmigrations to true , then it will apply database changes when application builds
Add Assignmnents controller like this, It will create assignmentsController with all CRUD operations and views
Create assignments as below, Itr's going to show a dropdown with student ids, lets leave it as it is, If you want you can list down student names
Add few assignmnets like this,
Let's change Student detail view a bit, we want to show assignmnets each user has submitted, We have to create a studentViewModel to display all assignmnets user has submitted
Change Student details methood like this, return StudentViewModel object to Details view with List of asignmnets student has submitted
StudentViewModel studentViewModel = new StudentViewModel();
  studentViewModel.Id = student.Id;
  studentViewModel.Name = student.Name;
  studentViewModel.Age = student.Age;
  studentViewModel.Year = student.Year;


  List<Assignment> assignments = _context.Assignments.Where(a => a.StudentId ==                                                                                    id).ToList();
  studentViewModel.Assignments = assignments;


  return View(studentViewModel);
<div>

    <h4>Student</h4>

    <hr />

    <dl class="dl-horizontal">

        <dt>

            @Html.DisplayNameFor(model => model.Name)

        </dt>

        <dd>

            @Html.DisplayFor(model => model.Name)

        </dd>

        <dt>

            @Html.DisplayNameFor(model => model.Age)

        </dt>

        <dd>

            @Html.DisplayFor(model => model.Age)

        </dd>

        <dt>

            @Html.DisplayNameFor(model => model.Year)

        </dt>

        <dd>

            @Html.DisplayFor(model => model.Year)

        </dd>

    </dl>

    <table class="table">

        <thead>

            <tr>

                <th style="display:none">


                </th>

                <th>

                    @Html.Display("Title")

                </th>

                <th>

                    @Html.Display("Subject")

                </th>

                <th>


                </th>

            </tr>

        </thead>

        @foreach (var item in Model.Assignments)

        {

            <tr>

                <td style="display:none">

                    @Html.HiddenFor(modelItem => item.Id)

                </td>

                <td>

                    @Html.DisplayFor(modelItem => item.Title)

                </td>

                <td>

                    @Html.DisplayFor(modelItem => item.Subject)

                </td>

                <td id="@item.Id">

                    @Html.ActionLink("Delete", "Delete", new { id = item.Id }, new { @id = "btnDelete" })

                </td>

            </tr>


        }

    </table>

</div>

<div>

    <a asp-action="Edit" asp-route-id="@Model.Id">Edit</a> |

    <a asp-action="Index">Back to List</a>

</div>
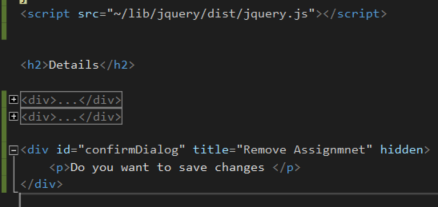
<div id="confirmDialog" title="Remove Assignmnet" hidden>

    <p>Do you want to save changes </p>

</div>
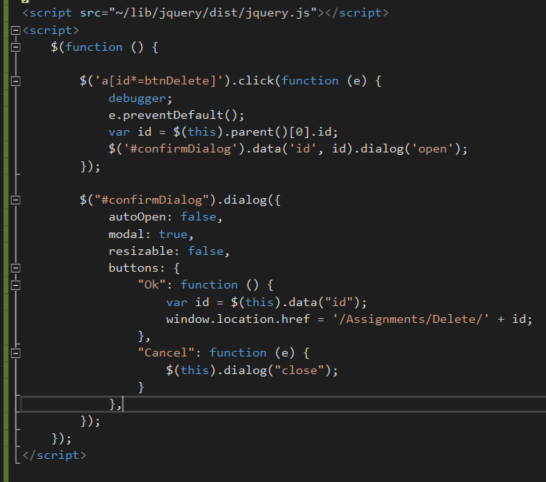
Its not straightforward to get id of an assignmmnet you want to delete,
When we delete a student we passed model ID , but in this example we need to get row id, when it clicks delete link, it retrieves id of the clicked row,
we clicked on delete link that means a td element in a row,
$(this).parent()[0].id is selecting the parent of that td element, that means clicked row id
We can pass a parameter to the confirm dialog by appending data property in a dialog box, $('#confirmDialog').data('id', id)
Wehn click on Ok button in the confirm dialog, it hit on Assignmnet delete action method
Download
Install front end libraries like Jquery, Jquery-ui using bower,Go to solution explorer and open cmd from there, install bower packages as below, you have to navigate to the path where bower.json file is available
TechNet Gallery
- You can find the code sample from https://gallery.technet.microsoft.com/Create-a-simple-smtp-email-5a1656b1
Github
- You can check the github repo from, https://github.com/hansamaligamage/Scheduler
Conclusion
Article has shown how to show a confirmation dialog whan a button clicks in a gridview and as well as a single button in a view, We could implement this functionality using jquery selectors and jquery ui dialog box
See Also
- ASP.NETCore: Create a Web API application
- Secure your .NETCore web applications using IdentityServer 4
- ASP.NET Identity: Customize User Authentication
- .NET Core with a Linux server: Hello World!
- Install .NETCore in a Linux server
- Create a web application in.NETCore with a Linux server
- .NET Core: Create web application with Yeoman template generator


I simply wanted to write down a quick word to say thanks to you for those wonderful tips and hints you are showing on this site.
ReplyDeletedot net training in chennai | dot net training institute in chennai | dot net course in chennai | .NET Training Center in Chennai
| Best .NET Course in Chennai with placements
On your place I won't waste my time on this post and create youtube video how to do it. I would get many likes for my video from this site https://soclikes.com
ReplyDeleteMMORPG OYUNLAR
ReplyDeleteınstagram takipci satin al
tiktok jeton hilesi
TİKTOK JETON HİLESİ
antalya saç ekim
Instagram Takipci Satın Al
İnstagram Takipçi Satın Al
Mt2 pvp
TAKİPÇİ